Set 1 to select pin mux to this group of funcion
7. System Control
- edwin.chiu (Unlicensed)
- Michael Su (Unlicensed)
Owned by edwin.chiu (Unlicensed)
Last updated: Nov 14, 2022
7.1 Introduction
This chapter will introduce the basic system control registers. For example, the clock and reset enable/disable of each block, the pinmux select, the thermal control, the DC2DC control and the GPIO select control. It can help user to set basic parameters for system and flexible operations. This chapter describes the following information and functions. (Detail descriptions please check each register list)
- Group 0: Describe the parameters of each block clock and reset enable/disable.
- Group 1: Describe the pinmux parameters.
- Group 2: Describe the pinmux parameters.
- Group 3: Describe the pinmux parameters.
- Group 4: Describe the PLL setting parameters for each block.
- Group 5: Describe the thermal and DC2DC control parameters.
- Group 6: Describe the GPIO control parameters.
- Group 7: Describe the GPIO control parameters.
7.2 Hardware Reset control
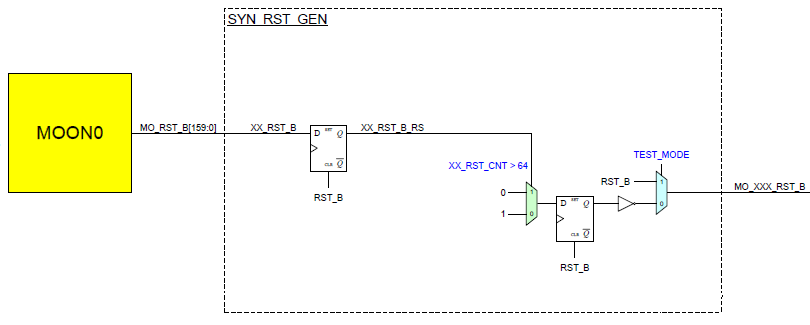
The system blocks reset can be issued by the Group0.21~30 registers. Each bit map to correspond block. Please make sure the reset bit set as 0 when the block starts to work.For example, if user want to enable I2CM0 reset, please set 0x00010001 to Group0.24 register. Set 0x00010000 to Group0.24 to disable reset.Figure 7-1 show the system hardware reset generator. Moon0 block mean Group0 registers that include control bits in lower 16bits and mask bits in higher 16bits.
Figure 7-1 Hardware Reset Generator
7.3 Clock enable control
The system blocks clock can be enabled or disabled by the Group0.1~10 registers. Each bit map to correspond block. Please set the clock bit to 1 for enable the block's clock.For example, if user want to enable SPI_COMBO_0 clock, please set 0x00040004 to Group0.3 register. Set 0x00040000 to Group0.3 to disable clock.Figure 7-2 show the SPI_COMBO block clock enable structure.
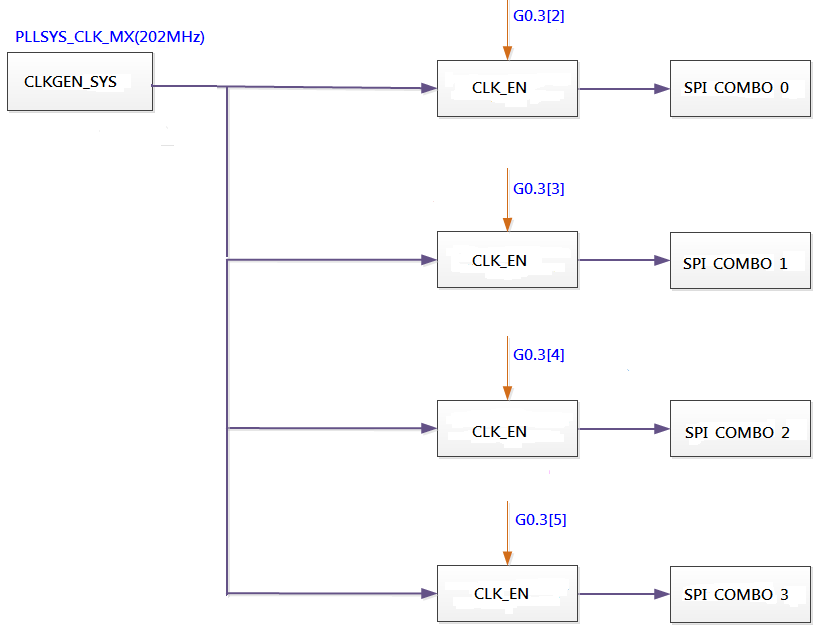
Figure 7-2 SPI_COMBO Block Clock Enable
7.4 System PLL control
There are 5 system PLL blocks in SP7021, they are PLLSYS, PLLA, PLLE, PLLF and PLLTV. They can be programmable by the Group4.0~16 registers.
7.4.1 PLLSYS control
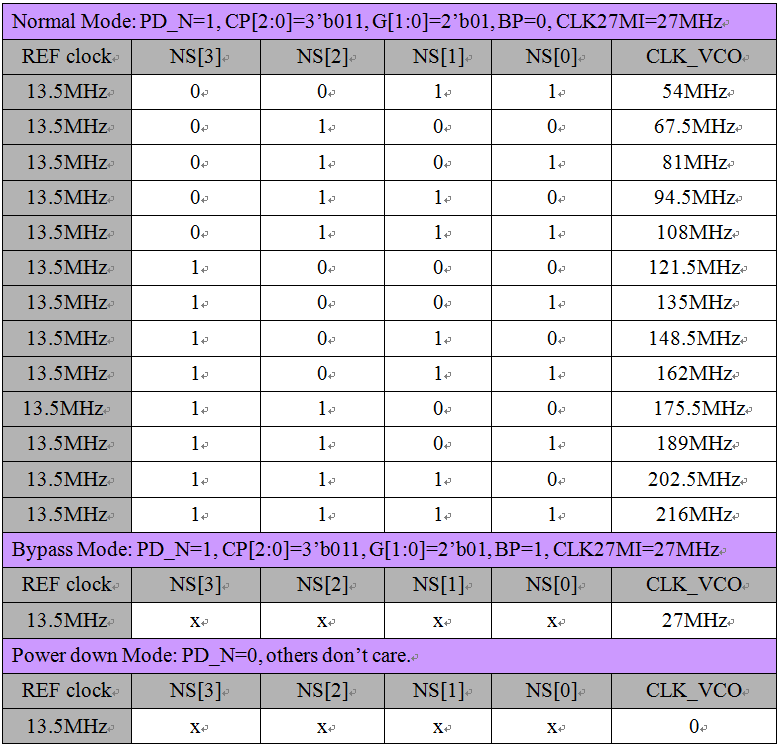
The PLLSYS is used for generating system clock; it could generate wide frequency range with different register setting, Also the PLLSYS could operate steady with low time jitter and low power consumption. The control register is Group4.26. There are three mode in PLLSYS module. Please refer to table 7-1&7-2 for parameters setting.
Table 7-1 Three mode PLLSYS
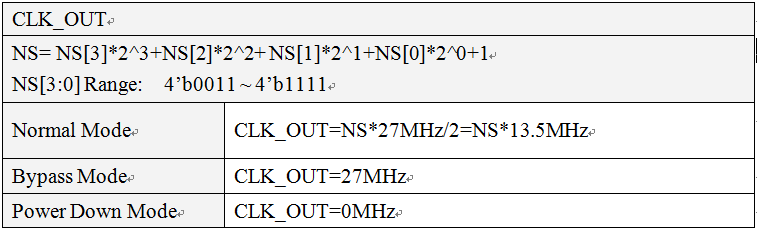
Table 7-2 The detail setting of three mode PLLSYS
7.4.2 PLLF control
The PLLFLASH(PLLF) is mainly used as clock sources for eMMC, SPI-NAND or SPI-NOR Flash memory. It could generate wide frequency range with different register setting, Also the PLLFLASH could operate steady with low time jitter and low power consumption. The control register is Group4.13. PLLSYS & PLLFLASH have identical function structure so each control bit usage is the same. Please refer to table 7-1&7-2 for parameters setting.
7.4.3 PLLE control
The PLLE is mainly used as clock source for ethernet. It could generate 4 kinds frequency, 50MHz, 2.5MHz, 25MHz and 112.5MHz, which controlled by register Group4.12 bit14, 13, 12 and 11. Please refer to Group4.12 register for detail parameters setting.
7.4.4 PLLTV control
The PLLTV is mainly used as clock source for HDMITX and Display module. It could generate wide frequency range with different register setting, Also the PLLTV could operate steady with low time jitter and low power consumption. The control registers are Group4.14, 15 and 16.
Frequency Operate Equation:
- Integer MODE (SEL_FRA_TV=0)

(A) DIVM [6:0]: Reference divider
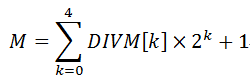
Ex. M=1 for DIVM[6:0]=7’b000_0000, M=32 for DIVM[6:0]=7’b001_1111.
(B) DIVN [7:0]: PLL feedback divider
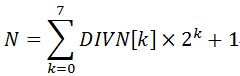
Ex. N=11 for DIVN[7:0]=8’b0000_1010, N=32 for DIVN[7:0]=8’b0001_1111.
(C) DIVR[1:0]: Post divider
Ex. R=0 for Divisor=1: FCKOUT= FVCO / 1
R=1 for Divisor=2: FCKOUT= FVCO / 2
R=2 for Divisor=4: FCKOUT= FVCO / 4
R=3 for Divisor=8: FCKOUT= FVCO / 8
- Fractional MODE (SEL_FRA_TV=1, DOUBLE_SEL_TV=0)
- For SDM_MOD_TV=0, PH_SEL_TV=0, NFRA=45

- For SDM_MOD_TV=0, PH_SEL_TV=1, NFRA=43

(A) DIVN [7:0]: PLL feedback divider is useless
DIVM & DIVR are the same as Integer mode
7.4.5 PLLA control
The PLLA is mainly used as clock source for audio module. It could generate wide frequency range with different register setting, Also the PLLA could operate steady with low time jitter and low power consumption. The control registers are Group4.7~11.
Frequency Operate Equation:

where R is modulus set by DIVR_A and M by DIVM_A.
FCKOUT indicates frequency of FCKOUT_A, FVCO stands for the frequency of VCO and FCLKREF is the frequency of CLKREF_A(27MHz).
- Fractional dividing modulus of f

where N.fideal is an ideal fractional dividing modulus and N.fbase is the basic fractional dividing modulus controlled by DIVN_A & PH_SEL_A.
DIVN_A directly represent integer part of the basic fractional dividing modulus shown below:
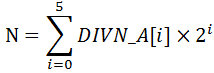
It should be noted that exception for N cannot be set less than 2 .
The N.fbase provides user a basic fractional dividing modulus with resolution of multiple of 0.1, and the fractional part is controlled by PH_SEL_A as shown in the pin description section. User can intuitively set this part:
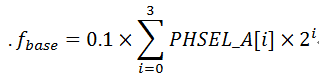
It should be noted that exception for .fbase is that setting PH_SEL_A=4’b1001~4’b1110 makes N.fideal a truly integer dividing modulus “plus one”, regardless of K & M.
For example, DIVN_A=6’b000100 and PH_SEL_A=4’b1001 makes N.fideal=4+1=5
The last part is the residue of the fractional dividing modulus, the ratio of K to M, which is realized by PH_STEP_SEL_A, M_SDM_A & K_SDM_A. Both K & M can be arbitrarily set from 0~2047 and noted that K must be equal or less than M, and the coefficient of 0.1 is set by PH_STEP_SEL=2’b01.
Now user can try to randomly give a fractional dividing modulus. There has an examples shown below.
Ex: N.f = 5.4033333 = 5+0.4+0.01x341/1023
DIVN_A=6’b000101, PH_SEL_A=4’b0100, PH_STEP_SEL=2’b01, K_SDM_A=11’b001-0101-0101 and M_SDM_A=11’b011-1111-1111
- Frequency calculate example
M_SDM_A=11’b1001, DIVR_A=2’b00, DOUBLE_SEL=1’b0, MUX_SEL_A=1’b0, PH_STEP_SEL_A=2’b01

7.5 DC2DC control
SP7021 embedded 3 DC2DC modules, they are 3.3V to 0.9V, 3.3V to 1.2V and 3.3V to 1.5V. So SP7021 just need one single power supply that is 3.3V. The parameters can be set by Group5.23~31 registers.
7.6 Thermal sensor control
SP7021 embedded a thermal sensor which operation temperature range between -40°C ~125°C. The resolution is 1°C. The parameters can be set by Group5 registers.
For example, when MO_THERMAL_VBE_SEL=0x01(default), then read TCODE value from G5.12[10:0] and calculate chip temperature as below:

Unit is Celsius.
7.7 System Pinmux control
There are totally 64 pins can be set as Multiplex Peripheral Pins. Multiplex Peripheral Pins include ETH_SW, SDIO, PWM, Input Capture, SPI MASTER, SPI SLAVE, I2C MASTER, UART(1~4), TIMER, GPIO INT functions. This function can be controlled by Group2~3 registers. Please refer to chapter 5 for detail description of this function.
Another pinmux type which provide fixed function in fixed pins is also supported. They can be control by Group1.1~4 registers. For example, in the chapter 4 pin description, the pin92~97 describe as below:
| Pin Name | LQFP 176 Pin No | Type | Description(Multiplex Pins in this interface Shown in Bold) | Drive (mA) |
|---|---|---|---|---|
EMMC_D0/ SPI_NAND_D0 | 92 | I/O I/O | EMMC data pin0 SPI_NAND_D0 | |
EMMC_D1/ SPI_NAND_D2 | 93 | I/O I/O | EMMC data pin1 SPI_NAND_D2 | |
EMMC_CLK/ SPI_NAND_CLK | 94 | I/O I/O | EMMC clock pin SPI_NAND_CLK | |
EMMC_D2/ SPI_NAND_D1 | 95 | I/O I/O | EMMC data pin2 SPI_NAND_D1 | |
EMMC_D7/ SPI_NAND_D3 | 96 | I/O I/O | EMMC data pin7 SPI_NAND_D3 | |
EMMC_D6/ SPI_NAND_CEN | 97 | I/O I/O | EMMC data pin6 SPI_NAND_CEN |
If user set Group1.1[4] as "1", the pin92~97 will support SPI_NAND function interface.
If user set Group1.1[5] as "1". the pin92~97 will become EMMC function interface.
7.8 System GPIO control
There are totally 72 GPIO pins which are separated into 9 I/O ports, and each port contains 8 GPIO signals. The I/O driving capability for signals in GPIO0 is 16mA and 8mA for those in other GPIO ports. All 72 GPIO signals are Tri-state Output with Schmitt Trigger Input. The GPIO can be controlled by Group6~7 registers. Please refer to chapter 5 for detail description of this function.
7.9 Core Clock Divide Enable
There has a special mode to divide core clock to half. Core clock is generated by dividing pll clock, so set pll cleck to half, it will let core clock become half also. The control bit is CORECLK_DIV2_EN which map to 0x9EC0000C[10]. 0: Pll cleck, 1: Pll clock/2.
7.10 Registers Map
7.10.1 Registers Memory Map
Address | Group No. | Register Name | Register Description |
0x9C000000 | G0.0 | mo stamp | Chip Revision Stamp ID Register |
0x9C000004 | G0.1 | mo clken0 | Clock Enable Register #0 |
0x9C000008 | G0.2 | mo clken1 | Clock Enable Register #1 |
0x9C00000C | G0.3 | mo clken2 | Clock Enable Register #2 |
0x9C000010 | G0.4 | mo clken3 | Clock Enable Register #3 |
0x9C000014 | G0.5 | mo clken4 | Clock Enable Register #4 |
0x9C000018 | G0.6 | mo clken5 | Clock Enable Register #5 |
0x9C00001C | G0.7 | mo clken6 | Clock Enable Register #6 |
0x9C000020 | G0.8 | mo clken7 | Clock Enable Register #7 |
0x9C000024 | G0.9 | mo clken8 | Clock Enable Register #8 |
0x9C000028 | G0.10 | mo clken9 | Clock Enable Register #9 |
0x9C00002C | G0.11 | mo gclken0 | Clock Gating Enable Register #0 |
0x9C000030 | G0.12 | mo gclken1 | Clock Gating Enable Register #1 |
0x9C000034 | G0.13 | mo gclken2 | Clock Gating Enable Register #2 |
0x9C000038 | G0.14 | mo gclken3 | Clock Gating Enable Register #3 |
0x9C00003C | G0.15 | mo gclken4 | Clock Gating Enable Register #4 |
0x9C000040 | G0.16 | mo gclken5 | Clock Gating Enable Register #5 |
0x9C000044 | G0.17 | mo gclken6 | Clock Gating Enable Register #6 |
0x9C000048 | G0.18 | mo gclken7 | Clock Gating Enable Register #7 |
0x9C00004C | G0.19 | mo gclken8 | Clock Gating Enable Register #8 |
0x9C000050 | G0.20 | mo gclken9 | Clock Gating Enable Register #9 |
0x9C000054 | G0.21 | mo reset0 | Hardware Reset Control Register #0 |
0x9C000058 | G0.22 | mo reset1 | Hardware Reset Control Register #1 |
0x9C00005C | G0.23 | mo reset2 | Hardware Reset Control Register #2 |
0x9C000060 | G0.24 | mo reset3 | Hardware Reset Control Register #3 |
0x9C000064 | G0.25 | mo reset4 | Hardware Reset Control Register #4 |
0x9C000068 | G0.26 | mo reset5 | Hardware Reset Control Register #5 |
0x9C00006C | G0.27 | mo reset6 | Hardware Reset Control Register #6 |
0x9C000070 | G0.28 | mo reset7 | Hardware Reset Control Register #7 |
0x9C000074 | G0.29 | mo reset8 | Hardware Reset Control Register #8 |
0x9C000078 | G0.30 | mo reset9 | Hardware Reset Control Register #9 |
0x9C00007C | G0.31 | mo sft cfg mode | Software Configure Hardware Mode |
Address | Group No. | Register Name | Register Description |
0x9C000080 | G1.0 | sft cfg 0 | Test Mode Control Register |
0x9C000084 | G1.1 | sft cfg 1 | PIN Mux Table Control Register #1 |
0x9C000088 | G1.2 | sft cfg 2 | PIN Mux Table Control Register #2 |
0x9C00008C | G1.3 | sft cfg 3 | PIN Mux Table Control Register #3 |
0x9C000090 | G1.4 | sft cfg 4 | PIN Mux Table Control Register #4 |
0x9C000094 | G1.5 | rsv | Reserved |
0x9C000098 | G1.6 | rsv | Reserved |
0x9C00009C | G1.7 | rsv | Reserved |
0x9C0000A0 | G1.8 | rsv | Reserved |
0x9C0000A4 | G1.9 | rsv | Reserved |
0x9C0000A8 | G1.10 | rsv | Reserved |
0x9C0000AC | G1.11 | rsv | Reserved |
0x9C0000B0 | G1.12 | rsv | Reserved |
0x9C0000B4 | G1.13 | rsv | Reserved |
0x9C0000B8 | G1.14 | rsv | Reserved |
0x9C0000BC | G1.15 | rsv | Reserved |
0x9C0000C0 | G1.16 | rsv | Reserved |
0x9C0000C4 | G1.17 | rsv | Reserved |
0x9C0000C8 | G1.18 | rsv | Reserved |
0x9C0000CC | G1.19 | rsv | Reserved |
0x9C0000D0 | G1.20 | rsv | Reserved |
0x9C0000D4 | G1.21 | rsv | Reserved |
0x9C0000D8 | G1.22 | rsv | Reserved |
0x9C0000DC | G1.23 | rsv | Reserved |
0x9C0000E0 | G1.24 | rsv | Reserved |
0x9C0000E4 | G1.25 | rsv | Reserved |
0x9C0000E8 | G1.26 | rsv | Reserved |
0x9C0000EC | G1.27 | rsv | Reserved |
0x9C0000F0 | G1.28 | rsv | Reserved |
0x9C0000F4 | G1.29 | rsv | Reserved |
0x9C0000F8 | G1.30 | rsv | Reserved |
0x9C0000FC | G1.31 | rsv | Reserved |
Address | Group No. | Register Name | Register Description |
0x9C000100 | G2.0 | sft cfg 0 | PIN Mux Table Control Register for L2SW CLK & L2SW LED |
0x9C000104 | G2.1 | sft cfg 1 | PIN Mux Table Control Register for L2SW LED & L2SW LED |
0x9C000108 | G2.2 | sft cfg 2 | PIN Mux Table Control Register for L2SW LED & L2SW MAC |
0x9C00010C | G2.3 | sft cfg 3 | PIN Mux Table Control Register for L2SW P0 & L2SW P0 |
0x9C000110 | G2.4 | sft cfg 4 | PIN Mux Table Control Register for L2SW P0 & L2SW P0 |
0x9C000114 | G2.5 | sft cfg 5 | PIN Mux Table Control Register for L2SW P0 & L2SW P0 |
0x9C000118 | G2.6 | sft cfg 6 | PIN Mux Table Control Register for L2SW P0 & L2SW P1 |
0x9C00011C | G2.7 | sft cfg 7 | PIN Mux Table Control Register for L2SW P1 & L2SW P1 |
0x9C000120 | G2.8 | sft cfg 8 | PIN Mux Table Control Register for L2SW P1 & L2SW P1 |
0x9C000124 | G2.9 | sft cfg 9 | PIN Mux Table Control Register for L2SW P1 & L2SW P1 |
0x9C000128 | G2.10 | sft cfg 10 | PIN Mux Table Control Register for L2SW P1 & DAISY MODE |
0x9C00012C | G2.11 | sft cfg 11 | PIN Mux Table Control Register for SDIO CLK & SDIO CMD |
0x9C000130 | G2.12 | sft cfg 12 | PIN Mux Table Control Register for SDIO D0 & SDIO D1 |
0x9C000134 | G2.13 | sft cfg 13 | PIN Mux Table Control Register for SDIO D2 & SDIO D3 |
0x9C000138 | G2.14 | sft cfg 14 | PIN Mux Table Control Register for PWM0 & PWM1 |
0x9C00013C | G2.15 | sft cfg 15 | PIN Mux Table Control Register for PWM2 & PWM3 |
0x9C000140 | G2.16 | sft cfg 16 | PIN Mux Table Control Register for PWM4 & PWM5 |
0x9C000144 | G2.17 | sft cfg 17 | PIN Mux Table Control Register for PWM6 & PWM7 |
0x9C000148 | G2.18 | sft cfg 18 | PIN Mux Table Control Register for ICM0 D & ICM1 D |
0x9C00014C | G2.19 | sft cfg 19 | PIN Mux Table Control Register for ICM2 D & ICM3 D |
0x9C000150 | G2.20 | sft cfg 20 | PIN Mux Table Control Register for ICM0 CLK & ICM1 CLK |
0x9C000154 | G2.21 | sft cfg 21 | PIN Mux Table Control Register for ICM2 CLK & ICM3 CLK |
0x9C000158 | G2.22 | sft cfg 22 | PIN Mux Table Control Register for SPIM0 INT & SPIM0 CLK |
0x9C00015C | G2.23 | sft cfg 23 | PIN Mux Table Control Register for SPIM0 EN & SPIM0 DO |
0x9C000160 | G2.24 | sft cfg 24 | PIN Mux Table Control Register for SPIM0 DI & SPIM1 INT |
0x9C000164 | G2.25 | sft cfg 25 | PIN Mux Table Control Register for SPIM1 CLK & SPIM1 CEN |
0x9C000168 | G2.26 | sft cfg 26 | PIN Mux Table Control Register for SPIM1 DO & SPIM1 DI |
0x9C00016C | G2.27 | sft cfg 27 | PIN Mux Table Control Register for SPIM2 INT |
0x9C000170 | G2.28 | sft cfg 28 | PIN Mux Table Control Register for SPIM2 CEN & SPIM2 DO |
0x9C000174 | G2.29 | sft cfg 29 | PIN Mux Table Control Register for SPIM2 DI & SPIM3 INT |
0x9C000178 | G2.30 | sft cfg 30 | PIN Mux Table Control Register for SPIM3 CLK & SPIM3 CEN |
0x9C00017C | G2.31 | sft cfg 31 | PIN Mux Table Control Register for SPIM3 DO & SPIM3 DI |
Address | Group No. | Register Name | Register Description |
0x9C000180 | G3.0 | sft cfg 32 | PIN Mux Table Control Register for SPI0S INT & SPI0S CLK |
0x9C000184 | G3.1 | sft cfg 33 | PIN Mux Table Control Register for SPI0S EN & SPI0S DO |
0x9C000188 | G3.2 | sft cfg 34 | PIN Mux Table Control Register for SPI0S DI & SPI1S INT |
0x9C00018C | G3.3 | sft cfg 35 | PIN Mux Table Control Register for SPI1S CLK & SPI1S EN |
0x9C000190 | G3.4 | sft cfg 36 | PIN Mux Table Control Register for SPI1S DO & SPI1S DI |
0x9C000194 | G3.5 | sft cfg 37 | PIN Mux Table Control Register for SPI2S INT & SPI2S CLK |
0x9C000198 | G3.6 | sft cfg 38 | PIN Mux Table Control Register for SPI2S EN & SPI2S DO |
0x9C00019C | G3.7 | sft cfg 39 | PIN Mux Table Control Register for SPI2S DI & SPI3S INT |
0x9C0001A0 | G3.8 | sft cfg 40 | PIN Mux Table Control Register for SPI3S CLK & SPI3S EN |
0x9C0001A4 | G3.9 | sft cfg 41 | PIN Mux Table Control Register for SPI3S DO & SPI3S DI |
0x9C0001A8 | G3.10 | sft cfg 42 | PIN Mux Table Control Register for I2CM0 CK & I2CM0 D |
0x9C0001AC | G3.11 | sft cfg 43 | PIN Mux Table Control Register for I2CM1 CK & I2CM1 D |
0x9C0001B0 | G3.12 | sft cfg 44 | PIN Mux Table Control Register for I2CM2 CK & I2CM2 D |
0x9C0001B4 | G3.13 | sft cfg 45 | PIN Mux Table Control Register for I2CM3 CK & I2CM3 D |
0x9C0001B8 | G3.14 | sft cfg 46 | PIN Mux Table Control Register for UA1 TX & UA1 RX |
0x9C0001BC | G3.15 | sft cfg 47 | PIN Mux Table Control Register for UA1 CTS & UA1 RTS |
0x9C0001C0 | G3.16 | sft cfg 48 | PIN Mux Table Control Register for UA2 TX & UA2 RX |
0x9C0001C4 | G3.17 | sft cfg 49 | PIN Mux Table Control Register for UA2 CTS & UA2 RTS |
0x9C0001C8 | G3.18 | sft cfg 50 | PIN Mux Table Control Register for UA3 TX & UA3 RX |
0x9C0001CC | G3.19 | sft cfg 51 | PIN Mux Table Control Register for UA3 CTS & UA3 RTS |
0x9C0001D0 | G3.20 | sft cfg 52 | PIN Mux Table Control Register for UA4 TX & UA4 RX |
0x9C0001D4 | G3.21 | sft cfg 53 | PIN Mux Table Control Register for UA4 CTS & UA4 RTS |
0x9C0001D8 | G3.22 | sft cfg 54 | PIN Mux Table Control Register for TIMER0 INT & TIMER1 INT |
0x9C0001DC | G3.23 | sft cfg 55 | PIN Mux Table Control Register for TIMER2 INT & TIMER3 INT |
0x9C0001E0 | G3.24 | sft cfg 56 | PIN Mux Table Control Register for GPIO INT0 & GPIO INT1 |
0x9C0001E4 | G3.25 | sft cfg 57 | PIN Mux Table Control Register for GPIO INT2 & GPIO INT3 |
0x9C0001E8 | G3.26 | sft cfg 58 | PIN Mux Table Control Register for GPIO INT4 & GPIO INT5 |
0x9C0001EC | G3.27 | sft cfg 59 | PIN Mux Table Control Register for GPIO INT6 & GPIO INT7 |
0x9C0001F0 | G3.28 | rsv | Reserved |
0x9C0001F4 | G3.29 | rsv | Reserved |
0x9C0001F8 | G3.30 | rsv | Reserved |
0x9C0001FC | G3.31 | rsv | Reserved |
Address | Group No. | Register Name | Register Description |
0x9C000200 | G4.0 | mo4 pllsp ctl 0 | SPDIF PLL Control Register #0 |
0x9C000204 | G4.1 | mo4 pllsp ctl 1 | SPDIF PLL Control Register #1 |
0x9C000208 | G4.2 | mo4 pllsp ctl 2 | SPDIF PLL Control Register #2 |
0x9C00020C | G4.3 | mo4 pllsp ctl 3 | SPDIF PLL Control Register #3 |
0x9C000210 | G4.4 | mo4 pllsp ctl 4 | SPDIF PLL Control Register #4 |
0x9C000214 | G4.5 | mo4 pllsp ctl 5 | SPDIF PLL Control Register #5 |
0x9C000218 | G4.6 | mo4 pllsp ctl 6 | SPDIF PLL Control Register #6 |
0x9C00021C | G4.7 | mo4 plla ctl 0 | PLLA Control Register #0 |
0x9C000220 | G4.8 | mo4 plla ctl 1 | PLLA Control Register #1 |
0x9C000224 | G4.9 | mo4 plla ctl 2 | PLLA Control Register #2 |
0x9C000228 | G4.10 | mo4 plla ctl 3 | PLLA Control Register #3 |
0x9C00022C | G4.11 | mo4 plla ctl 4 | PLLA Control Register #4 |
0x9C000230 | G4.12 | mo4 plle ctl | PLLE Control Register #0 |
0x9C000234 | G4.13 | mo4 pllf ctl | PLLF Control Register #0 |
0x9C000238 | G4.14 | mo4 plltv ctl 0 | PLLTV Control Register #0 |
0x9C00023C | G4.15 | mo4 plltv ctl 1 | PLLTV Control Register #1 |
0x9C000240 | G4.16 | mo4 plltv ctl 2 | PLLTV Control Register #2 |
0x9C000244 | G4.17 | mo4 usbc ctl | USBC Control Register |
0x9C000248 | G4.18 | mo4 uphy0 ctl0 | UPHY0 Control Register#0 |
0x9C00024C | G4.19 | mo4 uphy0 ctl1 | UPHY0 Control Register#1 |
0x9C000250 | G4.20 | mo4 uphy0 ctl2 | UPHY0 Control Register#2 |
0x9C000254 | G4.21 | mo4 uphy0 ctl3 | UPHY0 Control Register#3 |
0x9C000258 | G4.22 | mo4 uphy1 ctl0 | UPHY1 Control Register#0 |
0x9C00025C | G4.23 | mo4 uphy1 ctl1 | UPHY1 Control Register#1 |
0x9C000260 | G4.24 | mo4 uphy1 ctl2 | UPHY1 Control Register#2 |
0x9C000264 | G4.25 | mo4 uphy1 ctl3 | UPHY1 Control Register#3 |
0x9C000268 | G4.26 | mo4 pllsys | PLLSYS |
0x9C00026C | G4.27 | mo clk sel0 | Clock Setting and Selection Register |
0x9C000270 | G4.28 | MO PROBE SEL | Probe module selection |
0x9C000274 | G4.29 | mo4 misc ctl 0 | Miscellaneous Control Register #0 |
0x9C000278 | G4.30 | mo4 uphy0 sts | Reserved |
0x9C00027C | G4.31 | Reserved | Reserved |
Address | Group No. | Register Name | Register Description |
0x9C000280 | G5.0 | mo5 thermal ctl 0 | Thermal Control register #0 |
0x9C000284 | G5.1 | mo5 thermal ctl 1 | Thermal Control register #1 |
0x9C000288 | G5.2 | mo5 thermal ctl 2 | Thermal Control register #2 |
0x9C00028C | G5.3 | mo5 thermal ctl 3 | Thermal Control register #3 |
0x9C000290 | G5.4 | mo5 tmds l2sw ctl | TMDS L2SW Control Register |
0x9C000294 | G5.5 | mo5 l2sw clksw ctl | L2SW Clock Switch Control Register |
0x9C000298 | G5.6 | mo5 I2C2BUS ctl | I2C2BUS Control Register |
0x9C00029C | G5.7 | pfcnt ctl | PFCNT Register |
0x9C0002A0 | G5.8 | pfcnt sensor ctl 0 | PFCNT SENSOR Register #0 |
0x9C0002A4 | G5.9 | pfcnt sensor ctl 1 | PFCNT SENSOR Register #1 |
0x9C0002A8 | G5.10 | pfctn sts 0 | PFCNT Macro Status Register |
0x9C0002AC | G5.11 | pfctn sts 1 | PFCNT SENSOR Staus Register |
0x9C0002B0 | G5.12 | thermal sts 0 | THERMAL Status Register #0 |
0x9C0002B4 | G5.13 | thermal sts 1 | Reserved |
0x9C0002B8 | G5.14 | rsv | Reserved |
0x9C0002BC | G5.15 | rsv | Reserved |
0x9C0002C0 | G5.16 | rsv | Reserved |
0x9C0002C4 | G5.17 | rsv | Reserved |
0x9C0002C8 | G5.18 | rsv | Reserved |
0x9C0002CC | G5.19 | rsv | Reserved |
0x9C0002D0 | G5.20 | rsv | Reserved |
0x9C0002D4 | G5.21 | rsv | Reserved |
0x9C0002D8 | G5.22 | rsv | Reserved |
0x9C0002DC | G5.23 | DC09 CTL 0 | DC 0.9V Control Register #0 |
0x9C0002E0 | G5.24 | DC09 CTL 1 | DC 0.9V Control Register #1 |
0x9C0002E4 | G5.25 | DC09 CTL 2 | DC 0.9V Control Register #2 |
0x9C0002E8 | G5.26 | DC12 CTL 0 | DC 1.2V Control Register #0 |
0x9C0002EC | G5.27 | DC12 CTL 1 | DC 1.2V Control Register #1 |
0x9C0002F0 | G5.28 | DC12 CTL 2 | DC 1.2V Control Register #2 |
0x9C0002F4 | G5.29 | DC15 CTL 0 | DC 1.5V Control Register #0 |
0x9C0002F8 | G5.30 | DC15 CTL 1 | DC 1.5V Control Register #1 |
0x9C0002FC | G5.31 | DC15 CTL 2 | DC 1.5V Control Register #2 |
Address | Group No. | Register Name | Register Description |
0x9C000300 | G6.0 | gpio ctl sel 0 | GPIO Control Source Selection Register #0 |
0x9C000304 | G6.1 | gpio ctl sel 1 | GPIO Control Source Selection Register #1 |
0x9C000308 | G6.2 | gpio ctl sel 2 | GPIO Control Source Selection Register #2 |
0x9C00030C | G6.3 | gpio ctl sel 3 | GPIO Control Source Selection Register #3 |
0x9C000310 | G6.4 | gpio ctl sel 4 | GPIO Control Source Selection Register #4 |
0x9C000314 | G6.5 | gpio ctl sel 5 | GPIO Control Source Selection Register #5 |
0x9C000318 | G6.6 | gpio ctl sel 6 | GPIO Control Source Selection Register #6 |
0x9C00031C | G6.7 | gpio ctl sel 7 | GPIO Control Source Selection Register #7 |
0x9C000320 | G6.8 | gpio oe 0 | GPIO Output Enable Register #0 |
0x9C000324 | G6.9 | gpio oe 1 | GPIO Output Enable Register #1 |
0x9C000328 | G6.10 | gpio oe 2 | GPIO Output Enable Register #2 |
0x9C00032C | G6.11 | gpio oe 3 | GPIO Output Enable Register #3 |
0x9C000330 | G6.12 | gpio oe 4 | GPIO Output Enable Register #4 |
0x9C000334 | G6.13 | gpio oe 5 | GPIO Output Enable Register #5 |
0x9C000338 | G6.14 | gpio oe 6 | GPIO Output Enable Register #6 |
0x9C00033C | G6.15 | gpio oe 7 | GPIO Output Enable Register #7 |
0x9C000340 | G6.16 | gpio o 0 | GPIO Output Data Register #0 |
0x9C000344 | G6.17 | gpio o 1 | GPIO Output Data Register #1 |
0x9C000348 | G6.18 | gpio o 2 | GPIO Output Data Register #2 |
0x9C00034C | G6.19 | gpio o 3 | GPIO Output Data Register #3 |
0x9C000350 | G6.20 | gpio o 4 | GPIO Output Data Register #4 |
0x9C000354 | G6.21 | gpio o 5 | GPIO Output Data Register #5 |
0x9C000358 | G6.22 | gpio o 6 | GPIO Output Data Register #6 |
0x9C00035C | G6.23 | gpio o 7 | GPIO Output Data Register #7 |
0x9C000360 | G6.24 | gpio in 0 | GPIO Input Data Register #0 |
0x9C000364 | G6.25 | gpio in 1 | GPIO Input Data Register #1 |
0x9C000368 | G6.26 | gpio in 2 | GPIO Input Data Register #2 |
0x9C00036C | G6.27 | gpio in 3 | GPIO Input Data Register #3 |
0x9C000370 | G6.28 | gpio in 4 | GPIO Input Data Register #4 |
0x9C000374 | G6.29 | gpio in 5 | GPIO Input Data Register #5 |
0x9C000378 | G6.30 | rsv | Reserved |
0x9C00037C | G6.31 | rsv | Reserved |
Address | Group No. | Register Name | Register Description |
0x9C000380 | G7.0 | gpio in inv 0 | GPIO Input Invert Register #0 |
0x9C000384 | G7.1 | gpio in inv 1 | GPIO Input Invert Register #1 |
0x9C000388 | G7.2 | gpio in inv 2 | GPIO Input Invert Register #2 |
0x9C00038C | G7.3 | gpio in inv 3 | GPIO Input Invert Register #3 |
0x9C000390 | G7.4 | gpio in inv 4 | GPIO Input Invert Register #4 |
0x9C000394 | G7.5 | gpio in inv 5 | GPIO Input Invert Register #5 |
0x9C000398 | G7.6 | gpio in inv 6 | GPIO Input Invert Register #6 |
0x9C00039C | G7.7 | gpio in inv 7 | GPIO Input Invert Register #7 |
0x9C0003A0 | G7.8 | gpio out inv 0 | GPIO Output Invert Register #0 |
0x9C0003A4 | G7.9 | gpio out inv 1 | GPIO Output Invert Register #1 |
0x9C0003A8 | G7.10 | gpio out inv 2 | GPIO Output Invert Register #2 |
0x9C0003AC | G7.11 | gpio out inv 3 | GPIO Output Invert Register #3 |
0x9C0003B0 | G7.12 | gpio out inv 4 | GPIO Output Invert Register #4 |
0x9C0003B4 | G7.13 | gpio out inv 5 | GPIO Output Invert Register #5 |
0x9C0003B8 | G7.14 | gpio out inv 6 | GPIO Output Invert Register #6 |
0x9C0003BC | G7.15 | gpio out inv 7 | GPIO Output Invert Register #7 |
0x9C0003C0 | G7.16 | gpio od 0 | GPIO OD Register #0 |
0x9C0003C4 | G7.17 | gpio od 1 | GPIO OD Register #1 |
0x9C0003C8 | G7.18 | gpio od 2 | GPIO OD Register #2 |
0x9C0003CC | G7.19 | gpio od 3 | GPIO OD Register #3 |
0x9C0003D0 | G7.20 | gpio od 4 | GPIO OD Register #4 |
0x9C0003D4 | G7.21 | gpio od 5 | GPIO OD Register #5 |
0x9C0003D8 | G7.22 | gpio od 6 | GPIO OD Register #6 |
0x9C0003DC | G7.23 | gpio od 7 | GPIO OD Register #7 |
0x9C0003E0 | G7.24 | rsv | Reserved |
0x9C0003E4 | G7.25 | rsv | Reserved |
0x9C0003E8 | G7.26 | rsv | Reserved |
0x9C0003EC | G7.27 | rsv | Reserved |
0x9C0003F0 | G7.28 | rsv | Reserved |
0x9C0003F4 | G7.29 | rsv | Reserved |
0x9C0003F8 | G7.30 | rsv | Reserved |
0x9C0003FC | G7.31 | rsv | Reserved |
7.10.2 Registers Description
RGST Table Group 0 MOON
0.0 Chip Revision Stamp ID Register (mo stamp)
Address: 0x9C000000
Reset: 0x0000 0B10
| Field Name | Bit | Access | Description |
| MO STAMP | 31:0 | RO | Chip Revision Stamp ID |
0.1 Clock Enable Register #0 (mo clken0)
Address: 0x9C000004
Reset: 0x0000 FFFF
| Field Name | Bit | Access | Description |
| Mask bit | 31:16 | RW | Write valid bit for each LSB 16 bits The 16 bits map to corresponding LSB 16bits. Write 1 to valid the corresponding bit writing |
| PERI1 CLKEN | 15 | RW | PERI1 Hardware Clock Enable 0: Disable 1: Enable (default) |
| UMCTL2 CLKEN | 14 | RW | SDCTRL0 Hardware Clock Enable 0: Disable 1: Enable (default) |
A926 CLKEN | 13 | RW | A926 Hardware Clock Enable |
Reserved | 12 | RW | RESERVED |
PERI0 CLKEN | 11 | RW | PERI0 Hardware Clock Enable |
SDCTRL0 CLKEN | 10 | RW | SDCTRL Hardware Clock Enable |
SPIFL CLKEN | 9 | RW | SPIFL Hardware Clock Enable |
RBUS L00 CLKEN | 8 | RW | RBUS L00 Hardware Clock Enable |
BR CLKEN | 7 | RW | BR Hardware Clock Enable |
NOC CLKEN | 6 | RW | NOC Hardware Clock Enable |
Reserved | 5 | RW | RESERVED |
IOP CLKEN | 4 | RW | IOP Hardware Clock Enable |
IOCTL CLKEN | 3 | IO CTL Hardware Clock Enable | |
RTC CLKEN | 2 | RW | RTC Hardware Clock Enable |
Reserved | 1 | RESERVED | |
SYSTEM CLKEN | 0 | RW | SYSTEM Hardware Clock Enable |
0.2 Clock Enable Register #1 (mo clken1)
Address: 0x9C000008
Reset: 0x0000 FFFF
| Field Name | Bit | Access | Description |
| Mask bit | 31:16 | RW | Write valid bit for each LSB 16 bits The 16 bits map to corresponding LSB 16bits. Write 1 to valid the corresponding bit writing |
| UADMA CLKEN | 15 | RW | UADMA Hardware Clock Enable 0: Disable 1: Enable (default) |
| DDC0 CLKEN | 14 | RW | DDC0 Hardware Clock Enable 0: Disable 1: Enable (default) |
| HWUA | 13 | RW | HWUA Hardware Clock Enable 0: Disable 1: Enable (default) |
| UA4 CLKEN | 12 | RW | UA4 Hardware Clock Enable 0: Disable 1: Enable (default) |
| UA3 CLKEN | 11 | RW | UA3 Hardware Clock Enable 0: Disable 1: Enable (default) |
| UA2 CLKEN | 10 | RW | UA2 Hardware Clock Enable 0: Disable 1: Enable (default) |
| UA1 CLKEN | 9 | RW | UA1 Hardware Clock Enable 0: Disable 1: Enable (default) |
| UA0 CLKEN | 8 | RW | UA0 Hardware Clock Enable 0: Disable 1: Enable (default) |
| STC AV2 CLKEN | 7 | RW | STC AV2 Hardware Clock Enable 0: Disable 1: Enable (default) |
| STC AV1 CLKEN | 6 | RW | STC AV1 Hardware Clock Enable 0: Disable 1: Enable (default) |
STC AV0 CLKEN | 5 | RW | STC AV0 Hardware Clock Enable |
STC0 CLKEN | 4 | RW | STC0 Hardware Clock Enable |
Reserved | 3 | RW | RESERVED |
CHIP CLKEN | 2 | RW | TRACER Hardware Clock Enable |
Reserved | 1 | RW | RESERVED |
DDR PHY0 CLKEN | 0 | RW | DDR PHY0 Hardware Clock Enable |
0.3 Clock Enable Register #2 (mo clken2)
Address: 0x9C00000C
Reset: 0x0000 FFFF
| Field Name | Bit | Access | Description |
| Mask bit | 31:16 | RW | Write valid bit for each LSB 16 bits The 16 bits map to corresponding LSB 16bits. Write 1 to valid the corresponding bit writing |
| Reserved | 15 | RW | RESERVED |
| UPHY1 CLKEN | 14 | RW | UPHY1 Hardware Clock Enable 0: Disable 1: Enable (default) |
| UPHY0 CLKEN | 13 | RW | UPHY0 Hardware Clock Enable 0: Disable 1: Enable (default) |
| Reserved | 12 | RW | RESERVED |
| USBC1 CLKEN | 11 | RW | USBC1 Hardware Clock Enable 0: Disable 1: Enable (default) |
USBC0 CLKEN | 10 | RW | USBC0 Hardware Clock Enable |
Reserved | 9:7 | RW | RESERVED |
AUD CLKEN | 6 | RW | AUD Hardware Clock Enable |
SPI COMBO 3 CLKEN | 5 | RW | SPI COMBO 3 Hardware Clock Enable |
SPI COMBO 2 CLKEN | 4 | RW | SPI COMBO 2 Hardware Clock Enable |
SPI COMBO 1 CLKEN | 3 | RW | SPI COMBO 1 Hardware Clock Enable |
SPI COMBO 0 CLKEN | 2 | RW | SPI COMBO 0 Hardware Clock Enable |
CBDMA1 CLKEN | 1 | RW | CBDMA1 Hardware Clock Enable |
CBDMA0 CLKEN | 0 | RW | CBDMA0 Hardware Clock Enable |
0.4 Clock Enable Register #3 (mo clken3)
Address: 0x9C000010
Reset: 0x0000 FFFF
| Field Name | Bit | Access | Description |
| Mask bit | 31:16 | RW | Write valid bit for each LSB 16 bits The 16 bits map to corresponding LSB 16bits. Write 1 to valid the corresponding bit writing |
| CARD CTL1 CLKEN | 15 | RW | CARD CTL1 Hardware Clock Enable 0: Disable 1: Enable (default) |
CARD CTL0 CLKEN | 14 | RW | CARD CTL0 Hardware Clock Enable |
PMC CLKEN | 13 | RW | PMC Hardware Clock Enable |
Reserved | 12:4 | RW | RESERVED |
I2CM3 CLKEN | 3 | RW | I2CM3 Hardware Clock Enable |
I2CM2 CLKEN | 2 | RW | I2CM2 Hardware Clock Enable |
I2CM1 CLKEN | 1 | RW | I2CM1 Hardware Clock Enable |
I2CM0 CLKEN | 0 | RW | I2CM0 Hardware Clock Enable |
0.5 Clock Enable Register #4 (mo clken4)
Address: 0x9C000014
Reset: 0x0000 FFFF
| Field Name | Bit | Access | Description |
| Mask bit | 31:16 | RW | Write valid bit for each LSB 16 bits The 16 bits map to corresponding LSB 16bits. Write 1 to valid the corresponding bit writing |
| MIPICSI1 CLKEN | 15 | RW | MIPI CSI1 Hardware Clock Enable 0: Disable 1: Enable (default) |
| MIPICSI0 CLKEN | 14 | RW | MIPI CSI0 Hardware Clock Enable 0: Disable 1: Enable (default) |
| CSIIW1 CLKEN | 13 | RW | CSIIW1 Hardware Clock Enable 0: Disable 1: Enable (default) |
CSIIW0 CLKEN | 12 | RW | CSIIW0 Hardware Clock Enable |
DDFCH CLKEN | 11 | RW | DDFCH Hardware Clock Enable |
Reserved | 10:5 | RW | RESERVED |
BCH CLKEN | 4 | RW | BCH Hardware Clock Enable |
Reserved | 3 | RW | RESERVED |
CARD CTL4 CLKEN | 2 | RW | CARD CTL4 Hardware Clock Enable |
Reserved | 1:0 | RW | RESERVED |
0.6 Clock Enable Register #5 (mo clken5)
Address: 0x9C000018
Reset: 0x0000 FFFF
| Field Name | Bit | Access | Description |
| Mask bit | 31:16 | RW | Write valid bit for each LSB 16 bits The 16 bits map to corresponding LSB 16bits. Write 1 to valid the corresponding bit writing |
| Reserved | 15:6 | RW | RESERVED |
| VPOST CLKEN | 5 | RW | VPOST Hardware Clock Enable 0: Disable 1: Enable (default) |
| Reserved | 4:1 | RW | RESERVED |
| HDMI TX CLKEN | 0 | RW | HDMI TX Hardware Clock Enable 0: Disable 1: Enable (default) |
0.7 Clock Enable Register #6 (mo clken6)
Address: 0x9C00001C
Reset: 0x0000 FFFF
| Field Name | Bit | Access | Description |
| Mask bit | 31:16 | RW | Write valid bit for each LSB 16 bits The 16 bits map to corresponding LSB 16bits. Write 1 to valid the corresponding bit writing |
| INTERRUPT CLKEN | 15 | RW | INTERRUPT Hardware Clock Enable 0: Disable 1: Enable (default) |
| Reserved | 14:11 | RW | RESERVED |
| TCON CLKEN | 10 | RW | TCON Hardware Clock Enable 0: Disable 1: Enable (default) |
| Reserved | 9:2 | RW | RESERVED |
| DMIX CLKEN | 1 | RW | DMIX Hardware Clock Enable 0: Disable 1: Enable (default) |
| TGEN CLKEN | 0 | RW | TGEN Hardware Clock Enable 0: Disable 1: Enable (default) |
0.8 Clock Enable Register #7 (mo clken7)
Address: 0x9C000020
Reset: 0x0000 FFFF
| Field Name | Bit | Access | Description |
| Mask bit | 31:16 | RW | Write valid bit for each LSB 16 bits The 16 bits map to corresponding LSB 16bits. Write 1 to valid the corresponding bit writing |
| Reserved | 15:5 | RW | RESERVED |
| RBUS TOP CLKEN | 4 | RW | RBUS TOP Hardware Clock Enable 0: Disable 1: Enable (default) |
| GPIO CLKEN | 3 | RW | GPIO Hardware Clock Enable 0: Disable 1: Enable (default) |
| Reserved | 2:1 | RW | RESERVED |
| RGST CLKEN | 0 | RW | RGST Hardware Clock Enable 0: Disable 1: Enable (default) |
0.9 Clock Enable Register #8 (mo clken8)
Address: 0x9C000024
Reset: 0x0000 FFFF
| Field Name | Bit | Access | Description |
| Mask bit | 31:16 | RW | Write valid bit for each LSB 16 bits The 16 bits map to corresponding LSB 16bits. Write 1 to valid the corresponding bit writing |
| Reserved | 15:12 | RW | RESERVED |
| I2C2CBUS CLKEN | 11 | RW | I2C2CBUS Hardware Clock Enable 0: Disable (default) 1: Enable |
| SPIND CLKEN | 10 | RW | SPI NAND Hardware Clock Enable 0: Disable (default) 1: Enable |
| Reserved | 9:7 | RW | RESERVED |
| MAILBOX CLKEN | 6 | RW | MAILBOX Hardware Clock Enable 0: Disable 1: Enable (default) |
| Reserved | 5:0 | RW | RESERVED |
0.10 Clock Enable Register #9 (mo clken9)
Address: 0x9C000028
Reset: 0x0000 FFFF
| Field Name | Bit | Access | Description |
| Mask bit | 31:16 | RW | Write valid bit for each LSB 16 bits The 16 bits map to corresponding LSB 16bits. Write 1 to valid the corresponding bit writing |
Reserved | 15:10 | RO | RESERVED |
AXI GLOBAL CLKEN | 9 | RW | AXI GLOBAL Hardware IP Clock Enable |
ICM CLKEN | 8 | RW | ICM Hardware IP Clock Enable |
L2SW CLKEN | 7 | RW | L2SW Hardware IP Clock Enable |
FPGA CLKEN | 6 | RW | FPGA Hardware IP Clock Enable |
FIO CTL CLKEN | 5 | RW | FIO CTL Hardware IP Clock Enable |
DUMMY MASTER CLKEN | 4 | RW | DUMMY MASTER Hardware IP Clock Enable |
UADBG CLKEN | 3 | RW | UADBG Hardware IP Clock Enable |
DISP PWM CLKEN | 2 | RW | DISP PWM Hardware IP Clock Enable |
| Reserved | 1 | RW | RESERVED |
OSD0 CLKEN | 0 | RW | OSD0 Hardware IP Clock Enable |
0.11 Clock Gating Enable Register #0 (mo gclken0)
Address: 0x9C00002C
Reset: 0x0000 FFBF
| Field Name | Bit | Access | Description |
| Mask bit | 31:16 | RW | Write valid bit for each LSB 16 bits The 16 bits map to corresponding LSB 16bits. Write 1 to valid the corresponding bit writing |
PERI1 GCLKEN | 15 | RW | PERI1 Hardware Clock-Gating Enable |
UMCTL2 GCLKEN | 14 | RW | SDCTRL0 Hardware Clock-Gating Enable |
A926 GCLKEN | 13 | RW | A926 Hardware Clock-Gating Enable |
Reserved | 12 | RW | RESERVED |
PERI0 GCLKEN | 11 | RW | PERI0 Hardware Clock-Gating Enable |
SDCTRL0 GCLKEN | 10 | RW | SDCTRL Hardware Clock-Gating Enable |
SPIFL GCLKEN | 9 | RW | SPIFL Hardware Clock-Gating Enable |
RBUS L00 GCLKEN | 8 | RW | RBUS L00 Hardware Clock-Gating Enable |
BR GCLKEN | 7 | RW | BR Hardware Clock-Gating Enable |
NOC GCLKEN | 6 | RW | NOC Hardware Clock-Gating Enable |
Reserved | 5 | RW | Reserved |
IOP GCLKEN | 4 | RW | IOP Hardware Clock-Gating Enable |
IOCTL GCLKEN | 3 | RW | IO CTL Hardware Clock-Gating Enable |
RTC GCLKEN | 2 | RW | RTC Hardware Clock-Gating Enable |
| Reserved | 1 | RW | reserved |
| SYSTEM GCLKEN | 0 | RW | SYSTEM Hardware Clock-Gating Enable 0: Disable 1: Enable (default) |
0.12 Clock Gating Enable Register #1 (mo gclken1)
Address: 0x9C000030
Reset: 0x0000 FFFD
| Field Name | Bit | Access | Description |
| Mask bit | 31:16 | RW | Write valid bit for each LSB 16 bits The 16 bits map to corresponding LSB 16bits. Write 1 to valid the corresponding bit writing |
| UADMA GCLKEN | 15 | RW | UADMA Hardware Clock-Gating Enable 0: Disable 1: Enable (default) |
| DDC0 GCLKEN | 14 | RW | DDC0 Hardware Clock-Gating Enable 0: Disable 1: Enable (default) |
| HWUA | 13 | RW | HWUA Hardware Clock-Gating Enable 0: Disable 1: Enable (default) |
| UA4 GCLKEN | 12 | RW | UA4 Hardware Clock-Gating Enable 0: Disable 1: Enable (default) |
| UA3 GCLKEN | 11 | RW | UA3 Hardware Clock-Gating Enable 0: Disable 1: Enable (default) |
| UA2 GCLKEN | 10 | RW | UA2 Hardware Clock-Gating Enable 0: Disable 1: Enable (default) |
| UA1 GCLKEN | 9 | RW | UA1 Hardware Clock-Gating Enable 0: Disable 1: Enable (default) |
UA0 GCLKEN | 8 | RW | UA0 Hardware Clock-Gating Enable |
STC AV2 GCLKEN | 7 | RW | STC AV2 Hardware Clock-Gating Enable |
STC AV1 GCLKEN | 6 | RW | STC AV1 Hardware Clock-Gating Enable |
STC AV0 GCLKEN | 5 | RW | STC AV0 Hardware Clock-Gating Enable |
STC0 GCLKEN | 4 | RW | STC0 Hardware Clock-Gating Enable |
Reserved | 3 | RW | RESERVED |
CHIP GCLKEN | 2 | RW | TRACER Hardware Clock-Gating Enable |
Reserved | 1 | RW | RESERVED |
DDR PHY0 GCLKEN | 0 | RW | DDR PHY0 Hardware Clock-Gating Enable |
0.13 Clock Gating Enable Register #2 (mo gclken2)
Address: 0x9C000034
Reset: 0x0000 FFFF
| Field Name | Bit | Access | Description |
| Mask bit | 31:16 | RW | Write valid bit for each LSB 16 bits The 16 bits map to corresponding LSB 16bits. Write 1 to valid the corresponding bit writing |
| Reserved | 15 | RW | RESERVED |
| UPHY1 GCLKEN | 14 | RW | UPHY1 Hardware Clock-Gating Enable 0: Disable 1: Enable (default) |
UPHY0 GCLKEN | 13 | RW | UPHY0 Hardware Clock-Gating Enable |
Reserved | 12 | RW | RESERVED |
USBC1 GCLKEN | 11 | RW | USBC1 Hardware Clock-Gating Enable |
USBC0 GCLKEN | 10 | RW | USBC0 Hardware Clock-Gating Enable |
Reserved | 9:7 | RW | RESERVED |
AUD GCLKEN | 6 | RW | AUD Hardware Clock-Gating Enable |
SPI COMBO 3 GCLKEN | 5 | RW | SPI COMBO 3 Hardware Clock-Gating Enable |
SPI COMBO 2 GCLKEN | 4 | RW | SPI COMBO 2 Hardware Clock-Gating Enable |
SPI COMBO 1 GCLKEN | 3 | RW | SPI COMBO 1 Hardware Clock-Gating Enable |
SPI COMBO 0 GCLKEN | 2 | RW | SPI COMBO 0 Hardware Clock-Gating Enable |
CBDMA1 GCLKEN | 1 | RW | CBDMA1 Hardware Clock-Gating Enable |
CBDMA0 GCLKEN | 0 | RW | CBDMA0 Hardware Clock-Gating Enable |
0.14 Clock Gating Enable Register #3 (mo gclken3)
Address: 0x9C000038
Reset: 0x0000 FFFF
| Field Name | Bit | Access | Description |
| Mask bit | 31:16 | RW | Write valid bit for each LSB 16 bits The 16 bits map to corresponding LSB 16bits. Write 1 to valid the corresponding bit writing |
| CARD CTL1 GCLKEN | 15 | RW | CARD CTL1 Hardware Clock-Gating Enable 0: Disable 1: Enable (default) |
| CARD CTL0 GCLKEN | 14 | RW | CARD CTL0 Hardware Clock-Gating Enable 0: Disable 1: Enable (default) |
| PMC GCLKEN | 13 | RW | PMC Hardware Clock-Gating Enable 0: Disable 1: Enable (default) |
| Reserved | 12:4 | RW | RESERVED |
| I2CM3 GCLKEN | 3 | RW | I2CM3 Hardware Clock-Gating Enable 0: Disable 1: Enable (default) |
| I2CM2 GCLKEN | 2 | RW | I2CM2 Hardware Clock-Gating Enable 0: Disable 1: Enable (default) |
| I2CM1 GCLKEN | 1 | RW | I2CM1 Hardware Clock-Gating Enable 0: Disable 1: Enable (default) |
| I2CM0 GCLKEN | 0 | RW | I2CM0 Hardware Clock-Gating Enable 0: Disable 1: Enable (default) |
0.15 Clock Gating Enable Register #4 (mo gclken4)
Address: 0x9C00003C
Reset: 0x0000 FFFF
| Field Name | Bit | Access | Description |
| Mask bit | 31:16 | RW | Write valid bit for each LSB 16 bits The 16 bits map to corresponding LSB 16bits. Write 1 to valid the corresponding bit writing |
| MIPICSI1 GCLKEN | 15 | RW | MIPI CSI1 Hardware Clock-Gating Enable 0: Disable 1: Enable (default) |
MIPICSI0 GCLKEN | 14 | RW | MIPI CSI0 Hardware Clock-Gating Enable |
CSIIW1 GCLKEN | 23 | RW | CSIIW1 Hardware Clock-Gating Enable |
CSIIW0 GCLKEN | 12 | RW | CSIIW0 Hardware Clock-Gating Enable |
DDFCH GCLKEN | 11 | RW | DDFCH Hardware Clock-Gating Enable |
Reserved | 10:5 | RW | RESERVED |
BCH GCLKEN | 4 | RW | BCH Hardware Clock-Gating Enable |
Reserved | 3 | RW | RESERVED |
CARD CTL4 GCLKEN | 2 | RW | CARD CTL4 Hardware Clock-Gating Enable |
Reserved | 1:0 | RW | RESERVED |
0.16 Clock Gating Enable Register #5 (mo gclken5)
Address: 0x9C000040
Reset: 0x0000 FFFF
| Field Name | Bit | Access | Description |
| Mask bit | 31:16 | RW | Write valid bit for each LSB 16 bits The 16 bits map to corresponding LSB 16bits. Write 1 to valid the corresponding bit writing |
| Reserved | 15:6 | RW | RESERVED |
| VPOST GCLKEN | 5 | RW | VPOST Hardware Clock-Gating Enable 0: Disable 1: Enable (default) |
| Reserved | 4:1 | RW | RESERVED |
| HDMI TX GCLKEN | 0 | RW | HDMI TX Hardware Clock-Gating Enable 0: Disable 1: Enable (default) |
0.17 Clock Gating Enable Register #6 (mo gclken6)
Address: 0x9C000044
Reset: 0x0000 FFFF
| Field Name | Bit | Access | Description |
| Mask bit | 31:16 | RW | Write valid bit for each LSB 16 bits The 16 bits map to corresponding LSB 16bits. Write 1 to valid the corresponding bit writing |
| INTERRUPT GCLKEN | 15 | RW | INTERRUPT Hardware Clock-Gating Enable 0: Disable 1: Enable (default) |
| Reserved | 14:11 | RW | RESERVED |
| TCON GCLKEN | 10 | RW | TCON Hardware Clock-Gating Enable 0: Disable 1: Enable (default) |
| Reserved | 9:2 | RW | RESERVED |
| DMIX GCLKEN | 1 | RW | DMIX Hardware Clock-Gating Enable 0: Disable 1: Enable (default) |
| TGEN GCLKEN | 0 | RW | TGEN Hardware Clock-Gating Enable 0: Disable 1: Enable (default) |
0.18 Clock Gating Enable Register #7 (mo gclken7)
Address: 0x9C000048
Reset: 0x0000 FFFF
| Field Name | Bit | Access | Description |
| Mask bit | 31:16 | RW | Write valid bit for each LSB 16 bits The 16 bits map to corresponding LSB 16bits. Write 1 to valid the corresponding bit writing |
| Reserved | 15:5 | RW | RESERVED |
| RBUS TOP GCLKEN | 4 | RW | RBUS TOP Hardware Clock-Gating Enable 0: Disable 1: Enable (default) |
| GPIO GCLKEN | 3 | RW | GPIO Hardware Clock-Gating Enable 0: Disable 1: Enable (default) |
| Reserved | 2:1 | RW | RESERVED |
| RGST GCLKEN | 0 | RW | RGST Hardware Clock-Gating Enable 0: Disable 1: Enable (default) |
0.19 Clock Gating Enable Register #8 (mo gclken8)
Address: 0x9C00004C
Reset: 0x0000 FFFF
| Field Name | Bit | Access | Description |
| Mask bit | 31:16 | RW | Write valid bit for each LSB 16 bits The 16 bits map to corresponding LSB 16bits. Write 1 to valid the corresponding bit writing |
| Reserved | 15:12 | RW | RESERVED |
| I2C2CBUS GCLKEN | 11 | RW | I2C2CBUS Hardware Clock-Gating Enable 0: Disable (default) 1: Enable |
| SPIND GCLKEN | 10 | RW | SPI NAND Hardware Clock-Gating Enable 0: Disable (default) 1: Enable |
| Reserved | 9:7 | RW | RESERVED |
| MAILBOX GCLKEN | 6 | RW | MAILBOX Hardware Clock-Gating Enable 0: Disable 1: Enable (default) |
| Reserved | 5:0 | RW | RESERVED |
0.20 Clock Gating Enable Register #9 (mo gclken9)
Address: 0x9C000050
Reset: 0x0000 FFFF
| Field Name | Bit | Access | Description |
| Mask bit | 31:16 | RW | Write valid bit for each LSB 16 bits The 16 bits map to corresponding LSB 16bits. Write 1 to valid the corresponding bit writing |
| Reserved | 15:9 | RO | RESERVED |
| AXI GLOBAL GCLKEN | 8 | RW | AXI GLOBAL Hardware IP Clock-Gating Enable 0: Disable 1: Enable (default) |
| ICM GCLKEN | 7 | RW | ICM Hardware IP Clock-Gating Enable 0: Disable 1: Enable (default) |
| L2SW GCLKEN | 6 | RW | L2SW Hardware IP Clock-Gating Enable 0: Disable 1: Enable (default) |
| FPGA GCLKEN | 5 | RW | FPGA Hardware IP Clock-Gating Enable 0: Disable 1: Enable (default) |
| FIO CTL GCLKEN | 4 | RW | FIO CTL Hardware IP Clock-Gating Enable 0: Disable 1: Enable (default) |
| DUMMY MASTER GCLKEN | 3 | RW | DUMMY MASTER Hardware IP Clock-Gating Enable 0: Disable 1: Enable (default) |
| UADBG GCLKEN | 2 | RW | UADBG Hardware IP Clock-Gating Enable 0: Disable 1: Enable (default) |
| DISP PWM GCLKEN | 1 | RW | DISP PWM Hardware IP Clock-Gating Enable 0: Disable 1: Enable (default) |
| OSD0 GCLKEN | 0 | RW | OSD0 Hardware IP Clock-Gating Enable 0: Disable 1: Enable (default) |
0.21 Hardware Reset Control Register #0 (mo reset0)
Address: 0x9C000054
Reset: 0x0000 015D
| Field Name | Bit | Access | Description |
| Mask bit | 31:16 | RW | Write valid bit for each LSB 16 bits The 16 bits map to corresponding LSB 16bits. Write 1 to valid the corresponding bit writing |
PERI1 RESET | 15 | RW | TPI Hardware IP Reset Enable 0: Disable |
SDCTRL0 RESET | 14 | RW | SDCTRL0 Hardware IP Reset Enable |
A926 RESET | 13 | RW | A926 Hardware IP Reset Enable |
Reserved | 12 | RW | RESERVED |
PERI0 RESET | 11 | RW | PERI0 Hardware IP Reset Enable |
SPI COMBO RESET | 10 | RW | SPI COMBO Hardware IP Reset Enable |
SPIFL RESET | 9 | RW | SPIFL Hardware IP Reset Enable |
RBUS L00 RESET | 8 | RW | RBUS L00 Hardware IP Reset Enable |
BR RESET | 7 | RW | BR Hardware IP Reset Enable |
NOC RESET | 6 | RW | NOC Hardware IP Reset Enable |
Reserved | 5 | RW | RESERVED |
IOP RESET | 4 | RW | IOP Hardware IP Reset Enable |
IOCTL RESET | 3 | RW | IO CTL Hardware IP Reset Enable |
| RTC RESET | 2 | RW | RTC Hardware IP Reset Enable 0: Disable (default) 1: Enable |
| Reserved | 1 | RW | RESERVED |
| SYSTEM RESET | 0 | RW | SYSTEM Hardware Reset Enable 0: Disable (default) 1: Enable |
0.22 Hardware Reset Control Register #1 (mo reset1)
Address: 0x9C000058
Reset: 0x0000 0004
| Field Name | Bit | Access | Description |
| Mask bit | 31:16 | RW | Write valid bit for each LSB 16 bits The 16 bits map to corresponding LSB 16bits. Write 1 to valid the corresponding bit writing |
| UADMA RESET | 15 | RW | UADMA Hardware IP Reset Enable 0: Disable 1: Enable (default) |
| DDC0 RESET | 14 | RW | DDC0 Hardware IP Reset Enable 0: Disable 1: Enable (default) |
| Reserved | 13 | RW | RESERVED |
| UA4 RESET | 12 | RW | UA4 Hardware IP Reset Enable 0: Disable 1: Enable (default) |
| UA3 RESET | 11 | RW | UA3 Hardware IP Reset Enable 0: Disable 1: Enable (default) |
| UA2 RESET | 10 | RW | UA2 Hardware IP Reset Enable 0: Disable 1: Enable (default) |
| UA1 RESET | 9 | RW | UA1 Hardware IP Reset Enable 0: Disable 1: Enable (default) |
UA0 RESET | 8 | RW | UA0 Hardware IP Reset Enable |
STC AV2 RESET | 7 | RW | STC AV2 Hardware IP Reset Enable |
STC AV1 RESET | 6 | RW | STC AV1 Hardware IP Reset Enable |
STC AV0 RESET | 5 | RW | STC AV0 Hardware IP Reset Enable |
STC0 RESET | 4 | RW | STC0 Hardware IP Reset Enable |
Reserved | 3 | RW | RESERVED |
CHIP RESET | 2 | RW | TRACER Hardware IP Reset Enable |
Reserved | 1 | RW | RESERVED |
DDR PHY0 RESET | 0 | RW | DDR PHY0 Hardware IP Reset Enable |
0.23 Hardware Reset Control Register #2 (mo reset2)
Address: 0x9C00005C
Reset: 0x0000 0002
| Field Name | Bit | Access | Description |
| Mask bit | 31:16 | RW | Write valid bit for each LSB 16 bits The 16 bits map to corresponding LSB 16bits. Write 1 to valid the corresponding bit writing |
| Reserved | 15 | RW | RESERVED |
| UPHY1 RESET | 14 | RW | UPHY1 Hardware IP Reset Enable 0: Disable 1: Enable (default) |
UPHY0 RESET | 13 | RW | UPHY0 Hardware IP Reset Enable |
Reserved | 12 | RW | RESERVED |
USBC1 RESET | 11 | RW | USBC1 Hardware IP Reset Enable |
USBC0 RESET | 10 | RW | USBC0 Hardware IP Reset Enable |
Reserved | 9:7 | RW | RESERVED |
AUD RESET | 6 | RW | AUD Hardware IP Reset Enable |
SPI COMBO 3 RESET | 5 | RW | SPI COMBO 3 Hardware IP Reset Enable |
SPI COMBO 2 RESET | 4 | RW | SPI COMBO 2 Hardware IP Reset Enable |
SPI COMBO 2 RESET | 3 | RW | SPI COMBO 1 Hardware IP Reset Enable |
SPI COMBO 0 RESET | 2 | RW | SPI COMBO 0 Hardware IP Reset Enable |
CBDMA1 RESET | 1 | RW | CBDMA1 Hardware IP Reset Enable |
CBDMA0 RESET | 0 | RW | CBDMA0 Hardware IP Reset Enable |
0.24 Hardware Reset Control Register #3 (mo reset3)
Address: 0x9C000060
Reset: 0x0000 3000
| Field Name | Bit | Access | Description |
| Mask bit | 31:16 | RW | Write valid bit for each LSB 16 bits The 16 bits map to corresponding LSB 16bits. Write 1 to valid the corresponding bit writing |
| CARD1 CTL1 RESET | 15 | RW | CARD CTL1 Hardware IP Reset Enable 0: Disable 1: Enable (default) |
| CARD CTL0 RESET | 14 | RW | CARD CTL0 Hardware IP Reset Enable 0: Disable 1: Enable (default) |
| PMC RESET | 13 | RW | PMC Hardware IP Reset Enable 0: Disable 1: Enable (default) |
| Reserved | 12:4 | RW | RESERVED |
| I2CM3 RESET3 | 3 | RW | I2CM3 Hardware IP Reset Enable 0: Disable 1: Enable (default) |
| I2CM2 RESET2 | 2 | RW | I2CM2 Hardware IP Reset Enable 0: Disable 1: Enable (default) |
| I2CM1 RESET1 | 1 | RW | I2CM1 Hardware IP Reset Enable 0: Disable 1: Enable (default) |
| I2CM0 RESET0 | 0 | RW | I2CM0 Hardware IP Reset Enable 0: Disable 1: Enable (default) |
0.25 Hardware Reset Control Register #4 (mo reset4)
Address: 0x9C000064
Reset: 0x0000 0100
| Field Name | Bit | Access | Description |
| Mask bit | 31:16 | RW | Write valid bit for each LSB 16 bits The 16 bits map to corresponding LSB 16bits. Write 1 to valid the corresponding bit writing |
| MIPICSI1 GCLKEN | 15 | RW | MIPI CSI1 Hardware IP Reset Enable 0: Disable 1: Enable (default) |
MIPICSI0 GCLKEN | 14 | RW | MIPI CSI0 Hardware IP Reset Enable |
CSIIW1 GCLKEN | 13 | RW | CSIIW1 Hardware IP Reset Enable |
CSIIW0 GCLKEN | 12 | RW | CSIIW0 Hardware IP Reset Enable |
DDFCH0 GCLKEN | 11 | RW | DDFCH0 Hardware IP Reset Enable |
Reserved | 10:5 | RW | RESERVED |
BCH RESET | 4 | RW | BCH Hardware IP Reset Enable |
Reserved | 3 | RW | RESERVED |
CARD4 CTL1 RESET | 2 | RW | CARD CTL4 Hardware IP Reset Enable |
Reserved | 1:0 | RW | RESERVED |
0.26 Hardware Reset Control Register #5 (mo reset5)
Address: 0x9C000068
Reset: 0x0000 0100
| Field Name | Bit | Access | Description |
| Mask bit | 31:16 | RW | Write valid bit for each LSB 16 bits The 16 bits map to corresponding LSB 16bits. Write 1 to valid the corresponding bit writing |
| Reserved | 15:6 | RW | RESERVED |
| VPOST GCLKEN | 5 | RW | VPOST Hardware IP Reset Enable 0: Disable 1: Enable (default) |
| Reserved | 4:1 | RW | RESERVED |
| HDMI CTL1 RESET | 0 | RW | HDMI Hardware IP Reset Enable 0: Disable 1: Enable (default) |
0.27 Hardware Reset Control Register #6 (mo reset6)
Address: 0x9C00006C
Reset: 0x0000 0000
| Field Name | Bit | Access | Description |
| Mask bit | 31:16 | RW | Write valid bit for each LSB 16 bits The 16 bits map to corresponding LSB 16bits. Write 1 to valid the corresponding bit writing |
| INTERRUPT RESET | 15 | RW | INTERRUPT Hardware IP Reset Enable 0: Disable 1: Enable (default) |
| Reserved | 14:11 | RW | RESERVED |
| TCON RESET | 10 | RW | TCON Hardware IP Reset Enable 0: Disable 1: Enable (default) |
| Reserved | 9:2 | RW | RESERVED |
| DMIX RESET | 1 | RW | DMIX Hardware IP Reset Enable 0: Disable 1: Enable (default) |
| TGEN RESET | 0 | RW | TGEN Hardware IP Reset Enable 0: Disable 1: Enable (default) |
0.28 Hardware Reset Control Register #7 (mo reset7)
Address: 0x9C000070
Reset: 0x0000 0010
| Field Name | Bit | Access | Description |
| Mask bit | 31:16 | RW | Write valid bit for each LSB 16 bits The 16 bits map to corresponding LSB 16bits. Write 1 to valid the corresponding bit writing |
| Reserved | 15:5 | RW | RESERVED |
| RBUS TOP RESET | 4 | RW | RBUS TOP Hardware IP Reset Enable 0: Disable (default) 1: Enable |
| GPIO RESET | 3 | RW | GPIO Hardware IP Reset Enable 0: Disable 1: Enable (default) |
| Reserved | 2:1 | RW | RESERVED |
| RGST RESET | 0 | RW | RGST Hardware IP Reset Enable 0: Disable 1: Enable (default) |
0.29 Hardware Reset Control Register #8 (mo reset8)
Address: 0x9C000074
Reset: 0x0000 0300
| Field Name | Bit | Access | Description |
| Mask bit | 31:16 | RW | Write valid bit for each LSB 16 bits The 16 bits map to corresponding LSB 16bits. Write 1 to valid the corresponding bit writing |
| GPOST0 RESET | 15 | RW | GPOST Hardware IP Reset Enable 0: Disable 1: Enable (default) |
| DVE RESET | 14 | RW | DVE Hardware IP Reset Enable 0: Disable 1: Enable (default) |
| SEC RESET | 13 | RW | SEC Hardware IP Reset Enable 0: Disable 1: Enable (default) |
| GDMA RESET | 12 | RW | GDMA Hardware IP Reset Enable 0: Disable 1: Enable (default) |
| I2C2CBUS RESET | 11 | RW | I2C2CBUS Hardware IP Reset Enable 0: Disable 1: Enable (default) |
| SPIND RESET | 10 | RW | SPI NAND Hardware IP Reset Enable 0: Disable 1: Enable (default) |
| Reserved | 9:7 | RW | RESERVED |
| MAILBOX RESET | 6 | RW | MAILBOX Hardware IP Reset Enable 0: Disable 1: Enable (default) |
| Reserved | 5:0 | RW | RESERVED |
0.30 Hardware Reset Control Register #9 (mo reset9)
Address: 0x9C000078
Reset: 0x0000 0080
| Field Name | Bit | Access | Description |
| Mask bit | 31:16 | RW | Write valid bit for each LSB 16 bits The 16 bits map to corresponding LSB 16bits. Write 1 to valid the corresponding bit writing |
| Reserved | 15:9 | RO | RESERVED |
| AXI GLOBAL RESET | 8 | RW | AXI GLOBAL Hardware IP Reset Enable 0: Disable 1: Enable (default) |
| ICM RESET | 7 | RW | ICM Hardware IP Reset Enable 0: Disable 1: Enable (default) |
| L2SW RESET | 6 | RW | L2SW Hardware IP Reset Enable 0: Disable 1: Enable (default) |
| FPGA RESET | 5 | RW | FPGA Hardware IP Reset Enable 0: Disable 1: Enable (default) |
| FIO CTL RESET | 4 | RW | FIO CTL Hardware IP Reset Enable 0: Disable 1: Enable (default) |
| DUMMY MASTER RESET | 3 | RW | DUMMY MASTER Hardware IP Reset Enable 0: Disable 1: Enable (default) |
| UADBG RESET | 2 | RW | UADBG Hardware IP Reset Enable 0: Disable 1: Enable (default) |
| DISP PWM RESET | 1 | RW | DISP PWM Hardware IP Reset Enable 0: Disable 1: Enable (default) |
| OSD0 RESET | 0 | RW | OSD0 Hardware IP Reset Enable 0: Disable 1: Enable (default) |
0.31 Software Configure Hardware Mode (mo sft cfg mode)
Address: 0x9C00007C
Reset: 0x0
| Field Name | Bit | Access | Description |
| Reserved | 31:5 | RO | RESERVED |
| Reserved | 16:10 | RO | RESERVED |
| Reserved | 9:5 | RO | RESERVED |
| Reserved | 4:0 | RU | RESERVED |
RGST Table Group 1 MOON 1
1.0 Test Mode Control Register (sft cfg 0)
Address:0x9C000080
Reset:0x0
| Field Name | Bit | Access | Description |
| reserved | 31:8 | RW | RESERVED |
| reserved | 17 | RW | RESERVED |
| SFT CFG RTC TEST SEL | 16 | RW | RTC TEST Pin-Mux Column Selection Set 1 to select pin mux to this group of funcion |
| SFT CFG USB1 TEST SEL | 15 | RW | USB1 TEST Pin-Mux Column Selection Set 1 to select pin mux to this group of funcion |
| SFT CFG USB0 TEST SEL | 14 | RW | USB0 TEST Pin-Mux Column Selection Set 1 to select pin mux to this group of funcion |
| SFT CFG PLLSPDIF TEST SEL | 13 | RW | PLLSPDIF TEST Pin-Mux Column Selection Set 1 to select pin mux to this group of funcion |
| SFT CFG PLLTV TEST SEL | 12 | RW | PLLTV TEST Pin-Mux Column Selection Set 1 to select pin mux to this group of funcion |
| SFT CFG PLLE TEST SEL | 11 | RW | PLLE TEST Pin-Mux Column Selection Set 1 to select pin mux to this group of funcion |
| SFT CFG PLLF TEST SEL | 10 | RW | PLLF TEST Pin-Mux Column Selection Set 1 to select pin mux to this group of funcion |
| SFT CFG PLLSYS C TEST SEL | 9 | RW | PLLSYS C TEST Pin-Mux Column Selection Set 1 to select pin mux to this group of funcion |
| SFT CFG PLLA TEST SEL | 8 | RW | PLLA TEST Pin-Mux Column Selection Set 1 to select pin mux to this group of funcion |
| SFT CFG DDRIO TEST SEL | 7 | RW | DDRIO TEST Pin-Mux Column Selection Set 1 to select pin mux to this group of funcion |
| SFT CFG DDR SSCPLL TEST SEL | 6 | RW | DDR SSCPLL TEST Pin-Mux Column Selection Set 1 to select pin mux to this group of funcion |
Reserved | 5 | RW | RESERVED |
| SFT CFG THERMAL TEST SEL | 4 | RW | THERMAL TEST Pin-Mux Column Selection Set 1 to select pin mux to this group of funcion |
| SFT CFG TMDSTX TEST SEL | 3 | RW | TMDSTX TEST Pin-Mux Column Selection Set 1 to select pin mux to this group of funcion |
| SFT CFG MIPIDPHY1 TEST SEL | 2 | RW | MIPIDPHY1 TEST Pin-Mux Column Selection Set 1 to select pin mux to this group of funcion |
| SFT CFG MIPIDPHY0 TEST SEL | 1 | RW | MIPIDPHY0 TEST Pin-Mux Column Selection Set 1 to select pin mux to this group of funcion |
| SFT CFG CHIP PINMUX TEST SEL | 0 | RW | CHIP PINMUX TEST Pin-Mux Column Selection Set 1 to select pin mux to this group of funcion |
1.1 PIN Mux Table Control Register #1 (sft cfg 1)
Address: 0x9C000084
Reset:0x0
| Field Name | Bit | Access | Description |
| Mask Bits | 31:16 | RW | Write valid bit for each LSB 16 bits The 16 bits map to corresponding LSB 16bits. Write 1 to valid the corresponding bit writing |
| SFT CFG AUD EXT ADC IFX0 SEL | 15 | RW | AUD EXT ADC IFX0 Pin-Mux Column Selection |
| SFT CFG HDMI TX SEL | 14:13 | HDMI TX Pin-Mux Column Selection Set 0~3 to select pin mux to this group of funcion | |
| SFT CFG FPGA IFX SEL | 12 | RW | FPGA IFX Pin-Mux Column Selection Set 1 to select pin mux to this group of funcion |
| SFT CFG CHIP UA2AXI SEL | 11:10 | RW | CHIP UA2AXI Pin-Mux Column Selection Set 0~3 to select pin mux to this group of funcion |
| SFT CFG CHIP DEBUG SEL | 9:8 | RW | CHIP DEBUG Pin-Mux Column Selection Set 0~3 to select pin mux to this group of funcion |
| SFT CFG UA0 SEL | 7 | RW | UA0 Pin-Mux Column Selection Set 1 to select pin mux to this group of funcion |
| SFT CFG SD CARD SEL | 6 | RW | SD CARD Pin-Mux Column Selection Set 1 to select pin mux to this group of funcion |
| SFT CFG CARD0 EMMC SEL | 5 | RW | CARD0 EMMC Pin-Mux Column Selection Set 1 to select pin mux to this group of funcion |
| SFT CFG SPI NAND SEL | 4 | RW | SPI NAND Pin-Mux Column Selection Set 1 to select pin mux to this group of funcion |
| SFT CFG SPI FLASH 4BIT SEL | 3:2 | RW | SPI FLASH 4BIT Pin-Mux Column Selection Set 0~3 to select pin mux to this group of funcion |
| SFT CFG SPI FLASH SEL | 1:0 | RW | SPI FLASH Pin-Mux Column Selection Set 0~3 to select pin mux to this group of funcion |
1.2 PIN Mux Table Control Register #2 (sft cfg 2)
Address: 0x9C000088
Reset: 0x0
| Field Name | Bit | Access | Description |
Mask Bits | 31:16 | RW | Write valid bit for each LSB 16 bits |
SFT CFG UPHY0 IF SEL | 15:14 | RW | UPHY0 IF Pin-Mux Column Selection Set 0~3 to select pin mux to this group of funcion |
SFT CFG UADBG SEL | 13:12 | RW | UADBG Pin-Mux Column Selection Set 0~3 to select pin mux to this group of funcion |
SFT CFG IR IN SEL | 11 | RW | IR IN Pin-Mux Column Selection Set 1 to select pin mux to this group of funcion |
SFT CFG SLV I2C SEL | 10 | RW | SLV I2C Pin-Mux Column Selection Set 1 to select pin mux to this group of funcion |
SFT CFG DBG I2C SEL | 9 | RW | DBG I2C Pin-Mux Column Selection Set 1 to select pin mux to this group of funcion |
SFT CFG CLKGENA SEL | 8 | RW | CLKGENA Pin-Mux Column Selection Set 1 to select pin mux to this group of funcion |
SFT CFG PCM IEC TX SEL | 7 | RW | PCM IEC TX Pin-Mux Column Selection Set 1 to select pin mux to this group of funcion |
SFT CFG PDMRX IFX0 SEL | 6 | RW | PDMRX IFX0 Pin-Mux Column Selection Set 1 to select pin mux to this group of funcion |
SFT CFG TDMRX IFX0 SEL | 5 | RW | TDMRX IFX0 Pin-Mux Column Selection Set 1 to select pin mux to this group of funcion |
SFT CFG TDMTX IFX0 SEL | 4 | RW | TDMTX IFX0 Pin-Mux Column Selection Set 1 to select pin mux to this group of funcion |
SFT CFG IEC TX SEL | 3 | RW | IEC TX Pin-Mux Column Selection Set 1 to select pin mux to this group of funcion |
SFT CFG AUD IEC RX0 SEL | 2 | RW | AUD IEC RX0 Pin-Mux Column Selection Set 1 to select pin mux to this group of funcion |
SFT CFG AUD TEST SEL | 1 | RW | AUD TEST Pin-Mux Column Selection Set 1 to select pin mux to this group of funcion |
| SFT CFG AUD EXT DAC IFX0 SEL | 0 | RW | AUD EXT DAC IFX0 Pin-Mux Column Selection Set 1 to select pin mux to this group of funcion |
1.3 PIN Mux Table Control Register #3 (sft cfg 3)
Address: 0x9C00008C
Reset: 0x0
| Field Name | Bit | Access | Description |
| Mask Bits | 31:16 | RW | Write valid bit for each LSB 16 bits The 16 bits map to corresponding LSB 16bits. Write 1 to valid the corresponding bit writing |
| SFT CFG 8051 JTAG SEL | 15:14 | RW | 8051 JTAG Pin-Mux Column Selection Set 0~3 to select pin mux to this group of funcion |
| SFT CFG HWCFG PROB SEL | 13 | RW | HWCFG PROB Pin-Mux Column Selection Set 1 to select pin mux to this group of funcion |
| SFT CFG CLK27 OUT SEL | 12 | RW | CLK27 OUT Pin-Mux Column Selection Set 1 to select pin mux to this group of funcion |
| SFT CFG XCK OUT SEL | 11 | RW | XCK OUT Pin-Mux Column Selection Set 1 to select pin mux to this group of funcion |
| SFT CFG MO1 PLLA 135 147 O SEL | 10 | RW | MO1 PLLA 135 147 O Pin-Mux Column Selection Set 1 to select pin mux to this group of funcion |
| SFT CFG MO1 CLK27 O SEL | 9 | RW | MO1 CLK27 O Pin-Mux Column Selection Set 1 to select pin mux to this group of funcion |
| SFT CFG PROBE PORT SEL | 8:7 | RW | PROBE PORT Pin-Mux Column Selection Set 0~3 to select pin mux to this group of funcion |
| SFT CFG UPHY0 EXT SEL | 6 | RW | UPHY0 EXT Pin-Mux Column Selection Set 1 to select pin mux to this group of funcion |
| SFT CFG UPHY1 DEBUG SEL | 5 | RW | UPHY1 DEBUG Pin-Mux Column Selection Set 1 to select pin mux to this group of funcion |
| SFT CFG UPHY0 DEBUG SEL | 4 | RW | UPHY0 DEBUG Pin-Mux Column Selection Set 1 to select pin mux to this group of funcion |
| SFT CFG USBC1 OTG EN SEL | 3 | RW | USBC1 OTG EN Pin-Mux Column Selection Set 1 to select pin mux to this group of funcion |
| SFT CFG USBC0 OTG EN SEL | 2 | RW | USBC0 OTG EN Pin-Mux Column Selection Set 1 to select pin mux to this group of funcion |
| SFT CFG UPHY1 IF SEL | 1:0 | RW | UPHY1 IF Pin-Mux Column Selection Set 0~3 to select pin mux to this group of funcion |
1.4 PIN Mux Table Control Register #4 (sft cfg 4)
Address: 0x9C000090
Reset:0x0
| Field Name | Bit | Access | Description |
| Mask Bits | 31:16 | RW | Write valid bit for each LSB 16 bits The 16 bits map to corresponding LSB 16bits. Write 1 to valid the corresponding bit writing |
| Reserved | 15:7 | RW | RESERVED |
| SFT CFG LCDIF SEL | 6 | RW | LCD Interface Pin-Mux Column Selection Set 1 to select pin mux to this group of funcion |
| Reserved | 5:2 | RW | RESERVED |
| SFT CFG ARM926 JTAG SEL | 1:0 | RW | ARM926 JTAG Pin-Mux Column Selection Set 0~3 to select pin mux to this group of funcion |
1.5 Reserved (rsv)
Address: 0x9C000094
Reset:0x0
Field Name | Bit | Access | Description |
Reserved | 31:0 | RW | RESERVED |
1.6 Reserved (rsv)
Address: 0x9C000098
Reset:0x0
Field Name | Bit | Access | Description |
Reserved | 31:0 | RW | RESERVED |
1.7 Reserved (rsv)
Address: 0x9C00009C
Reset: 0x0
Field Name | Bit | Access | Description |
Reserved | 31:0 | RW | RESERVED |
1.7 Reserved (rsv)
Address: 0x9C00009C
Reset: 0x0
Field Name | Bit | Access | Description |
Reserved | 31:0 | RW | RESERVED |
1.8 Reserved (rsv)
Address: 0x9C0000A0
Reset:0x0
Field Name | Bit | Access | Description |
Reserved | 31:0 | RW | RESERVED |
1.9 Reserved (rsv)
Address: 0x9C0000A4
Reset:0x0
Field Name | Bit | Access | Description |
Reserved | 31:0 | RW | RESERVED |
1.10 Reserved (rsv)
Address: 0x9C0000A8
Reset:0x0
Field Name | Bit | Access | Description |
Reserved | 31:0 | RW | RESERVED |
1.11 Reserved (rsv)
Address: 0x9C0000AC
Reset: 0x0
Field Name | Bit | Access | Description |
Reserved | 31:0 | RW | RESERVED |
1.12 Reserved (rsv)
Address: 0x9C0000B0
Reset:0x0
Field Name | Bit | Access | Description |
Reserved | 31:0 | RW | RESERVED |
1.13 Reserved (rsv)
Address: 0x9C0000B4
Reset:0x0
Field Name | Bit | Access | Description |
Reserved | 31:0 | RW | RESERVED |
1.14 Reserved (rsv)
Address: 0x9C0000B8
Reset:0x0
Field Name | Bit | Access | Description |
Reserved | 31:0 | RW | RESERVED |
1.15 Reserved (rsv)
Address: 0x9C0000BC
Reset: 0x0
Field Name | Bit | Access | Description |
Reserved | 31:0 | RW | RESERVED |
1.16 Reserved (rsv)
Address: 0x9C0000C0
Reset: 0x0
Field Name | Bit | Access | Description |
Reserved | 31:0 | RW | RESERVED |
1.17 Reserved (rsv)
Address: 0x9C0000C4
Reset: 0x0
Field Name | Bit | Access | Description |
Reserved | 31:0 | RW | RESERVED |
1.18 Reserved (rsv)
Address: 0x9C0000C8
Reset:0x0
Field Name | Bit | Access | Description |
Reserved | 31:0 | RW | RESERVED |
1.19 Reserved (rsv)
Address: 0x9C0000CC
Reset: 0x0
Field Name | Bit | Access | Description |
Reserved | 31:0 | RW | RESERVED |
1.20 Reserved (rsv)
Address: 0x9C0000D0
Reset:0x0
Field Name | Bit | Access | Description |
Reserved | 31:0 | RW | RESERVED |
1.21 Reserved (rsv)
Address: 0x9C0000D4
Reset:0x0
Field Name | Bit | Access | Description |
Reserved | 31:0 | RW | RESERVED |
1.22 Reserved (rsv)
Address: 0x9C0000D8
Reset:0x0
Field Name | Bit | Access | Description |
Reserved | 31:0 | RW | RESERVED |
1.23 Reserved (rsv)
Address: 0x9C0000DC
Reset: 0x0
Field Name | Bit | Access | Description |
Reserved | 31:0 | RW | RESERVED |
1.24 Reserved (rsv)
Address: 0x9C0000E0
Reset: 0x0
Field Name | Bit | Access | Description |
Reserved | 31:0 | RW | RESERVED |
1.25 Reserved (rsv)
Address: 0x9C0000E4
Reset: 0x0
Field Name | Bit | Access | Description |
Reserved | 31:0 | RW | RESERVED |
1.26 Reserved (rsv)
Address: 0x9C0000E8
Reset: 0x0
Field Name | Bit | Access | Description |
Reserved | 31:0 | RW | RESERVED |
1.27 Reserved (rsv)
Address: 0x9C0000EC
Reset: 0x0
Field Name | Bit | Access | Description |
Reserved | 31:0 | RW | RESERVED |
1.28 Reserved (rsv)
Address: 0x9C0000F0
Reset: 0x0
Field Name | Bit | Access | Description |
Reserved | 31:0 | RW | RESERVED |
1.29 Reserved (rsv)
Address: 0x9C0000F4
Reset: 0x0
Field Name | Bit | Access | Description |
Reserved | 31:0 | RW | RESERVED |
1.30 Reserved (rsv)
Address: 0x9C0000F8
Reset: 0x0
Field Name | Bit | Access | Description |
Reserved | 31:0 | RW | RESERVED |
1.31 Reserved (rsv)
Address: 0x9C0000FC
Reset: 0x0
Field Name | Bit | Access | Description |
Reserved | 31:0 | RW | RESERVED |
RGST Table Group 2 MOON 2
2.0 PIN Mux Table Control Register for L2SW CLK & L2SW LED (sft cfg 0)
Address: 0x9C000100
Reset: 0x0
Field Name | Bit | Access | Description |
| Mask Bits | 31:16 | RW | Write valid bit for each LSB 16 bits The 16 bits map to corresponding LSB 16bits. Write 1 to valid the corresponding bit writing |
| reserved | 15 | RW | RESERVED |
| SFT CFG L2SW LED FLASH0 SEL | 14:8 | RW | L2SW LED FLASH0 Pin-Mux Column Selection |
| reserved | 7 | RW | RESERVED |
| SFT CFG L2SW CLK OUT SEL | 6:0 | RW | L2SW CLK OUT Pin-Mux Column Selection |
2.1 PIN Mux Table Control Register for L2SW LED & L2SW LED (sft cfg 1)
Address: 0x9C000104
Reset: 0x0
Field Name | Bit | Access | Description |
Mask Bits | 31:16 | RW | Write valid bit for each LSB 16 bits |
reserved | 15 | RW | RESERVED |
SFT CFG L2SW LED ON0 SEL | 14:8 | RW | Layer 2 Switch LED ON0 Pin-Mux Column Selection |
reserved | 7 | RW | RESERVED |
| SFT CFG L2SW LED FLASH1 SEL | 6:0 | RW | Layer 2 Switch LED FLASH1 Pin-Mux Column Selection |
2.2 PIN Mux Table Control Register for L2SW LED & L2SW MAC (sft cfg 2)
Address: 0x9C000108
Reset: 0x0
Field Name | Bit | Access | Description |
Mask Bits | 31:16 | RW | Write valid bit for each LSB 16 bits |
reserved | 15 | RW | RESERVED |
| SFT CFG L2SW MAC SMI MDIO SEL | 14:8 | RW | Layer 2 Switch MAC SMI MDIO Pin-Mux Column Selection |
reserved | 7 | RW | RESERVED |
SFT CFG L2SW LED ON1 SEL | 6:0 | RW | Layer 2 Switch LED ON1 Pin-Mux Column Selection |
2.3 PIN Mux Table Control Register for L2SW P0 & L2SW P0 (sft cfg 3)
Address: 0x9C00010C
Reset: 0x0
Field Name | Bit | Access | Description |
Mask Bits | 31:16 | RW | Write valid bit for each LSB 16 bits |
reserved | 15 | RW | RESERVED |
| SFT CFG L2SW P0 MAC RMII TXD 0 SEL | 14:8 | RW | Layer 2 Switch P0 MAC RMII TXD0 Pin-Mux Column Selection |
| reserved | 7 | RW | RESERVED |
| SFT CFG L2SW P0 MAC RMII TXEN SEL | 6:0 | RW | Layer 2 Switch P0 MAC RMII TXEN Pin-Mux Column Selection |
2.4 PIN Mux Table Control Register for L2SW P0 & L2SW P0 (sft cfg 4)
Address: 0x9C000110
Reset:0x0
Field Name | Bit | Access | Description |
Mask Bits | 31:16 | RW | Write valid bit for each LSB 16 bits |
reserved | 15 | RW | RESERVED |
| SFT CFG L2SW P0 MAC RMII CRSDV SEL | 14:8 | RW | Layer 2 Switch P0 MAC RMII CRSDV PinMux Column Selection |
| reserved | 7 | RW | RESERVED |
| SFT CFG L2SW P0 MAC RMII TXD1 SEL | 6:0 | RW | Layer 2 Switch P0 MAC RMII TXD1 Pin-Mux Column Selection |
2.5 PIN Mux Table Control Register for L2SW P0 & L2SW P0 (sft cfg 5)
Address: 0x9C000114
Reset: 0x0
Field Name | Bit | Access | Description |
Mask Bits | 31:16 | RW | Write valid bit for each LSB 16 bits |
reserved | 15 | RW | RESERVED |
| SFT CFG L2SW P0 MAC RMII RXD1 SEL | 14:8 | RW | Layer 2 Switch P0 MAC RMII RXD1 Pin-Mux Column Selection |
| reserved | 7 | RW | RESERVED |
| SFT CFG L2SW P0 MAC RMII RXD0 SEL | 6:0 | RW | Layer 2 Switch P0 MAC RMII RXD0 Pin-Mux Column Selection |
2.6 PIN Mux Table Control Register for L2SW P0 & L2SW P1 (sft cfg 6)
Address: 0x9C000118
Reset: 0x0
Field Name | Bit | Access | Description |
Mask Bits | 31:16 | RW | Write valid bit for each LSB 16 bits |
reserved | 15 | RW | RESERVED |
| SFT CFG L2SW P1 MAC RMII TXEN SEL | 14:8 | RW | Layer 2 Switch P1 MAC RMII TXEN Pin-Mux Column Selection |
| reserved | 7 | RW | RESERVED |
| SFT CFG L2SW P0 MAC RMII RXER SEL | 6:0 | Layer 2 Switch P0 MAC RMII RXER Pin-Mux Column Selection |
2.7 PIN Mux Table Control Register for L2SW P1 & L2SW P1 (sft cfg 7)
Address: 0x9C00011C
Reset: 0x0
Field Name | Bit | Access | Description |
Mask Bits | 31:16 | RW | Write valid bit for each LSB 16 bits |
reserved | 15 | RW | RESERVED |
| SFT CFG L2SW P1 MAC RMII TXD1 SEL | 14:8 | RW | Layer 2 Switch P1 MAC RMII TXD1 Pin-Mux Column Selection |
| reserved | 7 | RW | RESERVED |
| SFT CFG L2SW P1 MAC RMII TXD0 SEL | 6:0 | Layer 2 Switch P1 MAC RMII TXD0 Pin-Mux Column Selection |
2.8 PIN Mux Table Control Register for L2SW P1 & L2SW P1 (sft cfg 8)
Address: 0x9C000120
Reset: 0x0
Field Name | Bit | Access | Description |
Mask Bits | 31:16 | RW | Write valid bit for each LSB 16 bits |
reserved | 15 | RW | RESERVED |
| SFT CFG L2SW P1 MAC RMII RXD0 SEL | 14:8 | RW | Layer 2 Switch P1 MAC RMII RXD0 Pin-Mux Column Selection |
| reserved | 7 | RW | RESERVED |
| SFT CFG L2SW P1 MAC RMII CRSDV SEL | 6:0 | RW | Layer 2 Switch P1 MAC RMII CRSDV PinMux Column Selection |
2.9 PIN Mux Table Control Register for L2SW P1 & L2SW P1 (sft cfg 9)
Address: 0x9C000124
Reset:0x0
Field Name | Bit | Access | Description |
Mask Bits | 31:16 | RW | Write valid bit for each LSB 16 bits |
reserved | 15 | RW | RESERVED |
| SFT CFG L2SW P1 MAC RMII RXER SEL | 14:8 | RW | Layer 2 Switch P1 MAC RMII RXER PinMux Column Selection |
| reserved | 7 | RW | RESERVED |
| SFT CFG L2SW P1 MAC RMII RXD1 SEL | 6:0 | RW | Layer 2 Switch P1 MAC RMII RXD1 PinMux Column Selection |
2.10 PIN Mux Table Control Register for L2SW P1 & DAISY MODE (sft cfg 10)
Address: 0x9C000128
Reset: 0x0
Field Name | Bit | Access | Description |
| Mask Bits | 31:16 | RW | Write valid bit for each LSB 16 bits The 16 bits map to corresponding LSB 16bits. Write 1 to valid the corresponding bit writing |
| reserved | 15 | RW | RESERVED |
| SFT CFG SDIO CLK SEL | 14:8 | RW | SDIO CLK Pin-Mux Column Selection |
| reserved | 7 | RW | RESERVED |
| SFT CFG DAISY MODE SEL | 6:0 | RW | DAISY MODE Pin-Mux Column Selection |
2.11 PIN Mux Table Control Register for SDIO CLK & SDIO CMD (sft cfg 11)
Address: 0x9C00012C
Reset: 0x0
Field Name | Bit | Access | Description |
| Mask Bits | 31:16 | RW | Write valid bit for each LSB 16 bits The 16 bits map to corresponding LSB 16bits. Write 1 to valid the corresponding bit writing |
| reserved | 15 | RW | RESERVED |
| SFT CFG SDIO CMD SEL | 14:8 | RW | SDIO CMD Pin-Mux Column Selection |
| reserved | 7 | RW | RESERVED |
| SFT CFG SDIO CLK SEL | 6:0 | RW | SDIO CLK Pin-Mux Column Selection |
2.12 PIN Mux Table Control Register for SDIO D0 & SDIO D1 (sft cfg 12)
Address: 0x9C000130
Reset: 0x0
Field Name | Bit | Access | Description |
| Mask Bits | 31:16 | RW | Write valid bit for each LSB 16 bits The 16 bits map to corresponding LSB 16bits. Write 1 to valid the corresponding bit writing |
| reserved | 15 | RW | RESERVED |
| SFT CFG SDIO D1 SEL | 14:8 | RW | SDIO D1 Pin-Mux Column Selection |
| reserved | 7 | RW | RESERVED |
| SFT CFG SDIO D0 SEL | 6:0 | RW | SDIO D0 Pin-Mux Column Selection |
2.13 PIN Mux Table Control Register for SDIO D2 & SDIO D3 (sft cfg 13)
Address: 0x9C000134
Reset: 0x0
Field Name | Bit | Access | Description |
| Mask Bits | 31:16 | RW | Write valid bit for each LSB 16 bits The 16 bits map to corresponding LSB 16bits. Write 1 to valid the corresponding bit writing |
| reserved | 15 | RW | RESERVED |
| SFT CFG SDIO D3 SEL | 14:8 | RW | SDIO D3 Pin-Mux Column Selection |
| reserved | 7 | RW | RESERVED |
| SFT CFG SDIO D2 SEL | 6:0 | RW | SDIO D2 Pin-Mux Column Selection |
2.14 PIN Mux Table Control Register for PWM0 & PWM1 (sft cfg 14)
Address: 0x9C000138
Reset:0x0
Field Name | Bit | Access | Description |
| Mask Bits | 31:16 | RW | Write valid bit for each LSB 16 bits The 16 bits map to corresponding LSB 16bits. Write 1 to valid the corresponding bit writing |
| reserved | 15 | RW | RESERVED |
| SFT CFG PWM1 | 14:8 | RW | PWM1 Pin-Mux Column Selection |
| reserved | 7 | RW | RESERVED |
| SFT CFG PWM0 | 6:0 | RW | PWM0 Pin-Mux Column Selection |
2.15 PIN Mux Table Control Register for PWM2 & PWM3 (sft cfg 15)
Address: 0x9C00013C
Reset: 0x0
Field Name | Bit | Access | Description |
Mask Bits | 31:16 | RW | Write valid bit for each LSB 16 bits |
reserved | 15 | RW | RESERVED |
SFT CFG PWM3 SEL | 14:8 | RW | PWM3 Pin-Mux Column Selection |
reserved | 7 | RW | RESERVED |
SFT CFG PWM2 SEL | 6:0 | RW | PWM2 Pin-Mux Column Selection |
2.16 PIN Mux Table Control Register for PWM4 & PWM5 (sft cfg 16)
Address: 0x9C000140
Reset: 0x0
Field Name | Bit | Access | Description |
Mask Bits | 31:16 | RW | Write valid bit for each LSB 16 bits |
reserved | 15 | RW | RESERVED |
SFT CFG PWM5 SEL | 14:8 | RW | PWM5 Pin-Mux Column Selection |
reserved | 7 | RW | RESERVED |
SFT CFG PWM4 SEL | 6:0 | RW | PWM4 Pin-Mux Column Selection |
2.17 PIN Mux Table Control Register for PWM6 & PWM7 (sft cfg 17)
Address: 0x9C000144
Reset: 0x0
Field Name | Bit | Access | Description |
Mask Bits | 31:16 | RW | Write valid bit for each LSB 16 bits |
reserved | 15 | RW | RESERVED |
SFT CFG PWM7 SEL | 14:8 | RW | PWM7 Pin-Mux Column Selection |
reserved | 7 | RW | RESERVED |
SFT CFG PWM6 SEL | 6:0 | RW | PWM6 Pin-Mux Column Selection |
2.18 PIN Mux Table Control Register for ICM0 D & ICM1 D (sft cfg 18)
Address: 0x9C000148
Reset: 0x0
Field Name | Bit | Access | Description |
Mask Bits | 31:16 | RW | Write valid bit for each LSB 16 bits |
reserved | 15 | RW | RESERVED |
SFT CFG ICM1 | 14:8 | RW | ICM1 D Pin-Mux Column Selection |
reserved | 7 | RW | RESERVED |
SFT CFG ICM0 | 6:0 | RW | ICM0 D Pin-Mux Column Selection |
2.19 PIN Mux Table Control Register for ICM2 D & ICM3 D (sft cfg 19)
Address: 0x9C00014C
Reset: 0x0
Field Name | Bit | Access | Description |
Mask Bits | 31:16 | RW | Write valid bit for each LSB 16 bits |
reserved | 15 | RW | RESERVED |
SFT CFG ICM3 | 14:8 | RW | ICM3 D Pin-Mux Column Selection |
reserved | 7 | RW | RESERVED |
SFT CFG ICM2 | 6:0 | RW | ICM2 D Pin-Mux Column Selection |
2.20 PIN Mux Table Control Register for ICM0 CLK & ICM1 CLK (sft cfg 20)
Address: 0x9C000150
Reset: 0x0
Field Name | Bit | Access | Description |
Mask Bits | 31:16 | RW | Write valid bit for each LSB 16 bits |
reserved | 15 | RW | RRESERVED |
SFT CFG ICM1 CLK SEL | 14:8 | RW | ICM1 CLK Pin-Mux Column Selection |
reserved | 7 | RW | RESERVED |
SFT CFG ICM0 CLK SEL | 6:0 | RW | ICM0 CLK Pin-Mux Column Selection |
2.21 PIN Mux Table Control Register for ICM2 CLK & ICM3 CLK (sft cfg 21)
Address: 0x9C000154
Reset: 0x0
Field Name | Bit | Access | Description |
Mask Bits | 31:16 | RW | Write valid bit for each LSB 16 bits |
reserved | 15 | RW | RESERVED |
SFT CFG ICM3 CLK SEL | 14:8 | RW | ICM3 CLK Pin-Mux Column Selection |
reserved | 7 | RW | RESERVED |
SFT CFG ICM2 CLK SEL | 6:0 | RW | ICM2 CLK Pin-Mux Column Selection |
2.22 PIN Mux Table Control Register for SPIM0 INT & SPIM0 CLK (sft cfg22)
Address:0x9C000158
Reset:0x0
Field Name | Bit | Access | Description |
Mask Bits | 31:16 | RW | Write valid bit for each LSB 16 bits |
reserved | 15 | RW | RESERVED |
SFT CFG SPIM0 CLK SEL | 14:8 | RW | SPIM0 CLK Pin-Mux Column Selection |
reserved | 7 | RW | RESERVED |
SFT CFG SPIM0 INT SEL | 6:0 | RW | SPIM0 INT Pin-Mux Column Selection |
2.23 PIN Mux Table Control Register for SPIM0 EN & SPIM0 DO (sft cfg 23)
Address: 0x9C00015C
Reset: 0x0
Field Name | Bit | Access | Description |
Mask Bits | 31:16 | RW | Write valid bit for each LSB 16 bits |
reserved | 15 | RW | RESERVED |
SFT CFG SPIM0 D0 SEL | 14:8 | RW | SPIM0 D0 Pin-Mux Column Selection |
reserved | 7 | RW | RESERVED |
SFT CFG SPIM0 EN SEL | 6:0 | RW | SPIM0 EN Pin-Mux Column Selection |
2.24 PIN Mux Table Control Register for SPIM0 DI & SPIM1 INT (sft cfg 24)
Address: 0x9C000160
Reset: 0x0
Field Name | Bit | Access | Description |
Mask Bits | 31:16 | RW | Write valid bit for each LSB 16 bits |
reserved | 15 | RW | RESERVED |
SFT CFG SPIM0 INT SEL | 14:8 | RW | SPIM0 INT Pin-Mux Column Selection |
reserved | 7 | RW | RESERVED |
SFT CFG SPIM0 DI SEL | 6:0 | RW | SPIM0 DI Pin-Mux Column Selection |
2.25 PIN Mux Table Control Register for SPIM1 CLK & SPIM1 CEN (sft cfg25)
Address: 0x9C000164
Reset: 0x0
Field Name | Bit | Access | Description |
Mask Bits | 31:16 | RW | Write valid bit for each LSB 16 bits |
reserved | 15 | RW | RESERVED |
SFT CFG SPIM0 CEN SEL | 14:8 | RW | SPIM0 CEN Pin-Mux Column Selection |
reserved | 7 | RW | RESERVED |
SFT CFG SPIM0 CLK SEL | 6:0 | RW | SPIM0 CLK Pin-Mux Column Selection |
2.26PIN Mux Table Control Register for SPIM1 DO & SPIM1 DI (sft cfg 26)
Address: 0x9C000168
Reset: 0x0
Field Name | Bit | Access | Description |
Mask Bits | 31:16 | RW | Write valid bit for each LSB 16 bits |
reserved | 15 | RW | RESERVED |
SFT CFG SPIM1 DI SEL | 14:8 | RW | SPIM1 DI Pin-Mux Column Selection |
reserved | 7 | RW | RESERVED |
SFT CFG SPIM1 DO SEL | 6:0 | RW | SPIM1 DO Pin-Mux Column Selection |
2.27 PIN Mux Table Control Register for SPIM2 INT & SPIM2 CLK (sft cfg27)
Address: 0x9C00016C
Reset: 0x0
Field Name | Bit | Access | Description |
Mask Bits | 31:16 | RW | Write valid bit for each LSB 16 bits |
reserved | 15 | RW | RESERVED |
SFT CFG SPIM2 CLK SEL | 14:8 | RW | SPIM2 CLK Pin-Mux Column Selection |
reserved | 7 | RW | RESERVED |
SFT CFG SPIM2 INT SEL | 6:0 | RW | SPIM2 INT Pin-Mux Column Selection |
2.28 PIN Mux Table Control Register for SPIM2 CEN & SPIM2 DO (sft cfg28)
Address: 0x9C000170
Reset: 0x0
Field Name | Bit | Access | Description |
Mask Bits | 31:16 | RW | Write valid bit for each LSB 16 bits |
reserved | 15 | RW | RESERVED |
SFT CFG SPIM2 DO SEL | 14:8 | RW | SPIM2 DO Pin-Mux Column Selection |
reserved | 7 | RW | RESERVED |
SFT CFG SPIM2 CEN SEL | 6:0 | RW | SPIM2 CEN Pin-Mux Column Selection |
2.29 PIN Mux Table Control Register for SPIM2 DI & SPIM3 INT (sft cfg 29)
Address: 0x9C000174
Reset: 0x0
Field Name | Bit | Access | Description |
Mask Bits | 31:16 | RW | Write valid bit for each LSB 16 bits |
reserved | 15 | RW | RESERVED |
SFT CFG SPIM3 INT SEL | 14:8 | RW | SPIM3 INT Pin-Mux Column Selection |
reserved | 7 | RW | RESERVED |
SFT CFG SPIM2 DI SEL | 6:0 | RW | SPIM2 DI Pin-Mux Column Selection |
2.30 PIN Mux Table Control Register for SPIM3 CLK & SPIM3 CEN (sft cfg30)
Address: 0x9C000178
Reset: 0x0
Field Name | Bit | Access | Description |
Mask Bits | 31:16 | RW | Write valid bit for each LSB 16 bits |
reserved | 15 | RW | RESERVED |
SFT CFG SPIM3 CEN SEL | 14:8 | RW | SPIM3 CEN Pin-Mux Column Selection |
reserved | 7 | RW | RESERVED |
SFT CFG SPIM3 CLK SEL | 6:0 | RW | SPIM3 CLK Pin-Mux Column Selection |
2.31 PIN Mux Table Control Register for SPIM3 DO & SPIM3 DI (sft cfg 31)
Address: 0x9C00017C
Reset: 0x0
Field Name | Bit | Access | Description |
Mask Bits | 31:16 | RW | Write valid bit for each LSB 16 bits |
reserved | 15 | RW | RESERVED |
SFT CFG SPIM3 DI SEL | 14:8 | RW | SPIM3 DI Pin-Mux Column Selection |
reserved | 7 | RW | RESERVED |
SFT CFG SPIM3 DO SEL | 6:0 | RW | SPIM3 DO Pin-Mux Column Selection |
RGST Table Group 3 MOON 3
3.0 PIN Mux Table Control Register for SPI0S INT & SPI0S CLK (sft cfg 32)
Address: 0x9C000180
Reset: 0x0
Field Name | Bit | Access | Description |
Mask Bits | 31:16 | RW | Write valid bit for each LSB 16 bits |
reserved | 15 | RW | RESERVED |
SFT CFG SPI0S CLK SEL | 14:8 | RW | SPI0S CLK Pin-Mux Column Selection |
reserved | 7 | RW | RESERVED |
SFT CFG SPI0S INT SEL | 6:0 | RW | SPI0S INT Pin-Mux Column Selection |
3.1 PIN Mux Table Control Register for SPI0S EN & SPI0S DO (sft cfg 33)
Address: 0x9C000184
Reset: 0x0
Field Name | Bit | Access | Description |
Mask Bits | 31:16 | RW | Write valid bit for each LSB 16 bits |
reserved | 15 | RW | RESERVED |
SFT CFG SPI0S DO SEL | 14:8 | RW | SPI0S DO Pin-Mux Column Selection |
reserved | 7 | RW | RESERVED |
SFT CFG SPI0S EN SEL | 6:0 | RW | SPI0S EN Pin-Mux Column Selection |
3.2 PIN Mux Table Control Register for SPI0S DI & SPI1S INT (sft cfg 34)
Address: 0x9C000188
Reset: 0x0
Field Name | Bit | Access | Description |
Mask Bits | 31:16 | RW | Write valid bit for each LSB 16 bits |
reserved | 15 | RW | RESERVED |
SFT CFG SPI1S INT SEL | 14:8 | RW | SPI1S INT Pin-Mux Column Selection |
reserved | 7 | RW | RESERVED |
SFT CFG SPI0S DI SEL | 6:0 | RW | SPI0S DI Pin-Mux Column Selection |
3.3 PIN Mux Table Control Register for SPI1S CLK & SPI1S EN (sft cfg 35)
Address: 0x9C00018C
Reset: 0x0
Field Name | Bit | Access | Description |
Mask Bits | 31:16 | RW | Write valid bit for each LSB 16 bits |
reserved | 15 | RW | RESERVED |
SFT CFG SPI1S EN SEL | 14:8 | RW | SPI1S EN Pin-Mux Column Selection |
reserved | 7 | RW | RESERVED |
SFT CFG SPI1S CLK SEL | 6:0 | RW | SPI1S CLK Pin-Mux Column Selection |
3.4 PIN Mux Table Control Register for SPI1S DO & SPI1S DI (sft cfg 36)
Address: 0x9C000190
Reset: 0x0
Field Name | Bit | Access | Description |
Mask Bits | 31:16 | RW | Write valid bit for each LSB 16 bits |
reserved | 15 | RW | RESERVED |
SFT CFG SPI1S DI SEL | 14:8 | RW | SPI1S DI Pin-Mux Column Selection |
reserved | 7 | RW | RESERVED |
SFT CFG SPI1S DO SEL | 6:0 | RW | SPI1S DO Pin-Mux Column Selection |
3.5 PIN Mux Table Control Register for SPI2S INT & SPI2S CLK (sft cfg 37)
Address: 0x9C000194
Reset: 0x0
Field Name | Bit | Access | Description |
Mask Bits | 31:16 | RW | Write valid bit for each LSB 16 bits |
reserved | 15 | RW | RESERVED |
SFT CFG SPI2S CLK SEL | 14:8 | RW | SPI2S CLK Pin-Mux Column Selection |
reserved | 7 | RW | RESERVED |
SFT CFG SPI2S INT SEL | 6:0 | RW | SPI2S INT Pin-Mux Column Selection |
3.6 PIN Mux Table Control Register for SPI2S EN & SPI2S DO (sft cfg 38)
Address: 0x9C000198
Reset: 0x0
Field Name | Bit | Access | Description |
Mask Bits | 31:16 | RW | Write valid bit for each LSB 16 bits |
reserved | 15 | RW | RESERVED |
SFT CFG SPI2S DO SEL | 14:8 | RW | SPI2S DO Pin-Mux Column Selection |
reserved | 7 | RW | RESERVED |
SFT CFG SPI2S EN SEL | 6:0 | RW | SPI2S EN Pin-Mux Column Selection |
3.7 PIN Mux Table Control Register for SPI2S DI & SPI3S INT (sft cfg 39)
Address: 0x9C00019C
Reset: 0x0
Field Name | Bit | Access | Description |
Mask Bits | 31:16 | RW | Write valid bit for each LSB 16 bits |
reserved | 15 | RW | RESERVED |
SFT CFG SPI3S INT SEL | 14:8 | RW | SPI3S INT Pin-Mux Column Selection |
reserved | 7 | RW | RESERVED |
SFT CFG SPI2S DI SEL | 6:0 | RW | SPI2S DI Pin-Mux Column Selection |
3.8 PIN Mux Table Control Register for SPI3S CLK & SPI3S EN (sft cfg 40)
Address: 0x9C0001A0
Reset: 0x0
Field Name | Bit | Access | Description |
Mask Bits | 31:16 | RW | Write valid bit for each LSB 16 bits |
reserved | 15 | RW | RESERVED |
SFT CFG SPI3S EN SEL | 14:8 | RW | SPI3S EN Pin-Mux Column Selection |
reserved | 7 | RW | RESERVED |
SFT CFG SPI3S CLK SEL | 6:0 | RW | SPI3S CLK Pin-Mux Column Selection |
3.9 PIN Mux Table Control Register for SPI3S DO & SPI3S DI (sft cfg 41)
Address: 0x9C0001A4
Reset: 0x0
Field Name | Bit | Access | Description |
Mask Bits | 31:16 | RW | Write valid bit for each LSB 16 bits |
reserved | 15 | RW | RESERVED |
SFT CFG SPI3S DI SEL | 14:8 | RW | SPI3S DI Pin-Mux Column Selection |
reserved | 7 | RW | RESERVED |
SFT CFG SPI3S DO SEL | 6:0 | RW | SPI3S DO Pin-Mux Column Selection |
3.10 PIN Mux Table Control Register for I2CM0 CK & I2CM0 DAT (sft cfg 42)
Address: 0x9C0001A8
Reset: 0x0
Field Name | Bit | Access | Description |
Mask Bits | 31:16 | RW | Write valid bit for each LSB 16 bits |
reserved | 15 | RW | RESERVED |
SFT CFG I2CM0 DAT SEL | 14:8 | RW | I2CM0 DAT Pin-Mux Column Selection |
reserved | 7 | RW | RESERVED |
SFT CFG I2CM0 CK SEL | 6:0 | RW | I2CM0 CK Pin-Mux Column Selection |
3.11 PIN Mux Table Control Register for I2CM1 CK & I2CM1 DAT (sft cfg 43)
Address: 0x9C0001AC
Reset: 0x0
Field Name | Bit | Access | Description |
Mask Bits | 31:16 | RW | Write valid bit for each LSB 16 bits |
reserved | 15 | RW | RESERVED |
SFT CFG I2CM1 DAT SEL | 14:8 | RW | I2CM1 DAT Pin-Mux Column Selection |
reserved | 7 | RW | RESERVED |
SFT CFG I2CM1 CK SEL | 6:0 | RW | I2CM1 CK Pin-Mux Column Selection |
3.12 PIN Mux Table Control Register for I2CM2 CK & I2CM2 D (sft cfg 44)
Address: 0x9C0001B0
Reset: 0x0
Field Name | Bit | Access | Description |
Mask Bits | 31:16 | RW | Write valid bit for each LSB 16 bits |
reserved | 15 | RW | RESERVED |
SFT CFG I2CM2 DAT SEL | 14:8 | RW | I2CM2 DAT Pin-Mux Column Selection |
reserved | 7 | RW | RESERVED |
SFT CFG I2CM2 CK SEL | 6:0 | RW | I2CM2 CK Pin-Mux Column Selection |
3.13 PIN Mux Table Control Register for I2CM3 CK & I2CM3 D (sft cfg 45)
Address: 0x9C0001B4
Reset: 0x0
Field Name | Bit | Access | Description |
Mask Bits | 31:16 | RW | Write valid bit for each LSB 16 bits |
reserved | 15 | RW | RESERVED |
SFT CFG I2CM3 DAT SEL | 14:8 | RW | I2CM3 DAT Pin-Mux Column Selection |
reserved | 7 | RW | RESERVED |
SFT CFG I2CM3 CK SEL | 6:0 | RW | I2CM3 CK Pin-Mux Column Selection |
3.14 PIN Mux Table Control Register for UA1 TX & UA1 RX (sft cfg 46)
Address: 0x9C0001B8
Reset: 0x0
Field Name | Bit | Access | Description |
Mask Bits | 31:16 | RW | Write valid bit for each LSB 16 bits |
reserved | 15 | RW | RESERVED |
SFT CFG UA1 RX SEL | 14:8 | RW | UA1 RX Pin-Mux Column Selection |
reserved | 7 | RW | RESERVED |
SFT CFG UA1 TX SEL | 6:0 | RW | UA1 TX Pin-Mux Column Selection |
3.15 PIN Mux Table Control Register for UA1 CTS & UA1 RTS (sft cfg 47)
Address: 0x9C0001BC
Reset: 0x0
Field Name | Bit | Access | Description |
Mask Bits | 31:16 | RW | Write valid bit for each LSB 16 bits |
reserved | 15 | RW | RESERVED |
SFT CFG UA1 RTS SEL | 14:8 | RW | UA1 RTS Pin-Mux Column Selection |
reserved | 7 | RW | RESERVED |
SFT CFG UA1 CTS SEL | 6:0 | RW | UA1 CTS Pin-Mux Column Selection |
3.16 PIN Mux Table Control Register for UA2 TX & UA2 RX (sft cfg 48)
Address: 0x9C0001C0
Reset: 0x0
Field Name | Bit | Access | Description |
Mask Bits | 31:16 | RW | Write valid bit for each LSB 16 bits |
reserved | 15 | RW | RESERVED |
SFT CFG UA2 RX SEL | 14:8 | RW | UA2 RX Pin-Mux Column Selection |
reserved | 7 | RW | RESERVED |
SFT CFG UA2 TX SEL | 6:0 | RW | UA2 TX Pin-Mux Column Selection |
3.17 PIN Mux Table Control Register for UA2 CTS & UA2 RTS (sft cfg 49)
Address: 0x9C0001C4
Reset: 0x0
Field Name | Bit | Access | Description |
Mask Bits | 31:16 | RW | Write valid bit for each LSB 16 bits |
reserved | 15 | RW | RESERVED |
SFT CFG UA2 RTS SEL | 14:8 | RW | UA2 RTS Pin-Mux Column Selection |
reserved | 7 | RW | RESERVED |
SFT CFG UA2 CTS SEL | 6:0 | RW | UA2 CTS Pin-Mux Column Selection |
3.18 PIN Mux Table Control Register for UA3 TX & UA3 RX (sft cfg 50)
Address: 0x9C0001C8
Reset: 0x0
Field Name | Bit | Access | Description |
Mask Bits | 31:16 | RW | Write valid bit for each LSB 16 bits |
reserved | 15 | RW | RESERVED |
SFT CFG UA3 RX SEL | 14:8 | RW | UA3 RX Pin-Mux Column Selection |
reserved | 7 | RW | RESERVED |
SFT CFG UA3 TX SEL | 6:0 | RW | UA3 TX Pin-Mux Column Selection |
3.19 PIN Mux Table Control Register for UA3 CTS & UA3 RTS (sft cfg 51)
Address: 0x9C0001CC
Reset: 0x0
Field Name | Bit | Access | Description |
Mask Bits | 31:16 | RW | Write valid bit for each LSB 16 bits |
reserved | 15 | RW | RESERVED |
SFT CFG UA3 RTS SEL | 14:8 | RW | UA3 RTS Pin-Mux Column Selection |
reserved | 7 | RW | RESERVED |
SFT CFG UA3 CTS SEL | 6:0 | RW | UA3 CTS Pin-Mux Column Selection |
3.20 PIN Mux Table Control Register for UA4 TX & UA4 RX (sft cfg 52)
Address: 0x9C0001D0
Reset: 0x0
Field Name | Bit | Access | Description |
Mask Bits | 31:16 | RW | Write valid bit for each LSB 16 bits |
reserved | 15 | RW | RESERVED |
SFT CFG UA4 RX SEL | 14:8 | RW | UA4 RX Pin-Mux Column Selection |
reserved | 7 | RW | RESERVED |
SFT CFG UA4 TX SEL | 6:0 | RW | UA4 TX Pin-Mux Column Selection |
3.21 PIN Mux Table Control Register for UA4 CTS & UA4 RTS (sft cfg 53)
Address: 0x9C0001D4
Reset: 0x0
Field Name | Bit | Access | Description |
Mask Bits | 31:16 | RW | Write valid bit for each LSB 16 bits |
reserved | 15 | RW | RESERVED |
SFT CFG UA4 RTS SEL | 14:8 | RW | UA4 RTS Pin-Mux Column Selection |
reserved | 7 | RW | RESERVED |
SFT CFG UA4 CTS SEL | 6:0 | RW | UA4 CTS Pin-Mux Column Selection |
3.22 PIN Mux Table Control Register for TIMER0 INT & TIMER1 INT (sft cfg54)
Address: 0x9C0001D8
Reset: 0x0
Field Name | Bit | Access | Description |
Mask Bits | 31:16 | RW | Write valid bit for each LSB 16 bits |
reserved | 15 | RW | RESERVED |
SFT CFG TIMER1 INT SEL | 14:8 | RW | TIMER1 INT Pin-Mux Column Selection |
reserved | 7 | RW | RESERVED |
SFT CFG TIMER0 INT SEL | 6:0 | RW | TIMER0 INT Pin-Mux Column Selection |
3.23 PIN Mux Table Control Register for TIMER2 INT & TIMER3 INT (sft cfg55)
Address: 0x9C0001DC
Reset: 0x0
Field Name | Bit | Access | Description |
Mask Bits | 31:16 | RW | Write valid bit for each LSB 16 bits |
reserved | 15 | RW | RESERVED |
SFT CFG TIMER3 INT SEL | 14:8 | RW | TIMER3 INT Pin-Mux Column Selection |
reserved | 7 | RW | RESERVED |
SFT CFG TIMER2 INT SEL | 6:0 | RW | TIMER2 INT Pin-Mux Column Selection |
3.24 PIN Mux Table Control Register for GPIO INT0 & GPIO INT1 (sft cfg56)
Address: 0x9C0001E0
Reset: 0x0
Field Name | Bit | Access | Description |
Mask Bits | 31:16 | RW | Write valid bit for each LSB 16 bits |
reserved | 15 | RW | RESERVED |
SFT CFG GPIO INT1 SEL | 14:8 | RW | GPIO INT1 Pin-Mux Column Selection |
reserved | 7 | RW | RESERVED |
SFT CFG GPIO INT0 SEL | 6:0 | RW | GPIO INT0 Pin-Mux Column Selection |
3.25 PIN Mux Table Control Register for GPIO INT2 & GPIO INT3 (sft cfg57)
Address: 0x9C0001E4
Reset: 0x0
Field Name | Bit | Access | Description |
Mask Bits | 31:16 | RW | Write valid bit for each LSB 16 bits |
reserved | 15 | RW | RESERVED |
SFT CFG GPIO INT3 SEL | 14:8 | RW | GPIO INT3 Pin-Mux Column Selection |
reserved | 7 | RW | RESERVED |
SFT CFG GPIO INT2 SEL | 6:0 | RW | GPIO INT2 Pin-Mux Column Selection |
3.26 PIN Mux Table Control Register for GPIO INT4 & GPIO INT5 (sft cfg58)
Address: 0x9C0001E8
Reset: 0x0
Field Name | Bit | Access | Description |
Mask Bits | 31:16 | RW | Write valid bit for each LSB 16 bits |
reserved | 15 | RW | RESERVED |
SFT CFG GPIO INT5 SEL | 14:8 | RW | GPIO INT5 Pin-Mux Column Selection |
reserved | 7 | RW | RESERVED |
SFT CFG GPIO INT4 SEL | 6:0 | RW | GPIO INT4 Pin-Mux Column Selection |
3.27 PIN Mux Table Control Register for GPIO INT6 & GPIO INT7 (sft cfg59)
Address: 0x9C0001EC
Reset: 0x0
Field Name | Bit | Access | Description |
Mask Bits | 31:16 | RW | Write valid bit for each LSB 16 bits |
reserved | 15 | RW | RESERVED |
SFT CFG GPIO INT7 SEL | 14:8 | RW | GPIO INT7 Pin-Mux Column Selection |
reserved | 7 | RW | RESERVED |
SFT CFG GPIO INT6 SEL | 6:0 | RW | GPIO INT6 Pin-Mux Column Selection |
3.28 Reserved (rsv)
Address: 0x9C0001F0
Reset: 0x0
Field Name | Bit | Access | Description |
| Reserved | 31:0 | RW | RESERVED |
3.29 Reserved (rsv)
Address: 0x9C0001F4
Reset: 0x0
Field Name | Bit | Access | Description |
Reserved | 31:0 | RW | RESERVED |
3.30 Reserved (rsv)
Address: 0x9C0001F8
Reset: 0x0
Field Name | Bit | Access | Description |
Reserved | 31:0 | RW | RESERVED |
3.31 Reserved (rsv)
Address: 0x9C0001FC
Reset: 0x0
Field Name | Bit | Access | Description |
Reserved | 31:0 | RW | RESERVED |
RGST Table Group 4 MOON4
4.0 SPDIF PLL Control Register #0 (mo4 pllsp ctl 0)
Address: 0x9C000200
Reset: 0x0000 BB49
Field Name | Bit | Access | Description |
| Mask bit | 31:16 | RW | Write valid bit for each LSB 16 bits The 16 bits map to corresponding LSB 16bits. Write 1 to valid the corresponding bit writing. |
| Reserved | 15 | RW | RESERVED |
| MO3 PLLSP ICPP | 15:12 | RW | PLLSPDIF PD Charge Pump Current 0x0: 2uA 0x1: 4uA (default) 0x2: 8uA 0x3: 12uA 0x4: 16uA 0x5: 20uA 0x6: 24uA 0x7: 29uA |
| Reserved | 11 | RW | RESERVED |
| MO3 PLLSP ICPF | 10:8 | RW | PLLSPDIF FD Charge Pump Current 0x0: 2uA 0x1: 4uA (default) 0x2: 8uA 0x3: 12uA 0x4: 16uA 0x5: 20uA 0x6: 24uA 0x7: 29uA |
| MO3 PLLSP FBDIV | 7:4 | RW | PLLSPDIF Feedback Divider SRC_SEL_SP=0(SPDIFIN) 0x0: div6 0x1: div8 0x2: div12 0x3: div16 0x4: div24 (default) 0x5: div32 0x6: div36 0x7: div48 0x8: div64 0x9: div72 0xA: div96 Others: div4 SRC_SEL_SP=1(ADCBCKIN) 0x0: div12 0x1: div16 0x2: div24 0x3: div32 0x4: div48 (default) 0x5: div64 0x6: div72 0x7: div96 0x8: div128 0x9: div144 0xA: div192 Others: div8 |
| MO3 PLLSP CTL FROM DSP | 3 | RW | PLLSPDIF Control Source From Audio-DSP |
| MO3 PLLSP BP | 2 | RW | PLLSPDIF Bypass Mode Enable |
| MO3 PLLSP BANK | 1:0 | RW | PLLSPDIF VCO Bank Selection |
4.1 SPDIF PLL Control Register #1 (mo4 pllsp ctl 1)
Address: 0x9C000204
Reset: 0x0000 A14B
Field Name | Bit | Access | Description |
| Mask bit | 31:16 | RW | Write valid bit for each LSB 16 bits The 16 bits map to corresponding LSB 16bits. Write 1 to valid the corresponding bit writing. |
| MO3 PLLSP LOCKDETEN | 15 | RW | PLLSPDIF Lock Detector Enable |
| MO3 PLLSP FBDIVEN | 14 | RW | PLLSPDIF FBDIV Enable |
| MO3 PLLSP LRCYCLE | 13:12 | RW | PLLSPDIF I2S Format |
| MO3 PLLSP DIS FD2 MODE | 11 | RW | PLLSPDIF Disable FD2 Mode 0: FD2 disabled by PD_N only 1: FD2 disabled by PD_N and FLD2_OUT |
| MO3 PLLSP SR | 10:8 | RW | PLLSPDIF Sampling Rate 0x0: 32K 0x1: 48K 0x2: 96K 0x3: 192K 0x4: 44.1K 0x5: 88.2K 0x6: 176.4K 0x7: 176.4K |
MO3 PLLSP DIS FD1 MODE | 7 | RW | PLLSPDIF Disable FD1 Mode 0: FD1 disabled by PD_N only 1: FD1 disabled by PD_N and FLD1_OUT |
MO3 PLLSP LTCLK PARX | 6:4 | RW | PLLSPDIF Divider Option Control |
MO3 PLLSP PULSEW | 3:0 | RW | PLLSPDIF Pulse Width of Pulse Generator 0x0~7: Bypass Pulse Gen 0x8: 0.72ns 0x9: 1.83ns 0xA: 3.48ns 0xB: 5.1ns 0xC: 6.78ns 0xD: 8.43ns 0xE: 10.08ns 0xF: 11.43ns |
4.2 SPDIF PLL Control Register #2 (mo4 pllsp ctl 2)
Address: 0x9C000208
Reset: 0x0000 9206
Field Name | Bit | Access | Description |
| Mask bit | 31:16 | RW | Write valid bit for each LSB 16 bits The 16 bits map to corresponding LSB 16bits. Write 1 to valid the corresponding bit writing. |
| MO3 PLLSP FLD1 PARAM | 15:0 | RW | PLLSPDIF Frequency Lock Detector 1 Parameter |
4.3 SPDIF PLL Control Register #3 (mo4 pllsp ctl 3)
Address: 0x9C00020C
Reset: 0x0000 9206
Field Name | Bit | Access | Description |
| Mask bit | 31:16 | RW | Write valid bit for each LSB 16 bits The 16 bits map to corresponding LSB 16bits. Write 1 to valid the corresponding bit writing. |
| MO3 PLLSP FLD2 PARAM | 15:0 | RW | PLLSPDIF Frequency Lock Detector 2 Parameter |
4.4 SPDIF PLL Control Register #4 (mo4 pllsp ctl 4)
Address: 0x9C000210
Reset: 0x0000 9E47
Field Name | Bit | Access | Description |
| Mask bit | 31:16 | RW | Write valid bit for each LSB 16 bits The 16 bits map to corresponding LSB 16bits. Write 1 to valid the corresponding bit writing. |
| MO3 PLLSP PFLD PARAM | 15:0 | RW | PLLSPDIF Phase-Frequency Lock Detector Parameter |
4.5 SPDIF PLL Control Register #5 (mo4 pllsp ctl 5)
Address: 0x9C000214
Reset: 0x0000 9106
Field Name | Bit | Access | Description |
| Mask bit | 31:16 | RW | Write valid bit for each LSB 16 bits The 16 bits map to corresponding LSB 16bits. Write 1 to valid the corresponding bit writing. |
| MO3 PLLSP PLD PARAM | 15:0 | RW | PLLSPDIF Phase Lock Detector Parameter |
4.6 SPDIF PLL Control Register #6 (mo4 pllsp ctl 6)
Address: 0x9C000218
Reset: 0x0
Field Name | Bit | Access | Description |
| Mask bit | 31:16 | RW | Write valid bit for each LSB 16 bits The 16 bits map to corresponding LSB 16bits. Write 1 to valid the corresponding bit writing. |
| Reserved | 15:11 | RW | RESERVED |
| MO3 PLLSP SLOW EN | 10 | RW | Enable for all exceptional zero type SPDIF data 0: Disable all zero mode (default) 1: Enable all zero mode |
| MO3 PLLSP SRC SEL | 9 | RW | PLLSPDIF Input Source Selection 0: SPDIFIN (default) 1: BCKIN |
| MO3 PLLSP PDN | 8 | RW | PLLSPDIF Power Down 0: Power down SPDIFPLL 1: Active SPDIFPLL |
| MO3 PLLSP RSV IN | 7:0 | RW | PLLSPDIF Reserved In |
4.7 PLLA Control Register #0 (mo4 plla ctl 0)
Address: 0x9C00021C
Reset: 0x0000 3022
Field Name | Bit | Access | Description |
Mask bit | 31:16 | RW | Write valid bit for each LSB 16 bits |
Reserved | 15 | RW | RESERVED |
MO PLLA FS EL | 14 | RW | PLLA Higher Corner Frequency Selection 0: Corner frequency is 0.1fs(default) 1: Corner frequency is 0.18fs |
MO PLLA IT SEL | 13 | RW | PLLA SDM Input Dithering 0: Dither off (default) 1: Dither on |
MO PLLA BP | 12 | RW | PLLA Bypass Mode 0: Normal function 1: Bypass PLLA clock output to reference source (default) |
MO PLLA PD N | 11 | RW | PLLA Power Down 0: Power down (default) 1: Power up |
MO PLLA DOUBLE SEL | 10 | RW | PLLA Double Frequency Selection 0: Normal function (default) 1: Enable double function |
MO PLLA RSV IN | 9:2 | RW | PLLA Resevred Bit |
MO PLLA CP SEL | 1:0 | RW | PLLA Cp in Loop Filter Option 0x0: 11pF 0x1: 17.2pF 0x2: 23.5pF 0x3: 29.8pF |
4.8 PLLA Control Register #1 (mo4 plla ctl 1)
Address: 0x9C000220
Reset: 0x6138 B022
Field Name | Bit | Access | Description |
| Mask bit | 31:16 | RW | Write valid bit for each LSB 16 bits The 16 bits map to corresponding LSB 16bits. Write 1 to valid the corresponding bit writing. |
| Reserved | 15 | RW | RESERVED |
| MO PLLA PH SEL | 14:11 | RW | Fractional part of Base Modulus (N is integer part of Base Modulus, x is the residue of fractional dividing modulus) 0x0: N.0x 0x1: N.1x 0x2: N.2x 0x3: N.3x 0x4: N.4x 0x5: N.5x 0x6: N.6x 0x7: N.7x 0x8: N.8x 0x9: (N-1).9x others: reserved |
MO PLLA FCKOUT DIV SEL | 10 | RW | PLLA Clock out divider for pinmux out |
| Reserved | 9 | RW | RESERVED |
MO PLLA CS SEL | 8:7 | RW | PLLA Cs in Loop Filter Option |
| Reserved | 6 | RW | RESERVED |
MO PLLA BANK | 5:4 | RW | PLLA Frequency Selection |
| Reserved | 3 | RW | RESERVED |
MO PLLA ICP | 2:0 | RW | PLLA Charge Pump Current Selection |
4.9 PLLA Control Register #2 (mo4 plla ctl 2)
Address:0x9C000224
Reset: 0x0000 04C8
Field Name | Bit | Access | Description |
| Mask bit | 31:16 | RW | Write valid bit for each LSB 16 bits The 16 bits map to corresponding LSB 16bits. Write 1 to valid the corresponding bit writing. |
| Reserved | 15 | RW | RESERVED |
MO PLLA PH STEP SEL | 14:13 | RW | Adjacent phase skip step selection control |
MO PLLA DIVR | 12:11 | RW | post divider control |
MO PLLA DIVM | 10:9 | RW | CKREF dividing selection of DIVM block |
| MO PLLA RS SEL | 8:7 | RW | PLLA Rs in Loop Filter Option Rs option of LPF 0x0: 4kOhm 0x1: 11kOhm (default) 0x2: 18kOhm 0x3: 25kOhm |
| MO PLLA MUXEL | 6 | RW | Double PFD selection to avoid from fault lock 0: force single PFD output to CHP 1: force double PFD output to CHP |
MO PLLA DIVN | 5:0 | RW | Integer N dividing modulus control ... 0x3D: /61 0x3E: /62 0x3F: /63 |
4.10 PLLA Control Register #3 (mo4 plla ctl 3)
Address: 0x9C000228
Reset: 0x0000 0402
Field Name | Bit | Access | Description |
Mask bit | 31:16 | RW | Write valid bit for each LSB 16 bits |
| Reserved | 15:11 | RW | RESERVED |
| MO PLLA K SDM | 10:0 | RW | SDM fractional part of fractional dividing modulus Value range is from 0˜2047. Referring to timing description section to use this register 0x000: 0 0x001: 1 0x002: 2 ... 0x1fe: 2046 0x1ff: 2047 |
4.11 PLLA Control Register #4 (mo4 plla ctl 4)
Address: 0x9C00022C
Reset: 0x0000 0402
Field Name | Bit | Access | Description |
| Mask bit | 31:16 | RW | Write valid bit for each LSB 16 bits The 16 bits map to corresponding LSB 16bits. Write 1 to valid the corresponding bit writing. |
| Reserved | 15:14 | RW | RESERVED |
| MO PLLA TEST | 13 | RW | PLLA Test mode control 0: Test mode disable 1: Test mode enable |
| MO PLLA SRDIV | 12:11 | RW | SR dividing modulus when test mode enable: For MCLK Testing 2'b00: FCKSR=FVCO6 2'b01: FCKSR=FVCO8 2'b10: FCKSR=FVCO3072 |
| MO PLLA M SDM | 10:0 | RW | SDM quantizer threshold, value range is from 0˜2047. Referring to timing description section to use this register 0x000: 0 0x001: 1 0x002: 2 ... 0x1fe: 2046 0x1ff: 2047 |
4.12 PLLE Control Register #1 (mo4 plle ctl)
Address: 0x9C000230
Reset: 0x6138 B022
Field Name | Bit | Access | Description |
| Mask bit | 31:16 | RW | Write valid bit for each LSB 16 bits The 16 bits map to corresponding LSB 16bits. Write 1 to valid the corresponding bit writing. |
| Reserved | 15 | RW | RESERVED |
| MO PLLE CLKOUT DIV | 14 | RW | PLL Clock output divider 0x0: PLL clock output 0x1: PLL clock div 2 output |
| MO PLLE EN FCK2P5M | 13 | RW | FCK2P5M clock enable 0x0: disalbe 0x1: enable |
| MO PLLE EN FCK25M | 12 | RW | FCK25M clock enable 0x0: disalbe 0x1: enable |
| MO PLLE EN FCK | 11 | RW | FCK112P5M clock enable 0x0: disalbe 0x1: enable |
| MO PLLE RSV IN | 10:7 | RW | PLLE Resevred Bit |
| MO PLLE PD N | 6 | RW | Power down signal 0x0: disable PLL (power down) 0x1: enable PLL |
| MO PLLE ICP | 5:3 | RW | ICP current selection of CHP block 0x0: ICP=5uA 0x1: ICP=10uA 0x2: ICP=15uA 0x3: ICP=20uA 0x4: ICP=25uA 0x6: ICP=35uA 0x7: ICP=40uA |
| MO PLLE BP | 2 | RW | Bypass mode enable BP=1, FCKOUT=CLK27 (Only can be enabled when PD N=1) |
| MO PLLE BANK | 1:0 | RW | PLLE frequency selection 0x0:2.338GHz/V 0x1:2.617GHz/V 0x2: 2.886GHz/V 0x3: 3.103GHz/V |
4.13 PLLF Control Register #0 (mo4 pllf ctl)
Address: 0x9C000234
Reset: 0x6138 B022
Field Name | Bit | Access | Description |
| Mask bit | 31:16 | RW | Write valid bit for each LSB 16 bits The 16 bits map to corresponding LSB 16bits. Write 1 to valid the corresponding bit writing. |
| Reserved | 15:12 | RW | RESERVED |
MO PLLF CLKOUT DIV | 11 | RW | PLL Clock output divider 1'b0: PLL clock output 1'b1: PLL clock div 2 output |
MO PLLF BP | 10 | RW | PLL Clock Bypass 1'b0:Normal mode 1'b1: Bypass mode |
MO PLLF G | 9:8 | RW | VCO Gain Curve control 2'b00: min gain 2'b01: and 2'b11: max gain |
MO PLLF ICP | 7:5 | RW | PLL Charge pump Current adjust 3'b000: 10uA 3'b001: 15uA 3'b010: 20uA 3'b011: 25uA 3'b100: 30uA 3'b101: 35uA 3'b110: 40uA 3'b111: 45uA |
MO PLLF NS | 4:1 | RW | SYSPLL Feedback divider control 4'b0011: 4 4'b0100: 5 4'b0110: 7 4'b0111: 8 4'b1000: 9 4'b1001: 10 4'b1011: 12 4'b1100: 13 4'b1101: 14 4'b1110: 15 Other: not use |
MO PLLF PD N | 0 | RW | PLL Power down control: 1'b0: power down mode 1'b1: normal mode |
4.14 PLLTV Control Register #0 (mo4 plltv ctl 0)
Address: 0x9C000238
Reset: 0x8044 9CC8
Field Name | Bit | Access | Description |
| Mask bit | 31:16 | RW | Write valid bit for each LSB 16 bits The 16 bits map to corresponding LSB 16bits. Write 1 to valid the corresponding bit writing. |
| MO PLLTV BP | 15 | RW | Bypass mode enable 0: For normal operation 1: FCKOUT TV= FCKOUT A TV =27MHz, (Only can be enabled when PD N TV=1) |
| MO PLLTV CAP SEL | 14 | RW | Loop filter CAP selection bit 0:For integer mode (normal) (Default) 1:For fractional mode (CAP large than normal) |
MO PLLTV MUX SEL | 13 | RW | Double PFD mux select 0: single-edge PFD output 1: double-edge PFD output for DOUBLE SEL=1 |
MO PLLTV NFRA | 12:6 | RW | Fraction part of fractional divider number |
MO PLLTV PH EN | 5 | RW | Test pin for power saving PH EN TV =0, Using power-saving scheme depending on SEL FRA TV & PH SEL TV PH EN TV =1, Forcing not using power saving. |
MO PLLTV PH SEL | 4 | RW | Phase Selection Mode Enable 0: Disable phase-selection mode 1:(Default) Enable phase-selection mode |
MO PLLTV RSTB SDM | 3 | RW | SDM reset pin (low active) |
MO PLLTV SDM MOD | 2 | RW | SDM Quantizer mod select 0: (Default) SDM with Quantizer of mod=91 (original) 1: SDM with Quantizer of mod=55 (modified) |
MO PLLTV SEL FRA | 1 | RW | Fractional Divider Selection 0: Select integer divider (Default) (For 297M , 148.5MHz and 74.25MHz) 1: Select fractional divider (For 296.703296M , 148.3516484MHz and 74.1758242MHz) |
MO PLLTV PD N | 0 | RW | Power down signal 0: disable PLL (power down) 1: enable PLL (Default) |
4.15 PLLTV Control Register #1 (mo4 plltv ctl 1)
Address: 0x9C00023C
Reset:0x001A 0200
Field Name | Bit | Access | Description |
| Mask bit | 31:16 | RW | Write valid bit for each LSB 16 bits The 16 bits map to corresponding LSB 16bits. Write 1 to valid the corresponding bit writing. |
| Reserved | 15 | RW | RESERVED |
| MO PLLTV FCKOUT DIV SEL | 14 | RW | FCKOUT clock divider for probing 0: FCKOUT divide 2 output 1: FCKOUT divide 4 output |
| MO PLLTV RSV IN | 13:10 | RW | Reserved pin |
MO PLLTV DIT SEL | 9 | RW | Dithering select bit 0: dithering disable 1: dithering enable |
MO PLLTV DIVR | 8:7 | RW | 00: FCKOUT =FVCO1 01: FCKOUT =FVCO2 10: FCKOUT =FVCO4 11: FCKOUT =FVCO8 |
MO PLLTV DOULE SEL | 6 | RW | Double sampling select 0: Double sampling off 1: Double sampling on, FVCO doubles |
MO PLLTV FCKOUT A SEL | 5 | RW | FCKOUT A Select TV 0: FCKOUT A TV = FCKOUT TV (Default) 1: FCKOUT A TV = 1/2*FCKOUT TV |
MO PLLTV FS SEL | 4 | RW | PLLTV corner frequency select FS SEL TV =0 corner frequency of NTF is 0.1fs |
MO PLLTV ICP | 3:0 | RW | Charge Pump Current selection Normal mode (0,0,0,0) current = 10uA (0,0,0,1) current = 15uA (0,0,1,0) current = 20uA (0,0,1,1) current = 25uA (0,1,0,0) current = 30uA (Default) (0,1,0,1) current = 35uA (0,1,1,0) current = 40uA (0,1,1,1) current = 45uA Fractional mode (1,0,0,0) current = 1uA (1,0,0,1) current = 2uA (1,0,1,0) current = 3uA (1,0,1,1) current = 4uA (1,1,0,0) current = 5uA (1,1,0,1) current = 6uA (1,1,1,0) current = 7uA (1,1,1,1) current = 8uA |
4.16 PLLTV Control Register #2 (mo4 plltv ctl 2)
Address: 0x9C000240
Reset: 0x001A 0200
Field Name | Bit | Access | Description |
| Mask bit | 31:16 | RW | Write valid bit for each LSB 16 bits The 16 bits map to corresponding LSB 16bits. Write 1 to valid the corresponding bit writing. |
| Reserved | 15 | RW | RESERVED |
| MO PLLTV DIVM | 14:8 | RW | Reference divider counter number, get more information at Timing Description section |
| MO PLLTV DIVN | 7:0 | RW | VCO feedback divider counter number, get more information at Timing Description section |
4.17 USBC Control Register (mo4 usbc ctl)
Address: 0x9C000244
Reset: 0x0000 3030
Field Name | Bit | Access | Description |
| Mask bit | 31:16 | RW | Write valid bit for each LSB 16 bits The 16 bits map to corresponding LSB 16bits. Write 1 to valid the corresponding bit writing. |
| Reserved | 15 | RW | RESERVED |
| MO1 USBC1 USB0 TYPE | 14 | RW | USBC1 OTG Type Selection |
| MO1 USBC1 USB0 SEL | 13 | RW | USBC1 OTG Mode Selection |
| MO1 USBC1 USB0 CTRL | 12 | RW | USBC1 OTG Control Selection |
| MO1 USBC1 POWER MODE | 11 | RW | USBC1 Power Control |
| MO1 USBC1 POWER CONTROL | 10 | RW | USBC1 Power Control Selection |
| MO1 USBC1 NODRIVE | 9 | RW | USBC1 No-Drive Control |
| MO1 USBC1 CTRL DPDMPD | 8 | RW | USBC1 DP/DM Poll-Down Control |
| Reserved | 7 | RW | RESERVED |
| MO1 USBC0 USB0 TYPE | 6 | RW | USBC0 OTG Type Selection |
| MO1 USBC0 USB0 SEL | 5 | RW | USBC0 OTG Mode Selection |
| MO1 USBC0 USB0 CTRL | 4 | RW | USBC0 OTG Control Selection |
| MO1 USBC0 POWER MODE | 3 | RW | USBC0 Power Control |
| MO1 USBC0 POWER CONTROL | 2 | RW | USBC0 Power Control Selection |
| MO1 USBC0 NODRIVE | 1 | RW | USBC0 No-Drive Control |
| MO1 USBC0 CTRL DPDMPD | 0 | RW | USBC0 DP/DM Poll-Down Control |
4.18 UPHY0 Control Register#0 (mo4 uphy0 ctl0)
Address: 0x9C000248
Reset: 0x0000 0002
Field Name | Bit | Access | Description |
| Mask bit | 31:16 | RW | Write valid bit for each LSB 16 bits The 16 bits map to corresponding LSB 16bits. Write 1 to valid the corresponding bit writing. |
| MO1 UPHY0 DPN | 15:12 | RW | UPHY0 FS DP Falling Time Control Option |
| MO1 UPHY0 R TRIM | 11:10 | RW | UPHY0 R TRIM Control |
| MO1 UPHY0 SLUMBER | 9 | RW | UPHY0 Slumber Power Down Mode During UTMI Suspend |
| MO1 UPHY0 PARTIAL | 8 | RW | UPHY0 Partial Power Down Mode During UTMI Suspend |
| MO1 UPHY0 SIM MODE | 7 | RW | UPHY0 Simulation Mode |
| MO1 UPHY0 ID | 6:0 | RW | UPHY0 I2C Slave Address |
4.19 UPHY0 Control Register#1 (mo4 uphy0 ctl1)
Address: 0x9C00024C
Reset: 0x0000 8000
Field Name | Bit | Access | Description |
| Mask bit | 31:16 | RW | Write valid bit for each LSB 16 bits The 16 bits map to corresponding LSB 16bits. Write 1 to valid the corresponding bit writing. |
| MO1 UPHY0 EN INR | 15 | RW | UPHY0 EN IER Control UPHY Internal Rext function enable 0: Disable 1: Enable(default) |
| MO1 UPHY0 IPX | 14:12 | RW | UPHY0 Charge Pump Current Option |
MO1 UPHY0 DMP | 11:8 | RW | UPHY0 FS DM Raising Time Control Option |
MO1 UPHY0 DMN | 7:4 | RW | UPHY0 FS DM Falling Time Control Option |
MO1 UPHY0 DPP | 3:0 | RW | UPHY0 FS DP Raising Time Control Option |
4.20 UPHY0 Control Register #2 (mo4 uphy0 ctl 2)
Address: 0x9C000250
Reset: 0x0000 0404
Field Name | Bit | Access | Description |
| Mask bit | 31:16 | RW | Write valid bit for each LSB 16 bits The 16 bits map to corresponding LSB 16bits. Write 1 to valid the corresponding bit writing. |
| Reserved | 15:14 | RW | RESERVED |
| MO1 UPHY0 R | 13:8 | RW | UPHY0 Internal REXT Triming Option 0x0: 11905.22k / 0x1: 11673.43k / 0x2: 11485.60k / 0x3: 11325.87k 0x4: 11190.12k / 0x5: 11073.39k / 0x6: 10973.50k / 0x7: 10884.52k 0x8: 10681.99k / 0x9: 10239.76k / 0xA: 10052.23k / 0xB: 9892.74k 0xC: 9760.28k / 0xD: 9643.51k / 0xE: 9543.58k / 0xF: 9454.56k 0x10: 9249.83k / 0x11: 9192.83k / 0x12: 9141.88k / 0x13: 9094.90k 0x14: 9052.52k / 0x15: 9013.11k / 0x16: 8977.30k / 0x17: 8943.79k 0x18: 8865.09k / 0x19: 8839.56k / 0x1A: 8815.94k / 0x1B: 8793.55k 0x1C: 8772.59k / 0x1D: 8752.79k / 0x1E: 8734.34k / 0x1F: 8716.72k 0x20: 15084.14k / 0x21: 14930.75k / 0x22: 14789.59k / 0x23: 14658.46k 0x24: 14539.10k / 0x25: 14425.54k / 0x26: 14319.87k / 0x27: 14220.72k 0x28: 14134.50k / 0x29: 14046.75k / 0x2A: 13964.43k / 0x2B: 13886.58k 0x2C: 13814.61k / 0x2D: 13744.99k / 0x2E: 13679.24k / 0x2F: 13525.36k 0x30: 13373.16k / 0x31: 13219.73k / 0x32: 13078.52k / 0x33: 12947.35k 0x34: 12827.95k / 0x35: 12714.36k / 0x36: 12608.66k / 0x37: 12509.47k 0x38: 12423.22k / 0x39: 12335.44k / 0x3A: 12253.09k / 0x3B: 12175.22k 0x3C: 12103.23k / 0x3D: 12033.58k / 0x3E: 11967.81k / 0x3F: 11905.22k |
| MO1 UPHY0 DIG DPDM INV | 7 | RW | UPHY0 DIG DPDM Control Signal |
| MO1 UPHY0 RX CLK SEL | 6 | RW | UPHY0 Select Clock Edge Control Signal from AFE to EFE Interface |
| MO1 UPHY0 TX CLK SEL | 5 | RW | UPHY0 Select Clock Edge Control Signal from DFE to AFE Interface |
| MO1 UPHY0 DPDM MON REG EN | 4 | RW | UPHY0 Enable DPM Monitor |
| MO1 UPHY0 GATED CLK OFF | UPHY0 Gated Clock Disable UPHY gated clock disable 0: Enable gated clock(default) 1: Disable gated clock | ||
| MO1 UTMI0 P EDGE | 2 | RW | UPHY0 UTMI Edge Control Signal |
| MO1 UPHY0 DPDM MON REG | 1:0 | RW | UPHY0 DP/DM State Used by DP/DM monitor |
4.21 UPHY0 Control Register #3 (mo4 uphy0 ctl 3)
Address: 0x9C000254
Reset: 0x0
Field Name | Bit | Access | Description |
| Mask bit | 31:16 | RW | Write valid bit for each LSB 16 bits The 16 bits map to corresponding LSB 16bits. Write 1 to valid the corresponding bit writing. |
| Reserved | 15 | RW | RESERVED |
| MO1 UPHY0 AC | 14:12 | RW | Charge current operation 0x0: 1.1691mA 0x1: 1.2089mA 0x2: 1.2586mA 0x3: 1.3031mA 0x4: 1.3684mA(default) 0x5: 1.4181mA 0x6: 1.4779mA 0x7: 1.5268mA |
| MO1 UPHY0 ACB | 11:9 | RW | Discharge current operation 0x0: 1.1167mA 0x1: 1.2089mA 0x2: 1.4542mA 0x3: 1.5021mA 0x4: 1.3684mA(default) 0x5: 1.7116mA 0x6: 1.8235mA 0x7: 1.5268mA |
| MO1 UPHY0 R SEL | 8 | RW | UPHY0 internal REXT trimming control source selection 0: select source from OTP (default) 1: select source from MO1_UPHY0_R |
| MO1 UPHY0 PLL POWER OFF SEL | 7 | RW | UPHY0 PLL Power Down Source Selection |
| Reserved | 6:4 | RW | RESERVED |
| MO1 UPHY0 PLL POWER OFF | 3 | RW | UPHY0 PLL Power Down |
| Reserved | 2:0 | RW | RESERVED |
4.22 UPHY1 Control Register#0 (mo4 uphy1 ctl0)
Address: 0x9C000258
Reset: 0x0000 0002
Field Name | Bit | Access | Description |
| Mask bit | 31:16 | RW | Write valid bit for each LSB 16 bits The 16 bits map to corresponding LSB 16bits. Write 1 to valid the corresponding bit writing. |
| MO1 UPHY1 DPN | 15:12 | RW | UPHY1 FS DP Falling Time Control Option |
| MO1 UPHY1 R TRIM | 11:10 | RW | UPHY1 R TRIM Control |
| MO1 UPHY1 SLUMBER | 9 | RW | UPHY1 Slumber Power Down Mode During UTMI Suspend |
MO1 UPHY1 PARTIAL | 8 | RW | UPHY1 Partial Power Down Mode During UTMI Suspend |
MO1 UPHY1 SIM MODE | 7 | RW | UPHY1 Simulation Mode |
MO1 UPHY1 ID | 6:0 | RW | UPHY1 I2C Slave Address |
4.23 UPHY1 Control Register#1 (mo4 uphy1 ctl1)
Address: 0x9C00025C
Reset: 0x0000 8000
Field Name | Bit | Access | Description |
| Mask bit | 31:16 | RW | Write valid bit for each LSB 16 bits The 16 bits map to corresponding LSB 16bits. Write 1 to valid the corresponding bit writing. |
| MO1 UPHY1 EN INR | 15 | RW | UPHY1 EN IER Control UPHY Internal Rext function enable 0: Disable 1: Enable(default) |
| MO1 UPHY1 IPX | 14:12 | RW | UPHY1 Charge Pump Current Option |
| MO1 UPHY1 DMP | 11:8 | RW | UPHY1 FS DM Raising Time Control Option |
| MO1 UPHY1 DMN | 7:4 | RW | UPHY1 FS DM Falling Time Control Option |
| MO1 UPHY1 DPP | 3:0 | RW | UPHY1 FS DP Raising Time Control Option |
4.24 UPHY1 Control Register #2 (mo4 uphy1 ctl 2)
Address: 0x9C000260
Reset: 0x0000 0404
Field Name | Bit | Access | Description |
Mask bit | 31:16 | RW | Write valid bit for each LSB 16 bits |
Reserved | 15:14 | RW | RESERVED |
| MO1 UPHY1 R | 13:8 | RW | UPHY1 Internal REXT Triming Option 0x0: 11905.22k / 0x1: 11673.43k / 0x2: 11485.60k / 0x3: 11325.87k 0x4: 11190.12k / 0x5: 11073.39k / 0x6: 10973.50k / 0x7: 10884.52k 0x8: 10681.99k / 0x9: 10239.76k / 0xA: 10052.23k / 0xB: 9892.74k 0xC: 9760.28k / 0xD: 9643.51k / 0xE: 9543.58k / 0xF: 9454.56k 0x10: 9249.83k / 0x11: 9192.83k / 0x12: 9141.88k / 0x13: 9094.90k 0x14: 9052.52k / 0x15: 9013.11k / 0x16: 8977.30k / 0x17: 8943.79k 0x18: 8865.09k / 0x19: 8839.56k / 0x1A: 8815.94k / 0x1B: 8793.55k 0x1C: 8772.59k / 0x1D: 8752.79k / 0x1E: 8734.34k / 0x1F: 8716.72k 0x20: 15084.14k / 0x21: 14930.75k / 0x22: 14789.59k / 0x23: 14658.46k 0x24: 14539.10k / 0x25: 14425.54k / 0x26: 14319.87k / 0x27: 14220.72k 0x28: 14134.50k / 0x29: 14046.75k / 0x2A: 13964.43k / 0x2B: 13886.58k 0x2C: 13814.61k / 0x2D: 13744.99k / 0x2E: 13679.24k / 0x2F: 13525.36k 0x30: 13373.16k / 0x31: 13219.73k / 0x32: 13078.52k / 0x33: 12947.35k 0x34: 12827.95k / 0x35: 12714.36k / 0x36: 12608.66k / 0x37: 12509.47k 0x38: 12423.22k / 0x39: 12335.44k / 0x3A: 12253.09k / 0x3B: 12175.22k 0x3C: 12103.23k / 0x3D: 12033.58k / 0x3E: 11967.81k / 0x3F: 11905.22k |
| MO1 UPHY1 DIG DPDM INV | 7 | RW | UPHY1 DIG DPDM Control Signal |
| MO1 UPHY1 RX CLK SEL | 6 | RW | UPHY1 Select Clock Edge Control Signal from AFE to EFE Interface |
| MO1 UPHY1 TX CLK SEL | 5 | RW | UPHY1 Select Clock Edge Control Signal from DFE to AFE Interface |
| MO1 UPHY1 DPDM MON REG EN | 4 | RW | UPHY1 Enable DPM Monitor |
| MO1 UPHY1 GATED CLK OFF | 3 | RW | UPHY1 Gated Clock Disable UPHY gated clock disable 0: Enable gated clock(default) 1: Disable gated clock |
| MO1 UTMI1 P EDGE | 2 | RW | UPHY1 UTMI Edge Control Signal |
| MO1 UPHY1 DPDM MON REG | 1:0 | RW | UPHY1 DP/DM State Used by DP/DM monitor |
4.25 UPHY1 Control Register #3 (mo4 uphy1 ctl 3)
Address: 0x9C000264
Reset: 0x0
Field Name | Bit | Access | Description |
| Mask bit | 31:16 | RW | Write valid bit for each LSB 16 bits The 16 bits map to corresponding LSB 16bits. Write 1 to valid the corresponding bit writing. |
| Reserved | 15 | RW | RESERVED |
| MO1 UPHY1 AC | 14:12 | RW | Charge current operation 0x0: 1.1691mA 0x1: 1.2089mA 0x2: 1.2586mA 0x3: 1.3031mA 0x4: 1.3684mA(default) 0x5: 1.4181mA 0x6: 1.4779mA 0x7: 1.5268mA |
| MO1 UPHY1 ACB | 11:9 | RW | Discharge current operation 0x0: 1.1167mA 0x1: 1.2089mA 0x2: 1.4542mA 0x3: 1.5021mA 0x4: 1.3684mA(default) 0x5: 1.7116mA 0x6: 1.8235mA 0x7: 1.5268mA |
| MO1 UPHY1 R SEL | 8 | RW | UPHY0 internal REXT trimming control source selection 0: select source from OTP (default) 1: select source from MO1_UPHY1_R |
| MO1 UPHY1 PLL POWER OFF SEL | 7 | RW | UPHY1 PLL Power Down Source Selection |
| Reserved | 6:4 | RW | RESERVED |
| MO1 UPHY1 PLL POWER OFF | 3 | RW | UPHY1 PLL Power Down |
| Reserved | 2:0 | RW | RESERVED |
4.26 PLLSYS (mo4 pllsys)
Address: 0x9C000268
Reset: 0x0000 1CBE
Field Name | Bit | Access | Description |
| Mask bit | 31:16 | RW | Write valid bit for each LSB 16 bits The 16 bits map to corresponding LSB 16bits. Write 1 to valid the corresponding bit writing. |
| Reserved | 15:14 | RW | RESERVED |
| MO BYPASS PLLSYS | 13 | RW | SYSPLL Clock Bypass 0: Normal mode (default) 1: Bypass mode |
| MO PLLSYS CLKOUT DIV | 12:11 | RW | PLLSYS CLKOUT DIV Source Selection PLLSYS CLKOUT DIV is only output to PINMX for PLLSYS test purpose 0x0: PLLSYS CLKOUT DIV sources from PLLSYS CLKOUT 0x1: PLLSYS CLKOUT DIV sources from PLLSYS CLKOUT/4 0x2: PLLSYS CLKOUT DIV sources from PLLSYS CLKOUT/8 |
| MO PLLSYS PD N | 10 | RW | PLLSYS Power Down 0: Power down 1: Power on (default) |
| MO PLLSYS BP | 9 | RW | PLLSYS Bypass 0: Normal function(default) 1: Bypass PLLSYS CLKOUT to 27MHz clock |
MO PLLSYS G | 8:7 | RW | PLLSYS VCO Gain Curve Control VCO Gain Curve control (MHz/V) Gain value depends on MO PLLSYS NS setting 0x0: lower gain MO PLLSYS NS : VCO Gain 0x8: 480 0x5,0x6,0xb,0xd: 510 0xc: 520 0x1,0x2: nornal gain MO PLLSYS NS : VCO Gain 0x3,0x5,0x6,0x7,0xb,0xd,0xe,0xf: 560 0x4,0x9: 540 0x8: 500 0xa: 550 0xc: 570 0x3: higher gain MO PLLSYS NS : VCO Gain 0x3,0x6,0x7,0xc,0xd,0xe,0xf: 620 0x4,0x9: 570 0x5,0xb: 600 0x8: 520 0xa: 580 |
|
|
| PLLSYS PLL Charge Pump Current Adjust 0x0: current = 10uA 0x1: current = 15uA 0x2: current = 20uA 0x3: current = 25uA(default) 0x4: current = 30uA 0x5: current = 35uA 0x6: current = 40uA 0x7: current = 45uA |
MO PLLSYS NS | 3:0 | RW | PLLSYS Feedback Divider Control $NS=NS[3]*2ˆ3 + NS[2]*2ˆ2 NS[1]*2ˆ1 NS[0]*2ˆ0 + 1$ e.x.: 0x4:4 0x5:5 0xa:10 0xb:12 0xc:13 0xd:14 0xe:15 0xf: 16(Default) |
4.27 Clock Setting and Selection Register (mo clk sel0)
Address: 0x9C00026C
Reset: 0x0000 1CBE
Field Name | Bit | Access | Description |
| Mask bit | 31:16 | RW | Write valid bit for each LSB 16 bits The 16 bits map to corresponding LSB 16bits. Write 1 to valid the corresponding bit writing. |
| Reserved | 15 | RW | RESERVED |
MO A926 DIV SEL | 14:11 | RW | A926 Clock Source Divider Select 0x0: A926 CLK sources from (CLKOUT of PLLA926 CLK)(default) 0x1: A926 CLK sources from (CLKOUT of PLLA926 CLK)/2 0x2: A926 CLK sources from (CLKOUT of PLLA926 CLK)/4 0x3: A926 CLK sources from (CLKOUT of PLLA926 CLK)/8 0x4: A926 CLK sources from (CLKOUT of PLLA926 CLK)/16 0x5: A926 CLK sources from (CLKOUT of PLLA926 CLK)/32 0x6: A926 CLK sources from (CLKOUT of PLLA926 CLK)/64 0x7: A926 CLK sources from (CLKOUT of PLLA926 CLK)/128 0x9: A926 CLK sources from (CLKOUT of PLLA926 CLK)/512 0xa: A926 CLK sources from (CLKOUT of PLLA926 CLK)/1024 0xb: A926 CLK sources from (CLKOUT of PLLA926 CLK)/2048 0xc: A926 CLK sources from (CLKOUT of PLLA926 CLK)/4096 0xd: A926 CLK sources from (CLKOUT of PLLA926 CLK)/8192 0xe: A926 CLK sources from (CLKOUT of PLLA926 CLK)/16384 |
MO EXT CLK27 EN | 10 | RW | Enable external 27MHz clock |
MO CLK SPI SEL | 9:8 | RW | CLK SPI NOR Source Selection 0x0:CLK SPI NOR sources from SYSCLK(default) 0x1:CLK SPI NOR sources from PLLFLASH clock output divider by 2 others: Reserved |
| MO SYSSLOW DIV SEL | 7:4 | RW | SYSCLK source select 0x0: SYS sources from (CLKOUT of PLLSYS)(default) 0x2: SYS sources from (CLKOUT of PLLSYS)/4 0x3: SYS sources from (CLKOUT of PLLSYS)/8 0x4: SYS sources from (CLKOUT of PLLSYS)/16 0x5: SYS sources from (CLKOUT of PLLSYS)/32 0x6: SYS sources from (CLKOUT of PLLSYS)/64 0x7: SYS sources from (CLKOUT of PLLSYS)/128 0x8: SYS sources from (CLKOUT of PLLSYS)/256 0x9: SYS sources from (CLKOUT of PLLSYS)/512 0xa: SYS sources from (CLKOUT of PLLSYS)/1024 0xb: SYS sources from (CLKOUT of PLLSYS)/2048 0xc: SYS sources from (CLKOUT of PLLSYS)/4096 0xd: SYS sources from (CLKOUT of PLLSYS)/8192 0xe: SYS sources from (CLKOUT of PLLSYS)/16384 0xf: SYS sources from (CLKOUT of PLLSYS)/32768 |
| MO CLK SPIND SEL | 3:2 | RW | SPIND clock select |
| MO CLKIO INV | 1 | RW | IOCTL Clock Polarity Adjust 0: The phase of CHIP is the same with BIOCTL output(default) 1: The phase of CHIP is inverted with BIOCTL output |
| MO CK27 POL | 0 | RW | 27MHz Clock Polarity Adjust 0: The phase of 27MHz clock CLK27 XOR for DISP/CVBS ADC/VDAC is the same with 27MHz crystal output(default) 1: The phase of 27MHz clock CLK27 XOR for DISP/CVBS ADC/VDAC is inversed with 27MHz crystal output |
4.28 Probe module selection (MO PROBE SEL)
Address: 0x9C000270
Reset: 0x0
Field Name | Bit | Access | Description |
Mask bit | 31:16 | RW | Write valid bit for each LSB 16 bits |
Reserved | 15:12 | RW | RESERVED |
MO PROBE DATA SEL | 11:6 | RW | PROBE module data sel |
MO PROBE CLK SEL | 5:0 | RW | PROBE module clock sel |
4.29 Miscellaneous Control Register #0 (mo4 misc ctl 0)
Address: 0x9C000274
Reset: 0x0000 0040
| Mask bit | 31:16 | RW | Write valid bit for each LSB 16 bits The 16 bits map to corresponding LSB 16bits. Write 1 to valid the corresponding bit writing. |
| Reserved | 15:9 | RW | RESERVED |
MO1 MOONX USE FREE CLK | 8 | RW | MOON0/1/2 Use Free Running Clock Enable |
Reserved | 7:5 | RW | RESERVED |
MO1 STC WDG RST EN | 4 | RW | STC Watchdog Timeout Trigger System Reset Enable |
MO1 IOP WDG RST EN | 3 | RW | IOP Watchdog Timeout Trigger System Reset Enable |
MO1 STC WDG2 RST EN | 2 | RW | STC Watchdog 2 Timeout Trigger System Reset Enable |
MO1 RI WDG RST EN | 1 | RW | RBUS Watchdog Timeout Trigger System Reset Enable |
MO1 TIMER STAND BY EN | 0 | RW | Timer Standby Mode Enable |
4.30 Reserved (mo4 uphy0 sts)
Address: 0x9C000278
Reset:0x0
Field Name | Bit | Access | Description |
| Reserved | 31:16 | RW | RESERVED |
| Reserved | 15:0 | RO | RESERVED |
4.31 Reserved
Address: 0x9C00027C
Reset: 0x0
Field Name | Bit | Access | Description |
| Reserved | 31:6 | RO | RESERVED |
| Reserved | 5:4 | RW | RESERVED |
| Reserved | 3:2 | RO | RESERVED |
| Reserved | 1 | RO | RESERVED |
| Reserved | 0 | RO | RESERVED |
RGST Table Group 5 MOON5
5.0 Thermal Control register #0 (mo5 thermal ctl 0)
Address: 0x9C000280
Reset: 0x0000 0000
Field Name | Bit | Access | Description |
| Mask bit | 31:16 | RW | Write valid bit for each LSB 16 bits The 16 bits map to corresponding LSB 16bits. Write 1 to valid the corresponding bit writing. |
| MO THERMAL PD TSENS | 15 | RW | Power down Temperature sensor 0: power on |
| MO THERMAL M MODE EN | 14 | RW | Enable the manual mode to shift the output code TCODE[10:0] 0: from the REG_AVE_CODE[10:0] |
| MO THERMAL FS SRA | 13 | RW | SARADC conversion control 0: end conversion |
| MO THERMAL EN SAR | 12 | RW | SARADC enable 0: disable |
| MO THERMAL EN CAL | 11 | RW | Enable calibration function at specific temperature 0: disable |
| MO THERMAL DC SHIFT | 10:8 | RW | Shift the SARADC sample/hold DC voltage |
| MO THERMAL DAC EN | 7 | RW | Enable the DAC ramp counter test mode 0: disable |
| MO THERMAL DAC CAL EN | 6 | RW | DAC calibration mode enable 0: disable |
| Reserved | 5 | RW | Reserved |
| MO THERMAL CHOP EN | 0 | RW | TSEN chopper function 0: disable chopper function |
5.1 Thermal Control register #1 (mo5 thermal ctl 1)
Address: 0x9C000284
Reset: 0x0000 A14B
Field Name | Bit | Access | Description |
| Mask bit | 31:16 | RW | Write valid bit for each LSB 16 bits The 16 bits map to corresponding LSB 16bits. Write 1 to valid the corresponding bit writing. |
| Reserved | 15 | RW | RESERVED |
| MO THERMAL REG AVE CODE | 14:4 | RW | Enable the code average function 0: disable |
| MO THERMAL REG ADR | 3:0 | RW | The memory address |
5.2 Thermal Control register #2 (mo5 thermal ctl 2)
Address: 0x9C000288
Reset: 0x0000 0000
Field Name | Bit | Access | Description |
| Mask bit | 31:16 | RW | Write valid bit for each LSB 16 bits The 16 bits map to corresponding LSB 16bits. Write 1 to valid the corresponding bit writing. |
| Reserved | 15 | RW | RESERVED |
| MO THERMAL TDEC | 14:12 | RW | Trimming VBE voltage |
| MO THERMAL RESERVE | 11:4 | RW | Reserve pin |
| MO THERMAL REG UD | 3 | RW | DAC test mode Up/down counter function |
| MO THERMAL REG AVE MODE | 2:1 | RW | Average function 0x0: 4 rimes |
| MO THERMAL REG AVE CODE EN | 0 | RW | Enable the code average function 0: disable |
5.3 Thermal Control register #3 (mo5 thermal ctl 3)
Address: 0x9C00028C
Reset: 0x0000 9206
Field Name | Bit | Access | Description |
| Mask bit | 31:16 | RW | Write valid bit for each LSB 16 bits The 16 bits map to corresponding LSB 16bits. Write 1 to valid the corresponding bit writing. |
| Reserved | 15 | RW | RESERVED |
| MO THERMAL WR EN | 14 | RW | Enable the memory to write data 0: disable |
MO THERMAL WR DATA | 13:6 | RW | The memory input data |
MO THERMAL VBG SEL | 5:3 | RW | VBG voltage select |
MO THERMAL VBE SEL | 2:1 | RW | VBE voltage select 0x0: VBEX1 |
MO THERMAL TEST | 0 | RW | Enable SARADC test mode 0: SARADC input from TSEN |
5.4 TMDS L2SW Control Register (mo5 tmds l2sw ctl)
Address: 0x9C000290
Reset: 0x0000 0000
Field Name | Bit | Access | Description |
| Mask bit | 31:16 | RW | Write valid bit for each LSB 16 bits The 16 bits map to corresponding LSB 16bits. Write 1 to valid the corresponding bit writing. |
| Reserved | 15:14 | RW | RESERVED |
| MO L2SW BISH DIS | 13 | RW | Layer 2 Switch bish operation disable |
| MO L2SW BISH TH | 12:11 | RW | Layer 2 Switch bish operation block threshold |
| Reserved | 10 | RW | RESERVED |
| MO HDMI TX EXT CLK SEL | 9 | RW | PCKI selection |
| MO RFS ACLK SEL | 8:7 | RW | Audio clock control bit |
| RW MO RFS TMDS DATA DOUBLE | 6 | RW | Data double mode |
| MO RFS TMDS KV SEL | 5:4 | RW | KVCO gain selection |
| MO RFS TMDS SEL R SEL | 3 | RW | Internal REXT control |
| MO RFS TMDS TERM EN | 2:0 | RW | Data path dp term Ron control |
5.5 L2SW Clock Switch Control Register (mo5 l2sw clksw ctl)
Address: 0x9C000294
Reset: 0x0000 0000
Field Name | Bit | Access | Description |
| Mask bit | 31:16 | RW | Write valid bit for each LSB 16 bits The 16 bits map to corresponding LSB 16bits. Write 1 to valid the corresponding bit writing. |
Reserved | 15:4 | RW | RESERVED |
MO CLKRMIITX1 INV | 3 | RW | Port1 RMII TXCLK invert 0: non invert |
MO CLKRMIITX0 INV | 2 | RW | Port0 RMII TXCLK invert 0: non invert |
MO CLKRMIIRX1 INV | 1 | RW | Port1 RMII RXCLK invert 0: non invert |
MO CLKRMIIRX0 INV | 0 | RW | Port0 RMII RXCLK invert 0: non invert |
5.6 I2C2BUS Control Register (mo5 I2C2BUS ctl)
Address: 0x9C000298
Reset: 0x0
Field Name | Bit | Access | Description |
| Mask bit | 31:16 | RW | Write valid bit for each LSB 16 bits The 16 bits map to corresponding LSB 16bits. Write 1 to valid the corresponding bit writing. |
Reserved | 15:8 | RW | RESERVED |
MO I2C2BUS INVERSE | 7 | RW | I2CBUS Byte inverse 0: normal(default) |
MO I2C2BUS FILER | 6:4 | RW | The filter of I2C input port SCL and SDA 0x0: 0 continuous same data input (default) |
MO DRAM B SIZE | 3:2 | RW | DRAM 1 Size Control 0x0: 128MB |
MO DRAM A SIZE | 1:0 | RW | DRAM 0 Size Control 0x0: 128MB |
5.7 PFCNT Register (pfcnt ctl)
Address: 0x9C00029C
Reset: 0x0
Field Name | Bit | Access | Description |
| Mask bit | 31:16 | RW | Write valid bit for each LSB 16 bits The 16 bits map to corresponding LSB 16bits. Write 1 to valid the corresponding bit writing. |
| Reserved | 15 | RW | Reserved |
| MO PFCNT SENSOR INT CLR | 14 | RW | PFCNT SENSOR interrupt write 1 clear |
| MO RG PFCNT SENSE EN | 13 | RW | PFCNT SENSE enable 0: disable(default) |
| MO RG PFCNT FS | 12:10 | RW | PFCNT Macro Frequency Setting 0x0: 1T |
| MO RG PFCNT PD N | 9 | RW | PFCNT Macro Power Enable 0:Power down(default) |
| MO RG PFCNT RST N | 8 | RW | PFCNT Macro Reset Enable 0: Reset |
| MO RG PFCNT RSVI | 7:0 | RW | PFCNT Macro Reserved Input |
5.8 PFCNT SENSOR Register #0 (pfcnt sensor ctl 0)
Address: 0x9C0002A0
Reset: 0x0
Field Name | Bit | Access | Description |
| Mask bit | 31:16 | RW | Write valid bit for each LSB 16 bits The 16 bits map to corresponding LSB 16bits. Write 1 to valid the corresponding bit writing. |
| RG REFCNT MAX | 15:0 | RW | PFCNT Reference count max default:16'h0 |
5.9 PFCNT SENSOR Register #1 (pfcnt sensor ctl 1)
Address: 0x9C0002A4
Reset: 0x0
Field Name | Bit | Access | Description |
| Mask bit | 31:16 | RW | Write valid bit for each LSB 16 bits The 16 bits map to corresponding LSB 16bits. Write 1 to valid the corresponding bit writing. |
| RG REFCNT MIN | 15:0 | RW | PFCNT Reference count min default:16'h0 |
5.10 PFCNT Macro Status Register (pfctn sts 0)
Address: 0x9C0002A8
Reset: 0x0
Field Name | Bit | Access | Description |
| Reserved | 31:24 | RW | PFCNT SENSOR Staus Register #0 |
| STS PFCNT RSVO | 23:16 | RW | PFCNT Macro Output |
| STS PFCNT DO | 15:8 | RW | PFCNT Macro Data Output |
| STS PFCNT C | 7:0 | RW | PFCNT Macro Counter Output |
5.11 PFCNT SENSOR Staus Register #1 (pfctn sts 1)
Address: 0x9C0002AC
Reset: 0x0
Field Name | Bit | Access | Description |
| Reserved | 31:17 | RO | RESERVED |
| STS PFCNT SENSOR LATCH | 16:1 | RO | PFCNT SENSOR Latched count value once int default:16'h0 |
| STS PFCNT SENSOR STATUS | 0 | RO | PFCNT SENSOR Status default:1'b0 |
5.12 THERMAL Status Register #0 (thermal sts 0)
Address: 0x9C0002B0
Reset: 0x0
Field Name | Bit | Access | Description |
Reserved | 31:12 | RW | Reserved |
THERMAL TCODE | 10:0 | RO | Register to indicate The temperature code for system application |
5.13 Reserved (rsv)
Address: 0x9C0002B4
Reset: 0x0
Field Name | Bit | Access | Description |
| Reserved | 31:12 | RW | RESERVED |
| Reserved | 11 | RW | RESERVED |
| Reserved | 10:0 | RW | RESERVED |
5.14 Reserved (rsv)
Address: 0x9C0002B8
Reset: 0x0
Field Name | Bit | Access | Description |
Reserved | 31:0 | RW | RESERVED |
5.15 Reserved (rsv)
Address: 0x9C0002BC
Reset: 0x0
Field Name | Bit | Access | Description |
Reserved | 31:0 | RW | RESERVED |
5.16 Reserved (rsv)
Address: 0x9C0002C0
Reset: 0x0
Field Name | Bit | Access | Description |
Reserved | 31:0 | RW | RESERVED |
5.17 Reserved (rsv)
Address: 0x9C0002C4
Reset: 0x0
Field Name | Bit | Access | Description |
Reserved | 31:0 | RW | RESERVED |
5.18 Reserved (rsv)
Address: 0x9C0002C8
Reset: 0x0
Field Name | Bit | Access | Description |
Reserved | 31:0 | RW | RESERVED |
5.19 Reserved (rsv)
Address: 0x9C0002CC
Reset: 0x0
Field Name | Bit | Access | Description |
Reserved | 31:0 | RW | RESERVED |
5.20 Reserved (rsv)
Address: 0x9C0002D0
Reset: 0x0
Field Name | Bit | Access | Description |
Reserved | 31:0 | RW | RESERVED |
5.21 Reserved (rsv)
Address: 0x9C0002D4
Reset: 0x0
Field Name | Bit | Access | Description |
Reserved | 31:0 | RW | RESERVED |
5.22 Reserved (rsv)
Address: 0x9C0002D8
Reset: 0x0
Field Name | Bit | Access | Description |
Reserved | 31:0 | RW | RESERVED |
5.23 DC 0.9V Control Register #0 (DC09 CTL 0)
Address: 0x9C0002DC
Reset: 0x0
Field Name | Bit | Access | Description |
| Mask bit | 31:16 | RW | Write valid bit for each LSB 16 bits The 16 bits map to corresponding LSB 16bits. Write 1 to valid the corresponding bit writing. |
MO DC09 OPTION | 15 | RW | Spare register |
MO DC09 EN OCP | 14 | RW | Enable the current-limit detector function 0:Disable(Default) |
MO DC09 EN COMP | 13 | RW | Enable the comparator for temperature-limit, current-limit, power good and LVD 0:Disable(Default) |
MO DC09 EN TMP PROT | 12 | RW | Enable the temperature-limit protect function 0:Disable(Default) |
MO DC09 VREF OCP | 11:10 | RW | The current-limit trip point 0x0: 700mA |
Reserved | 9:7 | RW | RESERVED |
MO DC09 ENB DRVN | 6 | RW | Under-shoot protect 0:Enable |
Reserved | 5 | RW | RESERVED |
MO DC09 VREF SS | 4:3 | RW | Power ready reference voltage. 0x0: 0.844V(Default) |
MO DC09 EN OCP PROT | 2 | RW | Enable the comparator for temperature-limit, current-limit, power good and LVD 0:Disable(Default) |
Reserved | 1 | RW | RESERVED |
Reserved | 0 | RW | RESERVED |
5.24 DC 0.9V Control Register #1 (DC09 CTL 1)
Address: 0x9C0002E0
Reset: 0x0
Field Name | Bit | Access | Description |
| Mask bit | 31:16 | RW | Write valid bit for each LSB 16 bits The 16 bits map to corresponding LSB 16bits. Write 1 to valid the corresponding bit writing. |
| MO DC09 PWFM | 15 | RW | PWM or PFM select 0: PWM (default) |
| MO DC09 EN TMP | 14 | RW | Enable the temperature-limit detector function 0:Disable(Default) |
| MO DC09 PWMHYSEN | 13:11 | RW | Triangle wave generator comparator hysteresis window setting. 0x0:80mV(Default) |
| MO DC09 OCP HYS | 10:9 | RW | The hysteresis for current-limit trip point 0x0: 1.6%(Default) |
| MO DC09 N | 8:6 | RW | OSC frequency adjust, actual frequency variation is less then 20%. 0x0:429KHz (Default) |
| MO DC09 TMP HYS | 5:4 | RW | The hysteresis for thermal-limit trip point 0x0:5C (Default) |
| MO DC09 T TMP | 3:2 | RW | The thermal-shutdown trip point 0x0:125C(Default.) |
| MO DC09 VREF LVD | 1:0 | RW | Low voltage reference voltage. 0x0:0.706V |
5.25 DC 0.9V Control Register #2 (DC09 CTL 2)
Address: 0x9C0002E4
Reset: 0x0
Field Name | Bit | Access | Description |
| Mask bit | 31:16 | RW | Write valid bit for each LSB 16 bits The 16 bits map to corresponding LSB 16bits. Write 1 to valid the corresponding bit writing. |
| Reserved | 15:10 | RW | RESERVED |
DC09 LVD OUT | 9 | RO | Indicate the output voltage are low voltage or not. (control by VREF LVD[1:0]) 0:no low voltage |
DC09 READY | 8 | RO | Indicate the output voltage are power good or not. (control by VREF SS[1:0]) 0:not power good |
DC09 TMP OUT | 7 | RO | Indicate the output voltage are over-temperature or not. (control by T TMP[1:0]) 0:no over-temperature |
DC09 OCP OUT | 6 | RO | Indicate the output voltage are over-current or not. (control by VREF OCP[1:0]) 0:no over-current |
MO DC09 TRLVLADJ | 5:3 | RW | Reference voltage of Duty in PFM. 0x0:1.3458V(Default.) |
MO DC09 SFTHYSEN | 2:0 | RW | Soft-start comparator hysteresis window setting. |
5.26 DC 1.2V Control Register #0 (DC12 CTL 0)
Address: 0x9C0002E8
Reset: 0x0
Field Name | Bit | Access | Description |
| Mask bit | 31:16 | RW | Write valid bit for each LSB 16 bits The 16 bits map to corresponding LSB 16bits. Write 1 to valid the corresponding bit writing. |
| MO DC12 OPTION | 15 | RW | Spare register |
| MO DC12 EN OCP | 14 | RW | Enable the current-limit detector function 0:Disable(Default) |
| MO DC12 EN COMP | 13 | RW | Enable the comparator for temperature-limit, current-limit, power good and LVD 0:Disable(Default) |
| MO DC12 EN TMP PROT | 12 | RW | Enable the temperature-limit protect function 0:Disable(Default) |
| MO DC12 VREF OCP | 11:10 | RW | The current-limit trip point 0x0: 700mA |
Reserved | 9:7 | RW | RESERVED |
MO DC12 ENB DRVN | 6 | RW | Under-shoot protect 0:Enable |
MO DC12 ENB DRVP | 5 | RW | Over-shoot protect: 0:Enable |
MO DC12 VREF SS | 4:3 | RW | Power ready reference voltage. 0x0: 0.844V(Default.) |
MO DC12 EN OCP PROT | 2 | RW | Enable the comparator for temperature-limit, current-limit, power good and LVD 0:Disable(Default.) |
Reserved | 1 | RW | RESERVED |
Reserved | 0 | RW | RESERVED |
5.27 DC 1.2V Control Register #1 (DC12 CTL 1)
Address: 0x9C0002EC
Reset: 0x0
Field Name | Bit | Access | Description |
| Mask bit | 31:16 | RW | Write valid bit for each LSB 16 bits The 16 bits map to corresponding LSB 16bits. Write 1 to valid the corresponding bit writing. |
| MO DC12 PWFM | 15 | RW | PWM or PFM select 0: PWM (default) |
| MO DC12 EN TMP | 14 | RW | Enable the temperature-limit detector function 0:Disable(Default.) |
| MO DC12 PWMHYSEN | 13:11 | RW | Triangle wave generator comparator hysteresis window setting. 0x0:80mV(Default) |
MO DC12 OCP HYS | 10:9 | RW | The hysteresis for current-limit trip point 0x0: 1.6%(Default.) |
MO DC12 N | 8:6 | RW | OSC frequency adjust, actual frequency variation is less then 20%. 0x0:429KHz (Default) |
MO DC12 TMP HYS | 5:4 | RW | The hysteresis for thermal-limit trip point 0x0:5C (Default) |
MO DC12 T TMP | 3:2 | RW | The thermal-shutdown trip point 0x0:125C(Default.) |
MO DC12 VREF LVD | 1:0 | RW | Low voltage reference voltage. 0x0:0.706V |
5.28 DC 1.2V Control Register #2 (DC12 CTL 2)
Address: 0x9C0002F0
Reset: 0x0
Field Name | Bit | Access | Description |
| Mask bit | 31:16 | RW | Write valid bit for each LSB 16 bits The 16 bits map to corresponding LSB 16bits. Write 1 to valid the corresponding bit writing. |
| Reserved | 15:10 | RW | RESERVED |
| DC12 LVD OUT | 9 | RW | Indicate the output voltage are low voltage or not (control by VREF LVD[1:0]). 0:no low voltage |
| DC12 READY | 8 | RW | Indicate the output voltage are power good or not. (control by VREF SS[1:0]) 0:not power good |
| DC12 TMP OUT | 7 | RW | Indicate the output voltage are over-temperature or not. (control by T TMP[1:0]) 0:no over-temperature |
| DC12 OCP OUT | 6 | RW | Indicate the output voltage are over-current or not. (control by VREF OCP[1:0]) 0:no over-current |
MO DC12 TRLVLADJ | 5:3 | RW | Reference voltage of Duty in PFM. 0x0:1.3458V(Default.) |
MO DC12 SFTHYSEN | 2:0 | RW | Soft-start comparator hysteresis window setting. 0x0:80mV(Default) |
5.29 DC 1.5V Control Register #0 (DC15 CTL 0)
Address: 0x9C0002F4
Reset: 0x0
Field Name | Bit | Access | Description |
| Mask bit | 31:16 | RW | Write valid bit for each LSB 16 bits The 16 bits map to corresponding LSB 16bits. Write 1 to valid the corresponding bit writing. |
| MO DC15 OPTION | 15 | RW | Spare register |
| Reserved | 14:10 | RW | RESERVED |
| Reserved | 9:7 | RW | RESERVED |
MO DC15 ENB DRVN | 6 | RW | Under-shoot protect 0:Enable |
MO DC15 ENB DRVP | 5 | RW | Over-shoot protect: 0:Enable |
MO DC15 VREF SS | 4:3 | RW | Power ready reference voltage. 0x0: 0.844V(Default.) |
Reserved | 2 | RW | RESERVED |
Reserved | 1 | RW | RESERVED |
Reserved | 0 | RW | RESERVED |
5.30 DC 1.5V Control Register #1 (DC15 CTL 1)
Address: 0x9C0002F8
Reset: 0x0
Field Name | Bit | Access | Description |
| Mask bit | 31:16 | RWRW | Write valid bit for each LSB 16 bits The 16 bits map to corresponding LSB 16bits. Write 1 to valid the corresponding bit writing. |
| MO DC15 PWFM | 15 | RW | PWM or PFM select 0: PWM (default) |
| Reserved | 14 | RW | RESERVED |
| MO DC15 PWMHYSEN | 13:11 | RW | Triangle wave generator comparator hysteresis window setting. 0x0:80mV(Default) |
| Reserved | 10:9 | RW | RESERVED |
| MO DC15 N | 8:6 | RW | OSC frequency adjust, actual frequency variation is less then20%. 0x0:429KHz (Default) |
| Reserved | 5:4 | RW | RESERVED |
| MO DC15 T TMP | 3:2 | RW | The thermal-shutdown trip point 0x0:125C(Default.) |
| MO DC15 VREF LVD | 1:0 | RW | Low voltage reference voltage. 0x0:0.706V |
5.31 DC 1.5V Control Register #2 (DC15 CTL 2)
Address: 0x9C0002FC
Reset: 0x0
Field Name | Bit | Access | Description |
| Mask bit | 31:16 | RW | Write valid bit for each LSB 16 bits The 16 bits map to corresponding LSB 16bits. Write 1 to valid the corresponding bit writing. |
| Reserved | 15:8 | RW | RESERVED |
DC15 LVD OUT | 7 | RW | Indicate the output voltage are low voltage or not (control by VREF LVD[1:0]). 0:no low voltage |
DC15 READY | 6 | RW | Indicate the output voltage are power good or not. (control by VREF SS[1:0]) 0:not power good |
MO DC15 TRLVLADJ | 5:3 | RW | Reference voltage of Duty in PFM. 0x0:1.3458V(Default.) |
MO DC15 SFTHYSEN | 2:0 | RW | Soft-start comparator hysteresis window setting. 0x0:80mV(Default) |
RGST Table Group 6 GPIOXT
6.0 GPIO Control Source Selection Register #0 (gpio ctl sel 0)
Address: 0x9C000300
Reset: 0xFFFF FFFF
Field Name | Bit | Access | Description |
| Mask bit | 31:16 | RW | Write valid bit for each LSB 16 bits |
| GPIO CTL SEL[15:0] | 15:0 | RW | GPIO Control Source Selection Bit 15:0 |
6.1 GPIO Control Source Selection Register #1 (gpio ctl sel 1)
Address: 0x9C000304
Reset: 0xFFFF FFFF
Field Name | Bit | Access | Description |
Mask bit | 31:16 | RW | Write valid bit for each LSB 16 bits |
GPIO CTL SEL[31:16] | 15:0 | RW | GPIO Control Source Selection Bit 31:16 |
6.2 GPIO Control Source Selection Register #2 (gpio ctl sel 2)
Address: 0x9C000308
Reset: 0xFFFF FFFF
Field Name | Bit | Access | Description |
Mask bit | 31:16 | RW | Write valid bit for each LSB 16 bits |
GPIO CTL SEL[47:32] | 15:0 | RW | GPIO Control Source Selection Bit 47:32 |
6.3 GPIO Control Source Selection Register #3 (gpio ctl sel 3)
Address: 0x9C00030C
Reset: 0xFFFF FFFF
Field Name | Bit | Access | Description |
Mask bit | 31:16 | RW | Write valid bit for each LSB 16 bits |
GPIO CTL SEL[63:48] | 15:0 | RW | GPIO Control Source Selection Bit 63:48 |
6.4 GPIO Control Source Selection Register #4 (gpio ctl sel 4)
Address: 0x9C000310
Reset: 0xFFFF FFFF
Field Name | Bit | Access | Description |
| Mask bit | 31:16 | RW | Write valid bit for each LSB 16 bits The 16 bits map to corresponding LSB 16bits. Write 1 to valid the corresponding bit writing. |
GPIO CTL SEL[79:64] | 15:0 | RW | GPIO Control Source Selection Bit 79:64 For each bit of this register: |
6.5 GPIO Control Source Selection Register #5 (gpio ctl sel 5)
Address: 0x9C000314
Reset: 0xFFFF FFFF
Field Name | Bit | Access | Description |
Mask bit | 31:16 | RW | Write valid bit for each LSB 16 bits |
GPIO CTL SEL[95:80] | 15:0 | RW | GPIO Control Source Selection Bit 95:80 |
6.6 GPIO Control Source Selection Register #6 (gpio ctl sel 6)
Address: 0x9C000318
Reset: 0xFFFF FFFF
Field Name | Bit | Access | Description |
Mask bit | 31:16 | RW | Write valid bit for each LSB 16 bits |
GPIO CTL SEL[111:96] | 15:0 | RW | GPIO Control Source Selection Bit 111:96 |
6.7 GPIO Control Source Selection Register #7 (gpio ctl sel 7)
Address: 0x9C00031C
Reset: 0xFFFF FFFF
Field Name | Bit | Access | Description |
Mask bit | 31:16 | RW | Write valid bit for each LSB 16 bits |
GPIO CTL SEL[127:112] | 15:0 | RW | GPIO Control Source Selection Bit 127:112 |
6.8 GPIO Output Enable Register #0 (gpio oe 0)
Address: 0x9C000320
Reset: 0x0
Field Name | Bit | Access | Description |
| Mask bit | 31:16 | RW | Write valid bit for each LSB 16 bits |
| GPIO OE[15:0] | 15:0 | RW | GPIO Output Enable Bit 15:0 |
6.9 GPIO Output Enable Register #1 (gpio oe 1)
Address: 0x9C000324
Reset: 0x0
Field Name | Bit | Access | Description |
| Mask bit | 31:16 | RW | Write valid bit for each LSB 16 bits |
| GPIO OE[31:16] | 15:0 | RW | GPIO Output Enable Bit 31:16 |
6.10 GPIO Output Enable Register #2 (gpio oe 2)
Address: 0x9C000328
Reset: 0x0
Field Name | Bit | Access | Description |
| Mask bit | 31:16 | RW | Write valid bit for each LSB 16 bits |
| GPIO OE[47:32] | 15:0 | RW | GPIO Output Enable Bit 47:32 |
6.11 GPIO Output Enable Register #3 (gpio oe 3)
Address: 0x9C00032C
Reset: 0x0
Field Name | Bit | Access | Description |
| Mask bit | 31:16 | RW | Write valid bit for each LSB 16 bits |
| GPIO OE[63:48] | 15:0 | RW | GPIO Output Enable Bit 63:48 |
6.12 GPIO Output Enable Register #4 (gpio oe 4)
Address: 0x9C000330
Reset: 0x0
Field Name | Bit | Access | Description |
| Mask bit | 31:16 | RW | Write valid bit for each LSB 16 bits |
| GPIO OE[79:64] | 15:0 | RW | GPIO Output Enable Bit 79:64 |
6.13 GPIO Output Enable Register #5 (gpio oe 5)
Address: 0x9C000334
Reset: 0x0
Field Name | Bit | Access | Description |
| Mask bit | 31:16 | RW | Write valid bit for each LSB 16 bits |
| GPIO OE[95:80] | 15:0 | RW | GPIO Output Enable Bit 95:80 |
6.14 GPIO Output Enable Register #6 (gpio oe 6)
Address: 0x9C000338
Reset: 0xFFFF FFFF
Field Name | Bit | Access | Description |
| Mask bit | 31:16 | RW | Write valid bit for each LSB 16 bits |
| GPIO OE[111:96] | 15:0 | RW | GPIO Output Enable Bit 111:96 |
6.15 GPIO Output Enable Register #7 (gpio oe 7)
Address: 0x9C00033C
Reset: 0xFFFF FFFF
Field Name | Bit | Access | Description |
| Mask bit | 31:16 | RW | Write valid bit for each LSB 16 bits |
| GPIO OE[127:112] | 15:0 | RW | GPIO Output Enable Bit 127:112 |
6.16 GPIO Output Data Register #0 (gpio o 0)
Address: 0x9C000340
Reset: 0x0
Field Name | Bit | Access | Description |
| Mask bit | 31:16 | RW | Write valid bit for each LSB 16 bits |
| GPIO O[15:0] | 15:0 | RW | GPIO Output Data Bit 31:0 corresponding GPIO output data sources from corresponding bit of this register |
6.17 GPIO Output Data Register #1 (gpio o 1)
Address: 0x9C000344
Reset: 0x0
Field Name | Bit | Access | Description |
| Mask bit | 31:16 | RW | Write valid bit for each LSB 16 bits |
| GPIO O[31:16] | 15:0 | RW | GPIO Output Data Bit 31:16 corresponding GPIO output data sources from corresponding bit of this register |
6.18 GPIO Output Data Register #2 (gpio o 2)
Address: 0x9C000348
Reset: 0x0
Field Name | Bit | Access | Description |
| Mask bit | 31:16 | RW | Write valid bit for each LSB 16 bits |
| GPIO O[47:32] | 15:0 | RW | GPIO Output Data Bit 47:32 corresponding GPIO output data sources from corresponding bit of this register |
6.19 GPIO Output Data Register #3 (gpio o 3)
Address: 0x9C00034C
Reset: 0x0
Field Name | Bit | Access | Description |
| Mask bit | 31:16 | RW | Write valid bit for each LSB 16 bits |
| GPIO O[63:48] | 15:0 | RW | GPIO Output Data Bit 63:48 corresponding GPIO output data sources from corresponding bit of this register |
6.20 GPIO Output Data Register #4 (gpio o 4)
Address: 0x9C000350
Reset: 0x0
Field Name | Bit | Access | Description |
| Mask bit | 31:16 | RW | Write valid bit for each LSB 16 bits |
| GPIO O[79:64] | 15:0 | RW | GPIO Output Data Bit 79:64 corresponding GPIO output data sources from corresponding bit of this register |
6.21 GPIO Output Data Register #5 (gpio o 5)
Address: 0x9C000354
Reset: 0x0
Field Name | Bit | Access | Description |
| Mask bit | 31:16 | RW | Write valid bit for each LSB 16 bits |
| GPIO O[95:80] | 15:0 | RW | GPIO Output Data Bit 95:80 corresponding GPIO output data sources from corresponding bit of this register |
6.22 GPIO Output Data Register #6 (gpio o 6)
Address: 0x9C000358
Reset: 0x0
Field Name | Bit | Access | Description |
| Mask bit | 31:16 | RW | Write valid bit for each LSB 16 bits |
| GPIO O[111:96] | 15:0 | RW | GPIO Output Data Bit 111:96 |
6.23 GPIO Output Data Register #7 (gpio o 7)
Address: 0x9C00035C
Reset: 0x0
Field Name | Bit | Access | Description |
| Mask bit | 31:16 | RW | Write valid bit for each LSB 16 bits |
| GPIO O[127:112] | 15:0 | RW | GPIO Output Data Bit 127:112 |
6.24 GPIO Input Data Register #0 (gpio in 0)
Address: 0x9C000360
Reset: 0x0
Field Name | Bit | Access | Description |
| GPIO IN[31:0] | 31:0 | RO | GPIO Input Data Bit 31:0 For each bit of this register, its value equals to the value of corresponding GPIO |
6.25 GPIO Input Data Register #1 (gpio in 1)
Address: 0x9C000364
Reset: 0x0
Field Name | Bit | Access | Description |
| GPIO IN[63:32] | 31:0 | RO | GPIO Input Data Bit 63:32 For each bit of this register, its value equals to the value of corresponding GPIO |
6.26 GPIO Input Data Register #2 (gpio in 2)
Address: 0x9C000368
Reset: 0x0
Field Name | Bit | Access | Description |
| GPIO IN[95:64] | 31:0 | RO | GPIO Input Data Bit 95:64 For each bit of this register, its value equals to the value of corresponding GPIO |
6.27 GPIO Input Data Register #3 (gpio in 3)
Address: 0x9C00036C
Reset: 0x0
Field Name | Bit | Access | Description |
| GPIO IN[127:96] | 31:0 | RO | GPIO Input Data Bit 127:96 For each bit of this register, its value equals to the value of corresponding GPIO |
6.28 GPIO Input Data Register #4 (gpio in 4)
Address: 0x9C000370
Reset: 0x0
Field Name | Bit | Access | Description |
| GPIO IN[159:128] | 31:0 | RO | GPIO Input Data Bit 159:128 For each bit of this register, its value equals to the value of corresponding GPIO |
6.29 GPIO Input Data Register #5 (gpio in 5)
Address: 0x9C000374
Reset: 0x0
Field Name | Bit | Access | Description |
| Reserved | 31:27 | RO | RESERVED |
| GPIO IN[186:160] | 26:0 | RO | GPIO Input Data Bit 186:160 For each bit of this register, its value equals to the value of corresponding GPIO |
6.30 Reserved (rsv)
Address: 0x9C000378
Reset: 0x0
Field Name | Bit | Access | Description |
Reserved | 31:0 | RO | RESERVED |
6.31 Reserved (rsv)
Address: 0x9C00037C
Reset: 0x0
Field Name | Bit | Access | Description |
Reserved | 31:0 | RO | RESERVED |
RGST Table Group 7 GPIOXT
7.0 GPIO Input Invert Register #0 (gpio in inv 0)
Address: 0x9C000380
Reset: 0x0
Field Name | Bit | Access | Description |
Mask bit | 31:16 | RW | Write valid bit for each LSB 16 bits |
GPIO IN INV[15:0] | 15:0 | RW | GPIO Input Invert Bit 15:0 |
7.1 GPIO Input Invert Register #1 (gpio in inv 1)
Address: 0x9C000384
Reset: 0x0
Field Name | Bit | Access | Description |
Mask bit | 31:16 | RW | Write valid bit for each LSB 16 bits |
GPIO IN INV[31:16] | 15:0 | RW | GPIO Input Invert Bit 31:16 |
7.2 GPIO Input Invert Register #2 (gpio in inv 2)
Address: 0x9C000388
Reset: 0x0
Field Name | Bit | Access | Description |
Mask bit | 31:16 | RW | Write valid bit for each LSB 16 bits |
GPIO IN INV[47:32] | 15:0 | RW | GPIO Input Invert Bit47:32 |
7.3 GPIO Input Invert Register #3 (gpio in inv 3)
Address: 0x9C00038C
Reset: 0x0
Field Name | Bit | Access | Description |
Mask bit | 31:16 | RW | Write valid bit for each LSB 16 bits |
GPIO IN INV[63:48] | 15:0 | RW | GPIO Input Invert Bit 63:48 |
7.4 GPIO Input Invert Register #4 (gpio in inv 4)
Address: 0x9C000390
Reset: 0x0
Field Name | Bit | Access | Description |
Mask bit | 31:16 | RW | Write valid bit for each LSB 16 bits |
GPIO IN INV[79:64] | 15:0 | RW | GPIOInput Invert Bit 79:64 |
7.5 GPIO Input Invert Register #5 (gpio in inv 5)
Address: 0x9C000394
Reset: 0x0
Field Name | Bit | Access | Description |
Mask bit | 31:16 | RW | Write valid bit for each LSB 16 bits |
GPIO IN INV[95:80] | 15:0 | RW | GPIO Input Invert Bit 95:80 |
7.6 GPIO Input Invert Register #6 (gpio in inv 6)
Address: 0x9C000398
Reset: 0x0
Field Name | Bit | Access | Description |
Mask bit | 31:16 | RW | Write valid bit for each LSB 16 bits |
GPIO IN INV[111:96] | 15:0 | RW | GPIO Input Invert Bit 111:96 |
7.7 GPIO Input Invert Register #7 (gpio in inv 7)
Address: 0x9C00039C
Reset: 0x0
Field Name | Bit | Access | Description |
Mask bit | 31:16 | RW | Write valid bit for each LSB 16 bits |
GPIO IN INV[127:112] | 15:0 | RW | GPIO Input Invert Bit 127:112 |
7.8 GPIO Output Invert Register #0 (gpio out inv 0)
Address: 0x9C0003A0
Reset: 0x0
Field Name | Bit | Access | Description |
Mask bit | 31:16 | RW | Write valid bit for each LSB 16 bits |
GPIO OUT INV[15:0] | 15:0 | RW | GPIO Output Invert Bit 15:0 |
7.9 GPIO Output Invert Register #1 (gpio out inv 1)
Address: 0x9C0003A4
Reset: 0x0
Field Name | Bit | Access | Description |
Mask bit | 31:16 | RW | Write valid bit for each LSB 16 bits |
GPIO OUT INV[31:16] | 15:0 | RW | GPIO Output Invert Bit 31:16 |
7.10 GPIO Output Invert Register #2 (gpio out inv 2)
Address: 0x9C0003A8
Reset: 0x0
Field Name | Bit | Access | Description |
Mask bit | 31:16 | RW | Write valid bit for each LSB 16 bits |
| GPIO OUT INV[47:32] | 15:0 | RW | GPIO Output Invert Bit 47:32 When corresponding bit in this registers is 1 to invert output value, for each bit of this register: 0: Corresponding GPIO output value is normal(default) 1: Corresponding GPIO output value is invert |
7.11 GPIO Output Invert Register #3 (gpio out inv 3)
Address: 0x9C0003AC
Reset: 0x0
Field Name | Bit | Access | Description |
Mask bit | 31:16 | RW | Write valid bit for each LSB 16 bits |
GPIO OUT INV[63:48] | 15:0 | RW | GPIO Output Invert Bit 63:48 |
7.12 GPIO Output Invert Register #4 (gpio out inv 4)
Address: 0x9C0003B0
Reset: 0x0
Field Name | Bit | Access | Description |
Mask bit | 31:16 | RW | Write valid bit for each LSB 16 bits |
GPIO OUT INV[79:64] | 15:0 | RW | GPIO Output Invert Bit 79:64 |
7.13 GPIO Output Invert Register #5 (gpio out inv 5)
Address: 0x9C0003B4
Reset: 0x0
Field Name | Bit | Access | Description |
Mask bit | 31:16 | RW | Write valid bit for each LSB 16 bits |
GPIO OUT INV[95:80] | 15:0 | RW | GPIO Output Invert Bit 95:80 |
7.14 GPIO Output Invert Register #6 (gpio out inv 6)
Address: 0x9C0003B8
Reset: 0x0
Field Name | Bit | Access | Description |
Mask bit | 31:16 | RW | Write valid bit for each LSB 16 bits |
GPIO OUT INV[111:96] | 15:0 | RW | GPIO Output Invert Bit 111:96 |
7.15 GPIO Output Invert Register #7 (gpio out inv 7)
Address: 0x9C0003BC
Reset: 0x0
Field Name | Bit | Access | Description |
Mask bit | 31:16 | RW | Write valid bit for each LSB 16 bits |
GPIO OUT INV[127:112] | 15:0 | RW | GPIO Output Invert Bit 127:112 |
7.16 GPIO Open Drain Register #0 (gpio od 0)
Address: 0x9C0003C0
Reset: 0x0
Field Name | Bit | Access | Description |
Mask bit | 31:16 | RW | Write valid bit for each LSB 16 bits |
GPIO OD[15:0] | 15:0 | RW | GPIO Open Drain Mode Bit 15:0 Regarding GPIO control, please refer to CH5 Pin Multiplex Function. |
7.17 GPIO Open Drain Register #1 (gpio od 1)
Address: 0x9C0003C4
Reset: 0x0
Field Name | Bit | Access | Description |
| Mask bit | 31:16 | RW | Write valid bit for each LSB 16 bits The 16 bits map to corresponding LSB 16bits. Write 1 to valid the corresponding bit writing. |
| GPIO OD[31:16] | 15:0 | RW | GPIO Open Drain Mode Bit 31:16 Regarding GPIO control, please refer to CH5 Pin Multiplex Function. |
7.18 GPIO Open Drain Register #2 (gpio od 2)
Address: 0x9C0003C8
Reset: 0x0
Field Name | Bit | Access | Description |
Mask bit | 31:16 | RW | Write valid bit for each LSB 16 bits |
GPIO OD[47:32] | 15:0 | RW | GPIO Open Drain Mode Bit 47:32 Regarding GPIO control, please refer to CH5 Pin Multiplex Function. |
7.19 GPIO Open Drain Register #3 (gpio od 3)
Address: 0x9C0003CC
Reset: 0x0
Field Name | Bit | Access | Description |
Mask bit | 31:16 | RW | Write valid bit for each LSB 16 bits |
GPIO OD[63:48] | 15:0 | RW | GPIO Open Drain Mode Bit 63:48 Regarding GPIO control, please refer to CH5 Pin Multiplex Function. |
7.20 GPIO Open Drain Register #4 (gpio od 4)
Address: 0x9C0003D0
Reset: 0x0
Field Name | Bit | Access | Description |
Mask bit | 31:16 | RW | Write valid bit for each LSB 16 bits |
GPIO OD[79:64] | 15:0 | RW | GPIO Open Drain Mode Bit 79:64 Regarding GPIO control, please refer to CH5 Pin Multiplex Function. |
7.21 GPIO Open Drain Register #5 (gpio od 5)
Address: 0x9C0003D4
Reset: 0x0
Field Name | Bit | Access | Description |
Mask bit | 31:16 | RW | Write valid bit for each LSB 16 bits |
GPIO OD[95:80] | 15:0 | RW | GPIO Open Drain Mode Bit 95:80 Regarding GPIO control, please refer to CH5 Pin Multiplex Function. |
7.22 GPIO Open Drain Register #6 (gpio od 6)
Address: 0x9C0003D8
Reset: 0x0
Field Name | Bit | Access | Description |
Mask bit | 31:16 | RW | Write valid bit for each LSB 16 bits |
GPIO OD[111:96] | 15:0 | RW | GPIO Open Drain Mode Bit 111:96 Regarding GPIO control, please refer to CH5 Pin Multiplex Function. |
7.23 GPIO Open Drain Register #7 (gpio od 7)
Address: 0x9C0003DC
Reset: 0x0
Field Name | Bit | Access | Description |
Mask bit | 31:16 | RW | Write valid bit for each LSB 16 bits |
GPIO OD[127:112] | 15:0 | RW | GPIO Open Drain Mode Bit 127:112 Regarding GPIO control, please refer to CH5 Pin Multiplex Function. |
7.24 Reserved (rsv)
Address: 0x9C0003E0
Reset: 0x0
Field Name | Bit | Access | Description |
| Reserved | 31:0 | RO | RESERVED |
7.25 Reserved (rsv)
Address: 0x9C0003E4
Reset: 0x0
Field Name | Bit | Access | Description |
| Reserved | 31:0 | RO | RESERVED |
7.26 Reserved (rsv)
Address: 0x9C0003E8
Reset: 0x0
Field Name | Bit | Access | Description |
| Reserved | 31:0 | RO | RESERVED |
7.27 Reserved (rsv)
Address: 0x9C0003EC
Reset: 0x0
Field Name | Bit | Access | Description |
| Reserved | 31:0 | RO | RESERVED |
7.28 Reserved (rsv)
Address: 0x9C0003F0
Reset: 0x0
Field Name | Bit | Access | Description |
Reserved | 31:0 | RO | RESERVED |
7.29 Reserved (rsv)
Address: 0x9C0003F4
Reset: 0x0
Field Name | Bit | Access | Description |
Reserved | 31:0 | RO | RESERVED |
7.30 Reserved (rsv)
Address: 0x9C0003F8
Reset: 0x0
Field Name | Bit | Access | Description |
Reserved | 31:0 | RO | RESERVED |
7.31 Reserved (rsv)
Address: 0x9C0003FC
Reset: 0x0
Field Name | Bit | Access | Description |
Reserved | 31:0 | RO | RESERVED |
, multiple selections available,